
Honing And Sharpening Are Not The Same
Ever show up at a rental house or a friend’s house and all the knives are dull? It kinda kills your will to cook. The fact is, a sharp knife cuts faster and is safer to use because it won’t slip off foods as easily as a dull knife. Sharp knives make cooking easier and more fun.
To keep your blades at their best during daily use, try not to slam the blade down hard on the board when chopping. Use a light touch. When slicing, concentrate on drawing the blade across foods instead of pushing down into them.
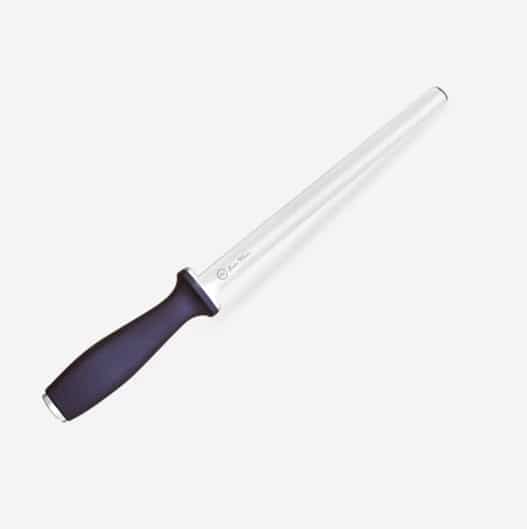
How to Hone a Knife
Periodically, you’ll need to hone your edge. Honing is different from sharpening. Honing maintains a knife’s edge, while sharpening repairs the edge. Honing should be done every few uses, but you will only need to sharpen your knife when it’s so dull that it slips off foods instead of cutting through them.
Here’s what’s going on. Even when sharp, the edge of a knife is lined with many tiny, thin, jagged pieces like the teeth on a saw. With repeated use, the teeth go out of alignment, making the blade less effective at its job of cutting. Honing the knife on a honing steel keeps the teeth aligned and straight so that the edge cuts more effectively.
Honing tools are made of one of three materials: special hardened stainless steel, ceramics, or “diamond” steel. Stainless honers have small fine ridges cut into the rod. Ceramics have an etched abrasive surface and they remove a small amount of metal which you can see on the ceramic surface. Ceramics are breakable so handle with care. Diamond steel has fine grit diamond dust embedded and like ceramic, it is abrasive and actually removes some metal.
To hone a knife, hold a honing steel in one hand with the point facing up and the knife in other hand with the point facing up. Position the heel of the blade at the top of the steel at an angle of 10 to 18 degrees (for Asian knives) or 18 to 22 degrees (for European and North American knives). With even, gentle pressure, pull the blade down the length of the steel, gradually moving the knife toward you to drag the blade across the steel as it goes down. End the sweep with the tip of the knife at the bottom of the steel. Hone the other side by reversing the knife and repeating the down-and-across sweeping motion. Repeat about five sweeps on each side. When you get really good, you can hone your knife faster by sweeping one edge of the blade down the steel then sweeping the other edge up the steel. This is how most professional chefs do it. It takes a little practice but it saves time.
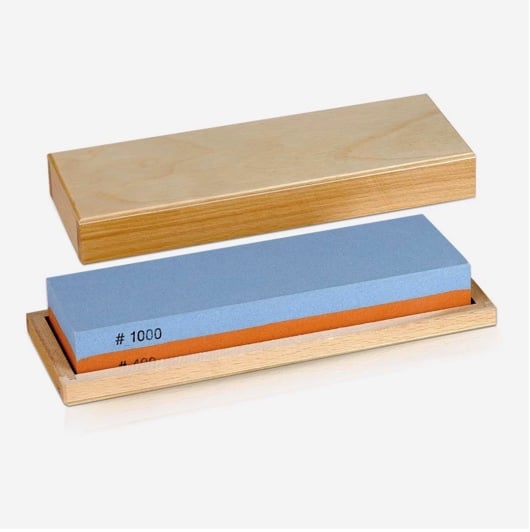
How to Sharpen a Knife Using Stones
If your knife is still dull after honing it, the blade should be resharpened. Good-quality electric sharpeners save time and we recommend several here. But many chefs prefer to sharpen their knives by hand on a sharpening stone (whetstone). Among stones, 1,200 grit is considered sufficient to sharpen and polish a cutting edge, while 6,000 or higher grit will create a very finely sharpened, highly polished edge. Some chefs prefer diamond-impregnated stones to obtain the sharpest edge.
Whichever stone you use, place it parallel to the edge of a countertop on a wet towel to prevent slipping, and start with the coarsest grit. Spread a thin coat of mineral oil (or water) over the stone to help reduce friction and heat that could damage the blade over time. If you’re right handed, stand facing the stone with the knife in your right hand and the cutting edge facing left. Position the knife blade against the upper left-hand corner of the stone and tilt the spine of the blade up about 10 to 18 degrees (for Asian knives) or 18 to 22 degrees (for European and North American knives). Hold the knife in position with the fingertips of your left hand, providing even, gentle pressure on the entire blade. Move the blade in a gradual arc over the stone so that the heel and then the point of the knife slip off the lower right-hand corner of the stone. Repeat 10 to 20 times. Flip over the knife so that the cutting edge is facing to the right and repeat by positioning the blade against the upper left-hand corner of the stone and tilting the spine the appropriate angle. With even, gentle pressure, arc the knife toward the lower right-hand corner so that the heel and then the point slip off the lower right-hand corner. Repeat 10 to 20 times. If your stone has more than one grit, move to the next finest grit and repeat. If you are left-handed, stand facing the stone with the knife in your left hand, and reverse the hands given in the directions from the beginning of the process.
There are numerous other sharpening devices which we have reviewed here.
DIY Honing and Sharpening
Don’t have a honing steel or knife sharpener? Try these DIY tips. They can help hone your knife just enough to keep the knife from slipping and cutting you by mistake.
Sandpaper. Some electric knife sharpeners like the WorkSharp Ken Onion Knife & Tool Sharpener, use sandpaper belts in various grits from coarse to fine. If you have some sandpaper on hand, draw the blade against it at the same angle you would when using a sharpener (10 to 18 degrees for Asian knives or 18 to 22 degrees for European knives).
Nail file. Many nail files have to coarse and fine sides. Use both sides to sharpen your blades, first on the coarse then on the fine side.
Coffee mug. Flip over a ceramic coffee mug and you’ll notice a rough, unglazed perimeter on the bottom. Use that rough ceramic like a ceramic honing tool and draw your blade across it to hone the knife. An upturned ceramic bowl works just as well.
Another knife. Worst case scenario: you can use the blunt top edge of a knife as a honing steel. Draw your blade across the blunt edge of a knife just like you would with a honing steel. Better than nothing!

High quality websites are expensive to run. If you help us, we’ll pay you back bigtime with an ad-free experience and a lot of freebies!
Millions come to AmazingRibs.com every month for high quality tested recipes, tips on technique, science, mythbusting, product reviews, and inspiration. But it is expensive to run a website with more than 2,000 pages and we don’t have a big corporate partner to subsidize us.
Our most important source of sustenance is people who join our Pitmaster Club. But please don’t think of it as a donation. Members get MANY great benefits. We block all third-party ads, we give members free ebooks, magazines, interviews, webinars, more recipes, a monthly sweepstakes with prizes worth up to $2,000, discounts on products, and best of all a community of like-minded cooks free of flame wars. Click below to see all the benefits, take a free 30 day trial, and help keep this site alive.
Post comments and questions below
1) Please try the search box at the top of every page before you ask for help.
2) Try to post your question to the appropriate page.
3) Tell us everything we need to know to help such as the type of cooker and thermometer. Dial thermometers are often off by as much as 50°F so if you are not using a good digital thermometer we probably can’t help you with time and temp questions. Please read this article about thermometers.
4) If you are a member of the Pitmaster Club, your comments login is probably different.
5) Posts with links in them may not appear immediately.
Moderators