Simple And Foolproof Single Crust Pie Dough Recipe
Tried this recipe?Tell others what you thought of it and give it a star rating below.
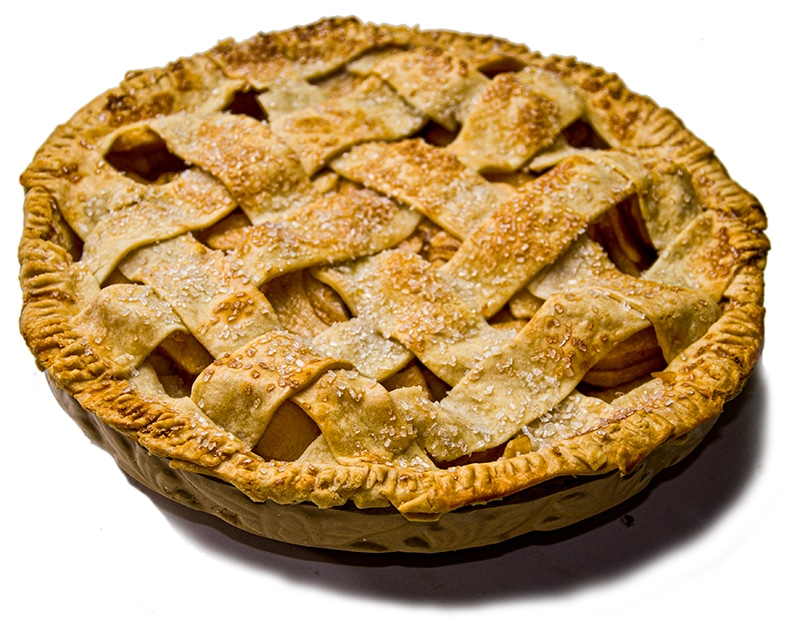
The idea of baking a homemade pie is intimidating to many but this pie dough recipe takes all of the guesswork out of the process.
Makes:
Servings: pie crust, top and bottom
Takes:
Ingredients
- 1 1/2 cups all purpose flour
- 1 teaspoon Morton Coarse Kosher Salt
- 1/2 cup cold unbutter (1 stick)
- 4 1/2 tablespoons ice water
Notes:
Options. A lot of bakers will add 1/2 teaspoon baking powder to make the crust a bit lighter. Add 1 large egg yolk for richness. Many bakers like to swap some of the butter, say half, for chilled vegetable shortening like Crisco, or even lard. Yes, lard is in some of the best pie crusts you've ever tasted. Makes it rich and flaky.
About the salt. Remember, Morton coarse kosher salt is half the concentration of table salt so if you use table salt, use half as much. Click here to read more about salt and how it works.
Metric conversion:
These recipes were created in US Customary measurements and the conversion to metric is being done by calculations. They should be accurate, but it is possible there could be an error. If you find one, please let us know in the comments at the bottom of the page
Method
- Prep. Fill a cup or glass with ice and water. Set aside.
- In a large bowl thoroughly mix the salt and flour.
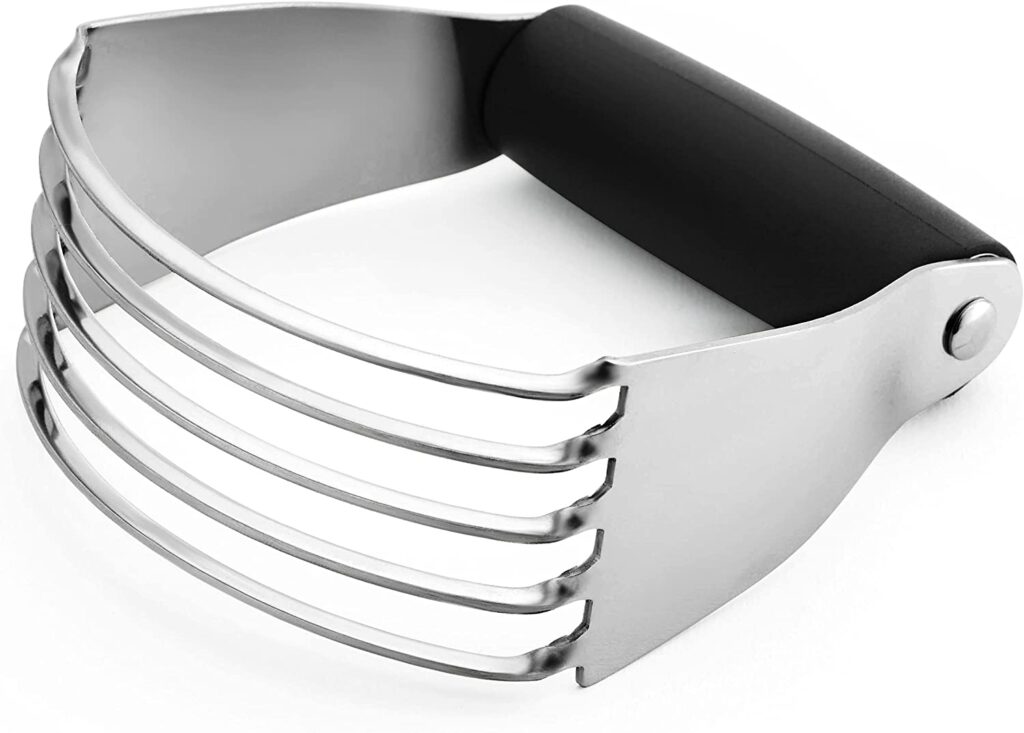
- It is important that the butter be cold and you do not handle it. Even though the butter is mixed into the flour, we do not want it thoroughly mixed in. Lumps in the dough the size of peas or even small marbles help make the crust flaky when baked. Start by cutting the butter into 1/4-inch (6.3 mm) cubes. Dump them into the flour and working quickly so the butter does not warm too much, "cut" it in with a pastry cutter (shown here). You can do this in a food processor with a steel blade, but my wife thinks it's just as easy to do it with a cutter and there's less cleanup. As the butter and flour accumulate on the cutter she just scrapes it off with a butter knife. She works the two flour and butter together for a few minutes until much of the flour has formed sandy granules, but there are still numerous pea sized lumps.
- Form a small fist size depression in the center of the mix, and add 2 tablespoons of ice water and cut it in quickly. Make another depression and add the rest of the ice water and cut it in. If the dough is too crumbly add another tablespoon ice water. Working quickly, form the dough into a large thick disk. If you are making a two crust pie, cut the disk into two parts, one about 60% of the quantity for the bottom, and one about 40% for the top. There may be some extra, but that's better than too little. Form the two parts into disks, and wrap with waxed paper or plastic wrap. But don't work the dough too much or else it starts to form gluten, the elastic stuff you need when making bread, but do not need when making a flaky pie crust. Neither do you want you hands to soften the butter. If you are going to bake the pie today, put the disks into the fridge for at least four hours to harden the butter and rest the dough. If you are not going to bake soon, these disks freeze well and can be used weeks later, so if you're feeling industrious, make a double batch and freeze some.
- When it is time to use the crusts, remove the disks from the refrigerator and let them sit at room temp for about 10 minutes to get soft enough to work. If they have been frozen, defrost them in the refrigerator overnight and them let them warm at room temp for about 10 minutes before you attempt to roll them.
- Find a smooth, flat, cool, clean, dry, work surface at least 3' x 3' for rolling the dough. The pros use a granite or metal surface, but wood and laminate will work fine. Table height is easier for rolling dough so you can put your weight into it, but a kitchen counter will work fine. Spread about 1/4 cup (32 g) of flour on the surface, and with your hand, get some on your rolling pin. Unwrap the disk, save the wrapper, and place the dough in the middle of the floured work surface. Now we're going to roll it, working from the center outward with some weight behind the downward pressure. Turn the dough 1/4 turn and repeat. Keep this up until the dough is about 2" (51 mm) larger than the pie pan. Pie experts say you should not roll back and forth, that this develops gluten. If the dough sticks to the surface, lift it with a dough scraper or a long flat carving knife. Put more flour on the surface if you need to. If there are cracks, don't start over. That will just make the dough tough. Patch cracks and spackle holes with your fingers by using a bit of dough from the edges.
- When the dough is the right diameter and about 1/8-inch (3.2 mm) thick, lay the rolling pin in the center and fold half the dough over the pin. Now lift the dough with the pin and lay it on the pan in the right position. Press it gently into the pan and along the sides with your finger tips.
- With a scissors, trim the overlap to about 1/4" (6.3 mm) and then roll the overlap underneath until it all fits neatly on the rim of the pie pan without hanging over. Take the wrapper that you set aside, and place it over the crust and put it back in the fridge. Now roll out the top. For a full crimped top or a lattice top, it must be about 1/2" (1.3 cm) larger than the pan. For a floating top, it must be about 1/4" (6.3 mm) narrower than the diameter of the pan with the bottom crust in there. Put the top on top of the bottom crust and the wrapper in the fridge until you are ready to fill it. If it's going to be in there for a while, slide the whole thing into a plastic bag so the crusts don't dry out. Or you can freeze it for later.
- Cook. When it's time to bake, add the filling and be careful not to fill it all the way to the top, leaving about 1/4" (6.3 mm) or more head space because the cooking can make the filling expand, and it will bubble up. Place the top on the filling, trim the edges to about 1/4" (6.3 mm) wider than the bottom crust. Roll the overlap under so the edge is nice and smooth, and crimp the top crust onto the bottom crust. You can do this with a finger, with a fork, or use the two finger crimp. Then remember to poke at least 3 cuts, each about 1/2" (1.3 cm) long, in the top crust with a sharp knife, near the center, so steam can escape and the crust will not expand and explode. You are now ready to bake according to the instructions in the filling recipe.