How To Roast A Whole Hog Or Suckling Pig
Tried this recipe?Tell others what you thought of it and give it a star rating below.
There are few dishes that send folks running for their cell phone cameras than a smoke roasted whole hog. Here is the ultimate recipe for cooking one in your own backyard!
Course: ,
Dinner
Main Course
Cuisine:
American
Makes:
Servings: pounds of edible pork
Takes:
Equipment
- 1 hog pit and stretcher
- 1 large cooler or refrigerator
- 1 table at least 5' (1.5 m) long
- 4 plastic table cloths, 1 to cover the table during prep, 2 to cover the floor under and around the table, and one spare
- 1 roll paper towels
- 1 hammer
- 1 sharp clean hatchet
- 1 sharp flexible filleting knife
- 1 food grade injector
- 1 disposable razor or butane lighter
- 1 digital meat thermometer
- 1 digital pit thermometer
- 6 bags [18 pounds (8.2 kg) each] of charcoal briquets
- 4 bags extra charcoal just in case
- 1 stack of newspapers
- 1 wheelbarrow or grill to start the coals in
- 1 long handled shovel
- 2 pounds hardwood chunks
- 1 pair heat resistant gloves
- 1 watering can filled with water
- 1 set claws or large forks for pulling the meat
- 1 roll of heavy duty aluminum foil
- 1 sauce brush
- Tongs and other serving utensils
- Platters
- 1 bucket of beer
- 2 lawn chairs
- Lotsa tunes
- 1 assistant/pigsitter to help flip the hog and to take shifts sitting by the pit through the entire cook in case something goes awry. Trust me, if you leave it unattended, there will be a grease fire.
Ingredients
- 75 pounds dressed hog (a 75-pounder feeds about 50 people)
- 4 cups Morton Coarse Kosher Salt
- 1 gallon Pork Brine Injection
- 1 cup Meathead's Memphis Dust
- 1 cup cooking oil
- 2 cherries or grapes to replace the eyes
- 2 quarts of your favorite barbecue sauce, preferably home made (optional, but I recommend one of these, or even all three: South Carolina Mustard Sauce, vinegary Lexington Dip, and/or sweet tomato based Kansas City Classic and bowls to serve them from with spoons)
- 70 buns (optional)
- 20 pounds cole slaw (optional)
- 20 pounds potato salad (optional)
Notes:
Ordering The Hog: Many local butchers will special order a hog for you, even grocery stores. If not, find a wholesale meat packer or, best of all, a local farmer who will deliver it really really fresh and dressed (cleaned and trimmed) to order. Maybe even a heritage breed.
Contact your supplier at least two weeks in advance. Expect to pay up to $3 per pound (453.6 g), dressed, depending on where you are and the time of year. If you plan to do the dressing, the price might be as low as $1.50 per pound (453.6 g). For suckling pigs, prices can go up to $4 per pound (453.6 g).
A dressed hog has had the belly slit open, the organs removed, hair removed, and usually the eyelids cut off. In some states the law dictates that the head be removed. Dressed, it is about 70% of its live weight.
Actual edible meat yield is about 40 to 50% of the dressed weight, after trimming, shrinkage during cooking, removing bone and some of the skin, and other loss. My methods leave the much of the skin edible. Smaller animals have a higher bone to meat ratio than large animals, so yield will be lower. A good rule of thumb is to order two pounds per person raw because you'll get about one pound of succulent, juicy meat. Most people will not eat more than 1/2 pound (226.8 g) so you'll have plenty of leftovers guest can take home. They freeze nicely.
Champion hog cooker Myron Mixon of Jack's Old South Barbecue teaches hog cookery in Vienna, GA. He recommends you keep the dressed weight under 100 pounds because larger animals are hard to lift and flip, even with two people.
Ask your butcher if it will arrive with head, feet, and tail. There's always somebody who is squeamish about the head, so you might want to cut it off and put it on his plate, raw. You may also want to request the liver and heart on the side to make South Carolina hash, but that's another recipe.
Ask if it will arrive frozen. Frozen is better than "fresh" that was killed three weeks ago. If so ask if your butcher will defrost it in his walk-in cooler. If not, you have a BIIIIIG problem because defrosting must be done in a refrigerator or insulated cooler or in a really clean bathtub with ice water. Defrosting can take a week.
You should not crowd your cooker. Make sure you measure the cooking surface and leave room all around before you order. You will need to push the coals to the edges of your cooker so they are not directly under the meat or use a heat shield under the carcass (described on my page on building a pit). If necessary, you may have to cut off the head, hocks, and feet at the elbows and knees in order to fit. But don't throw them away. Smoked, hocks and trotters can really put split pea soup and stews over the top. And the cheeks (jowels) can be turned into a lean bacon that Italians call guanciale.
Use your butcher to make less work for you. Ask her to cut through the breastbone right up to the hair on its chinny chin chin so the animal can be butterflied and splayed open flat. Have her bust the hip sockets so the hind legs lie flat, and split the spine from one end of the rib cage to the other. Have the spinal cord removed and make sure all stray hairs are shaved with a disposable razor or burned off with a lighter. Nobody wants to eat spinal cord or pig bristles.
If you aren't going to cook it immediately, see if your butcher will keep it cold for you until the day you will start cooking. Plan ahead because many butchers are closed on Sunday. But if you plan to serve on Sunday, you need to start prep and cooking on Saturday. If your butcher cannot hold it for you, make sure you have a spare refrigerator large enough for the whole carcass or a large ice chest with plenty of ice. As a last resort, scrub and disinfect the bathtub with bleach, line it with plastic and cover the body with ice water.
Here's my standard order: "I want a whole dressed hog about 75 pounds (34 kg) delivered, fresh killed within a week of delivery, never frozen, skin on, hair scalded off, head, ears, trotters, tail on. Please cut through the backbone and breastbone and crack the hip joints so it will lie flat. Please remove the spinal cord. Save me the liver, kidneys, tongue, and heart, on the side please. I reserve the right to reject it if it looks or smells bad."
About the salt. Remember, kosher salt is half the concentration of table salt so if you use table salt, use half as much. Click here to read more about salt and how it works.
Metric conversion:
These recipes were created in US Customary measurements and the conversion to metric is being done by calculations. They should be accurate, but it is possible there could be an error. If you find one, please let us know in the comments at the bottom of the page
Method
- Clean the carcass. Everything. Ears, nose, mouth, tooter, feet. Make sure all the hair has been removed. You can visually inspect the skin and burn off any strays with a butane lighter or shave them off with a disposable razor.
- Fire up. Before you start operating on the patient, fire up your pit and get it up to 250°F (121.1°C) and stabilized. Start the fire by crumpling at least six sheets of newspaper and placing them in the bottom of the wheelbarrow or grill. Squirt some cooking oil on them, not charcoal fluid. Dump one 18 pound (8.2 kg) bag of charcoal on top and light the newspaper in several locations.I recommend charcoal briquets because they ignite easily, burn steadily, and they are consistent batch to batch. Read more about your fuel options in my article on the Science of charcoal.When they are covered in a thin layer of ash, shovel them off to the side of the pit, but never under the space where the hog will lie. You want to cook this baby with convection heat flowing up and around it rather than under it. Put a few extra coals in the four corners so the hams and shoulders get a bit more heat.You can use hardwood, but you need to burn it down to glowing embers. Don't put raw logs onto the fire. After about 10 minutes, use your shovel to shuffle the coals around so they all light evenly. When the coals are ready, shovel them into the four corners of the pit with a little extra at the end where the hams will go.Getting the temp right, and keeping it there is tricky. If you can do a dry run the day before, without the hog, that would be ideal. Set a probe on the cooking grate in the center and walk away for at least 30 minutes. Shoot for 250°F (121.1°C) but you will not suffer if it runs up to about 275°F (135°C). Adjust the temp by adding coals and by adjusting the access the coals have to oxygen. If it is running cool, open the intake vents at the bottom and put a stone under the lid so hot air can escape and create an upward draft that pulls in more oxygen. If that doesn't work, light more coals and add them. You can just throw in unlit coals, but the temperature will stabilize faster with fully engaged coals.If it is running hot, close off the intake vents, but not all the way, and put a weight on the lid. But don't leave the lid sealed tight for long. You need draft or your fire will die. If it is still running hot, it will slowly cool as the coals are consumed.
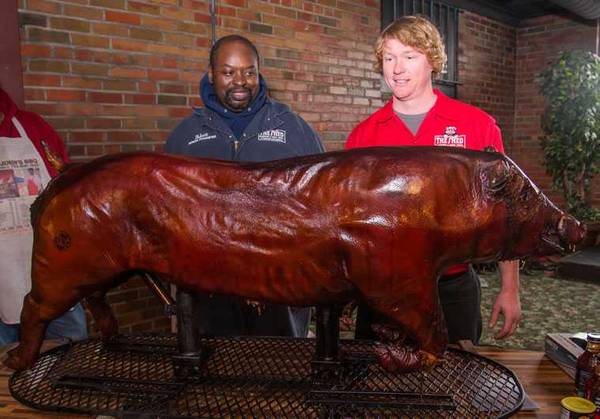
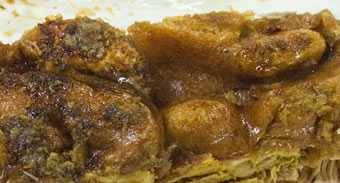
- Prep the skin. Get a work table and cover it with a plastic table cloth. Then put plastic table cloths under it to protect the ground. There will be splatters and spills. Wear old clothes and an apron.Place the stretcher that you will use to carry the meat to the cooker on the table, and place Miss Piggy belly down on the stretcher.As much as I like the shiny lacquered look of the competition hogs, the skin is leathery and not really good eats, so I prefer the blistered crackling Cheeto-textured skin that Sam Jones and Jackie Hite get (below with mustard BBQ sauce). It ain't pretty, but my guests love munching on it, and I chop some of it up and sprinkle it on the meat on a sandwich.Now wet the skin thoroughly. Splash it on and wipe it all over. Don't be shy. Soak the skin. Then take kosher salt and sprinkle it all over generously, about two tablespoons per square foot. You're not oversalting. Much of it will fall off during the rest of the prep and the cooking.
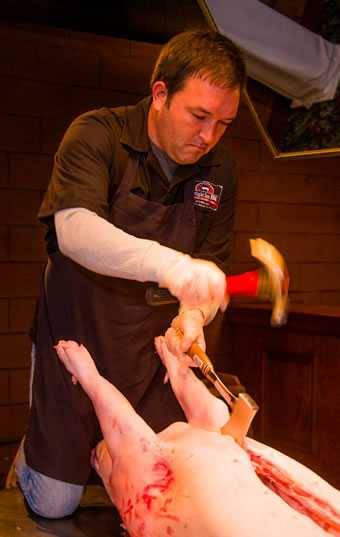
- Dress the carcass. If your butcher can't fully dress the hog for you, you can do it yourself in about an hour.If it arrived with the belly slit, but the ribcage connected at the chest, you can cut it open by extending the belly cut with the hatchet and hammer, a sawzall, a handsaw, a cleaver, pruning shears, or a heavy chef's knife.Here's Sam Jones splitting the breastbone with a hatchet and hammer. Cut slightly off center. It is easier to get through the cartilage between the breastbone and the ribs than it is to split the breastbone.
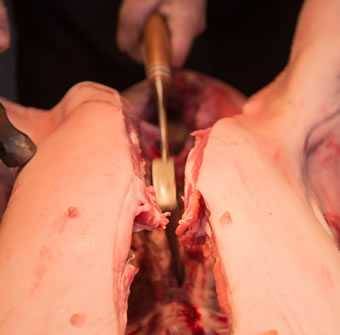
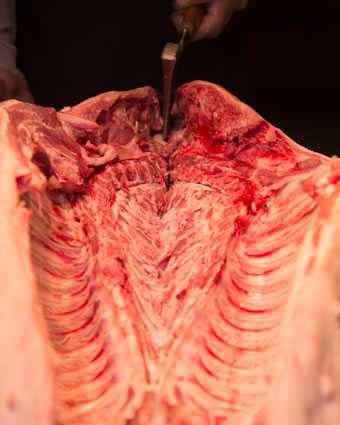
- Now you need to lay open the chest cavity by pushing the two sides apart. Put some weight behind the effort. To make the hog lie flat for even cooking you need to split the backbone right down the middle from the first rib all the way down to the hams.
- This is what you get when splitting the spine. The spinal cord will be in one or both sides of the spine bones. Remove it with your fingers or a knife. This is important. Nobody wants to eat spinal cord.
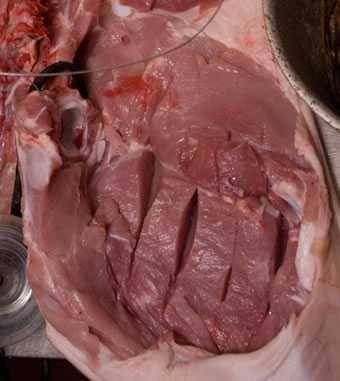
- Then bust the hip socket so the hind legs lie flat. The hind legs, the hams, are the thickest pieces of meat and they determine how long the hog must cook. Remove the skin from the thighs so you can get more rub on the hams, build bark, and speed cooking.I go one step further. I use a trick I learned from Sun Wah BBQ, a Chinese restaurant in Chicago. Pitmasters will say this is cheating, but I say, whatever works. Put some cuts into the hams, about 4" (10.2 cm) long and 1" (2.5 cm) deep and about 2" (5.1 cm) apart, as seen below. This will help them cook faster, and that keeps the other parts of the animal from overcooking. It also creates more surface for seasoning and bark. I wouldn't do this in a competition because I doubt the typical conservative judge would like the concept.
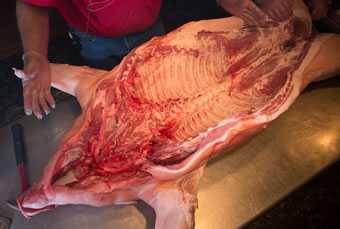
- Now you want to get in there and remove the membrane that wraps around the abdominal cavity and covers the ribs. This is the pleura, and it can be very chewy. Underneath the pleura you want to trim off any silverskin and fat cap so there is plenty of bare meat exposed. Remove any veins, nerves, or glands (which look like marble sized white lumps). With your hands, make a gap between the three or four ribs that cover the shoulder meat. Clean out any fat and silverskin down in there so bare meat can be seen. Save the fat.Now separate the ribs from the spine by running your knife at their junction. A sawzall is also a nice tool for this. I have been known to cut the rib cage in half lengthwise and leave the curved baby backs in, the part that was attached to the spine, to protect the loins, and remove the rest for cooking another day. This step leaves the bacon and the side meat open to the heat and seasoning. They are high in fat and can take the heat. Trim jagged edges from the belly flaps. The picture here shows what a hog looks like when it is prepped by Mike Mills.
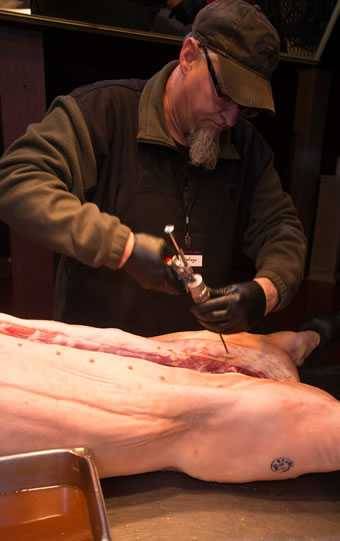
- Inject and rub the cavity. As much as I admire the old school Skylight style, no seasoning in the cavity, not even salt and pepper, I like to add interest by injecting a flavored brine, I like to cover the exposed meat with a spice rub to build a crusty bark, and, just before it is finished, I like to paint the meat with a thin coat of shiny sauce, more for show than flavor. I never use so much of anything that I mask the natural taste of the pork. Just enough to add a few instruments to the orchestra.Start by making a gallon of my Pork Brine Injection. The salt helps protein hold on to moisture during cooking, the liquids increase moisture and offset evaporation somewhat, and the extra flavor and sugar fight the bane of whole hogs, blandness. A common rookie mistake is to inject a lot of sugar, garlic, apple juice, and other strong flavors, and when you are done, that's all you taste. The pork is lost.Flip Babe onto her back. With a meat injector, squeeze as much in there as you can, poking the needle between the ribs several times to get down into the shoulders and loins as Phil Wingo is doing here. Get the hams, bacon, tenderloins, the neck, even the cheeks. Stick the needle in deep and slowly back it out, injecting as you go. Don't poke holes in the skin, inject from the inside of the cavity. Click here to read more about injecting and injectors.Some injection will leak out. Wipe it up with paper towels making an effort to wipe out any bone dust, slivers, scraps of meat and fat.
- Now pour some water or leftover injection into the cavity and lightly coat all surfaces. Sprinkle my Meathead's Memphis Dust recipe all over. Work the rub down into the slits in the hams, the gap between the spine and the ribs, and the gap between the ribs and the shoulders.
- Cover the ears and tail with foil. You will remove the foil later on, but this will prevent them from burning. Finally, pop out the eyeballs with a spoon. You can leave the eyeballs in and try to sucker somebody into eating them, but if you do, expect reprisals somewhere, someday, when your back is turned.
- Cook. Open the pit. With your assistant, sandwich Wilbur into the stretcher and flip him skin side up and lay him on the cooking surface. Make sure the handles of the stretcher are hanging outside the sides of the pit. Make certain none of the flesh is directly over coals. If some is, move Miss Piggy around and push the coals aside or insert a heat shield cut from plywood, larger than the carcass between the flesh and the flame. The heat shield is described in detail on the page with my plans for building a hog pit.
- Insert a good digital meat thermometer probe into the deepest portion of one of the hams and run the cable outside the pit. This is very important. Put another probe on the stretcher next to the hog to monitor oven temp. Working without good thermometers is like driving without a speedometer.
- Cover the pit with the lid. Toss one fist size chunk of dry wood on each pile of coals. Do not use wet wood. It just steams and cools the coals. Close the lid, discard the contaminated table cloth, pull up a lawn chair, crank the tunes, and pour a drink. You have a 9 to 12 hour wait.
- Keep a close eye on the proceedings. You do not want to leave the side of the pig for any longer than it takes to get a beer or make room for it. Dripping fat can cause a grease fire that can easily engulf the whole hog and incinerate it in minutes. Don't believe me? Watch this video of a pig roast gone wrong.
- If you get big flames, get the meat off immediately. Douse the flames with the squirt gun or watering can. Try to keep ash from flying onto the meat when you squirt and try to not extinguish the coals.
- When the smoke starts to dwindle toss another chunk of wood in each corner of the pit. That's it for the wood. Too much can ruin the meat.
- After about 60 minutes or as soon as you notice the temp starting to drop, start another bag of coals on the side and when they're ready shovel them in. You want to try to keep the temperature as steady as possible. That's tricky. Keep adding pre-lit coals around the carcass every hour or so as necessary. Don't add any more wood. Watch the meat on the underside. You want it dark golden, but not mahogany yet.
- If the meat looks like it might be ready to burn, lift the hog up and insert the heat shield. There is no need to spray, spritz, or mop the hog. We want the skin to get dry and crunchy, and we want the meat to develop a nice bark. After about 4 hours, remove the foil from the ears and tail so they can brown.
- After about six hours the temp of the coolest part of the shoulders and hams should be getting up to 160°F (71.1°C) or so. Push the skin on the hams. It should slide a bit. The skin should be hard and thump when you tap it. It is now time to flip poor Pumbaa. Get your assistant and if you can scrounge a few more hands that would be nice. Flipping is a momentous moment. Gather the troops and encourage applause. You are now on the home stretch. Have a 16 ouncer.
- When the temp in the hams and shoulders hits 185°F (85°C), the meat should be getting a nice dark crust, and look a lot like your pork butt or ribs when you cook them. If you wish, you can shine the meat with a glaze of sauce. Just one or two layers 15 minutes apart. Or you can serve the meat nekkid and let people dip into sauce if they want.
- It should only take about three hours after the flip to get the skin ready and the hams and shoulders up to about 185°F (85°C). Test the temp in several spots. Don't worry about the precise temp. No harm will be done if you go over 10°F (-12.2°C). The meat will continue to carryover cook when you remove it from the pit. Keep an eye on the skin. There's a lot of fat under it and if it springs a leak you could have an inferno. Don't let it burn.When is it done? It will be done when it is done. As Mill's daughter and business partner Amy says, "we're not baking a cake here". The pig is calling the shots, not you, at least not until you've done this a few times. The exact time it takes will depend on a lot of variables: Size of the hog, breed of hog, age of hog, weight of hog, type of charcoal, reliability of your thermometers, amount of coals, distance of the meat from the coals, color of the inside of the pit, size of the pit, type of lid, outside temp, wind, etc.
- When Piglet is ready, put a layer or three of foil on the table. Don't use a plastic table cloth, it might melt. Move her to the table skin side down. If you left the head on insert grapes or cherries in the eye sockets.
- Serve. You worked hard. You deserve a treat. Some of the choicest muscles are the tenderloins, small tapered muscles nestled against the base of the spine. When nobody is looking, eat one. Make sure you sample each of the muscle groups and the skin for "educational purposes". Test the skin. Some parts will be too hard to serve, but the skin on the back and sides should be perfect, loudly crunchy, and salty on the outside, and sinfully unctuous below. There are several ways to serve the meat to your guests
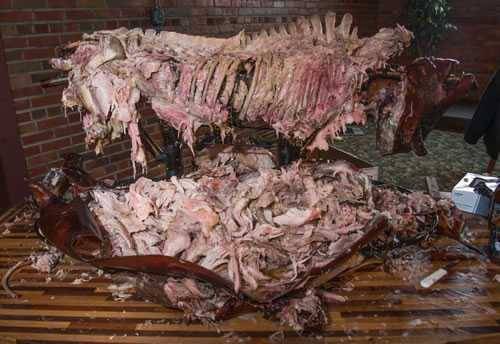
- Taste the skin. If it is rubbery or leathery, don't use it. If it is crunchy and easy to chew, chop up sections of skin and scatter it inside the cavity. Simply put the hog on display and let your guests dig in with forks or tongs, a real "Pig Pickin'". This way they can try different muscles and taste the differences.
- Pull out the ribs and with Wolf Claws shred the meat or chop it with cleavers, mix all the meat together with some chopped skin, some fat for moisture, and put it on platters. Many Carolinians insist this is the best way to serve hog because you get all the different muscle flavors and textures mixed together, the crunchy unctuousness of the cracklins, and the last person in line isn't stuck with the lesser cuts.
- Another method is to remove the ribs, slice them apart, and serve them from one platter, remove the loin meat, slice it and serve it from a another platter, ditto for the hams, shoulders, and other meat. Sprinkle them with cracklins.
- Sauce. When it comes to sauce, I prefer to serve it on the side in bowls with spoons so people can taste the different meats unadorned and then add sauce if they wish. This way I can also offer several sauces. I like to serve piquant Lexington Dip, savory South Carolina Mustard Sauce, and succulent tomato based Kansas City. You can put out buns for sandwiches if you wish or just heap the meat on plates. In many places in the Southeast, barbecue sandwiches are served with a mound of sweet & sour coleslaw on top whether you ask for it or not. Do not let the meat sit out at room temp for more than 2 hours. Another option is to put the serving platters on the pit to stay warm.
- Be sure to check out this video from our friends at HowToBBQRight.com, showcasing their method for cooking a suckling pig.