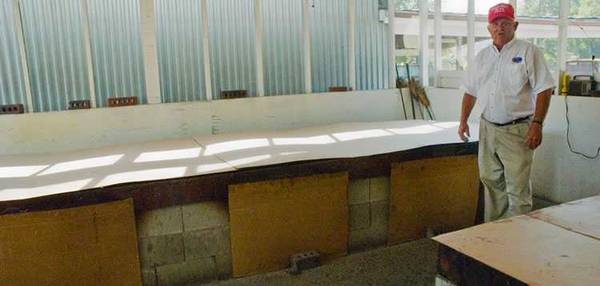
Above are some of the old school concrete block pits at Jackie Hite’s Bar-B-Q in Batesburg-Leesville, SC. Below are plans for building your own no-frills pit suitable for a butterflied 75 pound hog, enough to feed about 35 people. It is designed so it can be a temporary structure or you can make it permanent. If you cut the head and remove the trotters at the knees and elbows, you can fit a 100 pounder or more on this rig. But don’t throw away the head and trotters. Just place them on the stretcher next to the torso. If you plan on cooking larger hogs, you can scale this plan up. You must cook with indirect heat. Click here for instructions on how to prep and cook the hog.
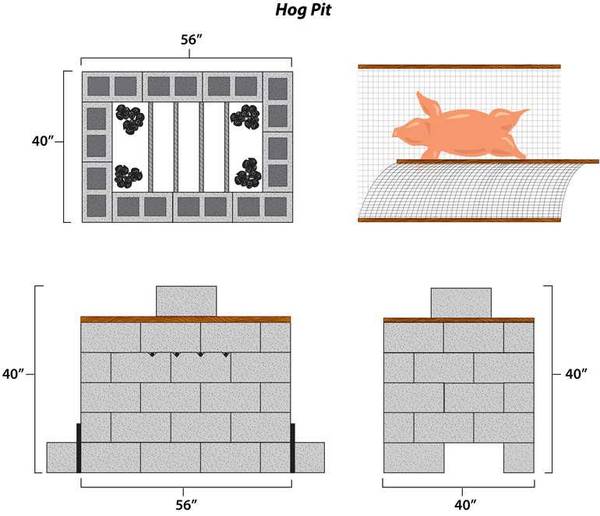
Materials
- SIDES: 54 concrete blocks 16″ x 8″ x 8″ (actually 15.75 x 7.75 x 7.75″). This will get your hog 32 ” above the embers, plus a course to hold the lid. Cost about $54.
- LID: 4 x 8′ sheet of 1/4″ plywood, cut down to about 44 x 60″ for the lid. Note that Hite uses sheets of cardboard for his lids as seen in the photo above, but I strongly advise against this. He is a master of fire control, and if yours burn, they could ruin the hog. And then you have no lid. Cost about $10. Usually the lid will not be a tight fit. If it is you can crack it open with a stone or make a vent by cutting a hole in it.
- HEAT SHIELD: Half of a 4 x 8′ sheet of 1/4″ plywood cut down to 20 x 36″ for the optional heat shield. Cost about $10.
- PROTECTION: 2 rolls heavy duty aluminum foil. Cost about $30.
- COOKING GRATE: 4 lengths of 48″ each of 3/8″ rebar. You can use a sheet of expanded metal rather than rebar if you wish. Cost about $5 per 10′ bar, 3 bars needed.
- STRETCHER: Non-climbable uncoated fence wire or rabbit wire at least 14 gauge, 46 x 72″. Do not use galvanized metal because it can give off noxious gases. Cost about $30 for a 50′ roll.
- STRETCHER HANDLES: 2 boards 1″ x 2″ x 6′ each. Cost about $2.
- STRETCHER HANDLES: 100 bare wire loop ties, 6″ each. Cost about $2.50.
- DAMPERS: 2 pieces lightweight sheet metal, about 20″ x 10″ each or you can use sheet pans. They will go over the openings in the sides to help you control oxygen to the coals if it runs too hot. Cost about $15.
Optional
- More rebar to pound from the top down into the ground to prevent the blocks from shifting. Cost about $15.
- Mortar to lock the blocks permanently into place. Cost about $10.
- Lightweight sheet metal for the lid, about 44 x 60″. Cost about $30.
- Lightweight sheet metal for the heat shield, about 30 x 48″. Cost about $30.
- 20 bags (40 pounds each) premix concrete for a 3″ thick slab FOR THE BASE AND BOTTOM. Cost about $40.
Tools
- Fire extinguisher.
- Wire cutter.
- Level.
- Hack saw.
- Hammer.
- Chisel.
- Utility stapler and plenty of staples.
- Wheel barrow, steel drum, or charcoal grill to start coals.
- Shovel.
- Garden hose or buckets of water or fire extinguisher.
- Good digital oven thermometer.
About the pit
Keep the pit at least 10′ from buildings and overhanging trees in case there is a grease fire. Keep a fire extinguisher rated for grease on hand. Fire extinguishers rated ABC can handle most everything except combustible metals. Beware, they contain a yellow powder that can damage electrical devices.
Start by clearing a base that is 4′ x 5′ by removing grass and prepare an all dirt or sand base at least 2″ thick. You will need to discard some of it when you are done because fat and meat drippings may get in the dirt. The dogs will roll in it and it will attract insects, mice, you name it. If needed, you can buy sand at a hardware store. I recommend lining the pit with aluminum foil.
Make sure the ground is level. Stack the concrete blocks 4 rows high, 3 full lengths and then turn one block on each course, staggering the blocks so they overlap as in the illustration. Notice that I have left out a block on the head and tail side so you can add coals and wood and rake them around. Cover these wholes with a board and a concrete block when they are not in use.
Make notches in the blocks with a hammer and chisel deep enough to hold the rebar so the next course of blocks will lie flat on the course below. Put the rebar on top of the fourth course of blocks. Don’t put the top course of blocks on yet.
The stretcher
To carry the hog and hold it in place on the pit, you need to build a stretcher. It is two poles for the stretcher bearers on either side, and a wire mesh sling in between for the hog. Non-climbable fence wire is heavier gauge and sturdier than chicken wire. You can use chicken wire for but it would be a good idea to use two layers. Make sure the wire is not coated with plastic. For something more permanent, use heavy duty expanded metal mesh. Do not use galvanized, it can create toxins.
Make the sling of the wire wide enough to rest on the rebar and hang over the edges of the pit by at least 1′ on either side. Attach two 6′ lengths of 1″ x 2″ boards for handles with staples and reinforce them with the wire loop ties. Then lay another section of mesh over the top of the first and fasten it to one of the handles, but leave the other open. Attach a handle to the open edge. You then have a reversible stretcher so you can flip the hog.
About the heat shield
I specified a sheet of plywood cut down to 20 x 36″ for an optional heat shield. If you bank your coals to the sides and corners properly you may not need it, but I recommend you have it on hand in case something starts to burn or overcook. This goes on top of the rebar and beneath the stretcher to shield the hog from direct heat. This size leaves space between the shield and the inside of the pit so hot air can rise alongside the shield and bounce off the lid. You will remove it late in the cook when it is time to crisp the skin. Wrap it in aluminum foil and staple down the foil. Don’t worry, it won’t burn unless you have a grease fire because the pig-sitter fell asleep or spent too much time in the toilet. If the pit is to be a permanent structure, make your heat shield from sheet metal, preferably aluminum because it won’t rust.
The cover
Cover the bottom of the plywood lid with foil. If you wish, you can use a sheet metal top instead of plywood.
Other designs for whole hog cookers from readers
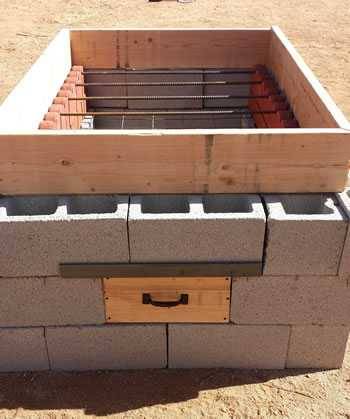
Here’s the “Hog Cabin” built by Jacob Hanson of Tucson, AZ. Notice the innovation : He used half width blocks along the sides and put scalloped garden edging to hold the rebar. He also put an access door with an angle iron header. The wood frame holds a removable pitched roof, not shown.
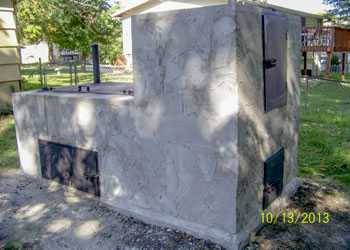
James Brownfield of Kansas City built this beauty from concrete blocks. On the left is the hog pit and on the right he tacked on a separate vertical smoker. The hog pit side is a little larger than my design: 66″ long (4 blocks), 47″ wide (3 blocks) and 35″ tall (4 blocks) with a 2″ top cap. The interior measures 52″ long by 32″ wide. The cooking grate is 20″ above the coals and he has another grate 10″ under the cooking grate on which he can cover with foil and/or cheap catering pans to catch the grease. Both grates are simply expanded metal that rest on rebar. There’s some pretty nifty metalwork for the pit top, chimney, doors, and smoker shelving. The whole shebang sits on a concrete slab he poured.
Carl Herbert built this pit. The insert shows the access door on the other side.
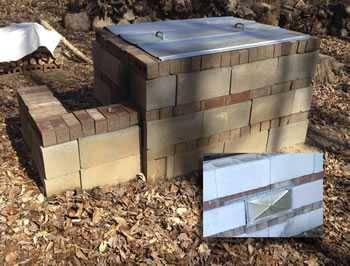
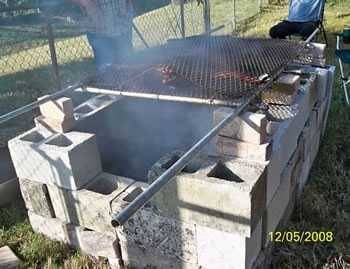
From Jim S. This guy built a simple quick and dirty pit, below.
David Wm. Reed of Texas A&M has a good article on roasting cochon au lait, French for suckling pig, and a novel design for a pig roaster with the hog hanging by his hind legs.


High quality websites are expensive to run. If you help us, we’ll pay you back bigtime with an ad-free experience and a lot of freebies!
Millions come to AmazingRibs.com every month for high quality tested recipes, tips on technique, science, mythbusting, product reviews, and inspiration. But it is expensive to run a website with more than 2,000 pages and we don’t have a big corporate partner to subsidize us.
Our most important source of sustenance is people who join our Pitmaster Club. But please don’t think of it as a donation. Members get MANY great benefits. We block all third-party ads, we give members free ebooks, magazines, interviews, webinars, more recipes, a monthly sweepstakes with prizes worth up to $2,000, discounts on products, and best of all a community of like-minded cooks free of flame wars. Click below to see all the benefits, take a free 30 day trial, and help keep this site alive.
Post comments and questions below
1) Please try the search box at the top of every page before you ask for help.
2) Try to post your question to the appropriate page.
3) Tell us everything we need to know to help such as the type of cooker and thermometer. Dial thermometers are often off by as much as 50°F so if you are not using a good digital thermometer we probably can’t help you with time and temp questions. Please read this article about thermometers.
4) If you are a member of the Pitmaster Club, your comments login is probably different.
5) Posts with links in them may not appear immediately.
Moderators