 The Pit Barrel Cooker (PBC) is beloved and has a cult following. Not surprising. For $399, delivered to your door (in the continental US), ready to use right out of the box, this charcoal smoker puts out tender, juicy, crusty, great tasting food with minimal effort. We don’t know of a better bargain for a smoker and as a result we have awarded it our Gold Medal and it has made our Top 10 list several years in a row. We get a lot of questions from readers about the PBC so we pulled together some of the best tips on the subject.
If you want a macho looking cooker, skip the cheap offset smokers from the big box hardware stores. Click here to read why. Get a PBC. Looks manly and works beautifully. If you were thinking of building your own UDS (Ugly Drum Smoker) feel free, but I have to tell you, this one is very cleverly designed and it will be hard to match its physics or its output on a homemade UDS.
Made from a sturdy 18 gauge steel porcelain coated 30 gallon barrel (brand new, never been used for chemicals), it has a simple air flow control that allows it to run steady at 275 to 310°F for 8 hours with minimal fiddling (really!). Some folks report 12 hour cooks without adding charcoal. It runs a little hotter than we normally like to smoke, but the quality is in the meat so we have a rough time arguing with the PBC designer and owner, Noah Glanville. And the higher temps mean dinner is ready sooner.
How it works its magic
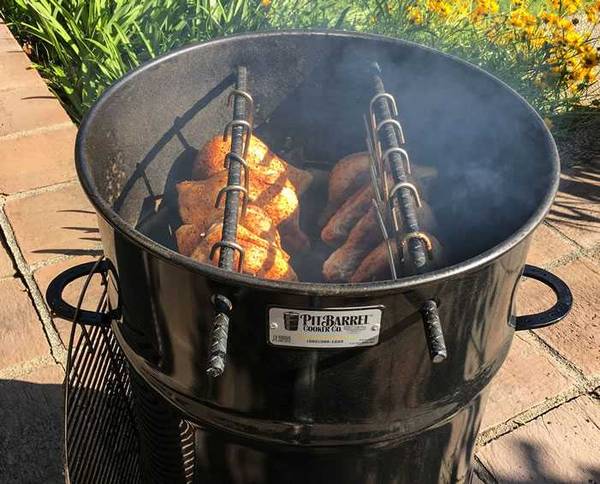
There is a carbon steel basket in the bottom that holds the charcoal and the device is designed to burn best using plain old inexpensive briquets. If you wish, you can use the included grate to cook on but for most cooks you will want to use the “hook ‘n’ hang” method. That means you will put one or two of the stainless steel hooks through the meat and hang it from a length of rebar mounted just below the tight fitting lid. The capacity of the PBC when hanging meat is impressive. We’ve done 8 racks of ribs at once without any issues.
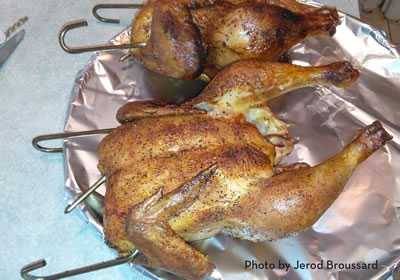
The hooks place the food in the center of the heat, creating what some call a “stationary rotisserie”. As a bonus, the juices from the meat drip onto the hot coals creating a smoke fog that rises back up into the meat, producing a flavor that you can’t get with an offset smoker with the heat off to one side, or a Weber Smokey Mountain with a water pan below the food. The burning of these juices, laden with seasoning and melted fats, is a crucial part of the flavor. They produce most of the smoke, so much that most owners don’t even use wood
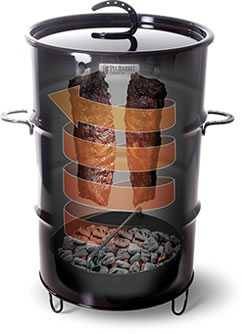
Although the thin lower ends of long slabs of ribs sometimes get too close to the coals and overcook a little (I call it “chef’s treat” because they never get to the table), we were puzzled as to why they don’t badly overcook. The AmazingRibs.com Science Advisor, Dr. Greg Blonder says “Hanging the meat vertically reduces the amount of direct infrared radiation from the coals for the same reason pointing your fingers at a fire doesn’t feel as hot as holding your palm to the fire. Meanwhile, dripping juices baste and cool the bottom of the meat. And remember, heat rises, so you have a hot fire at the bottom, and hot air rises to the top evening out the temperature so it is more or less constant in the area where the food hangs. Imagine a really wide barrel. Hot air would rise, bump into the cooler lid, cool off and sink, forming a rotating convection cell that lowers air temp at the lid and creates unpredictable turbulence. But as you narrow the diameter of the cooker, it becomes harder and harder for air to make the turn and descend. Sounds like 30 gallons is the dividing line between stable and unstable flow.”
David “Pit Boss” Parrish, the director of our Pitmaster Club (which has an active forum for PBC users) points out another cool sciencey feature, “Water from the meat evaporates as it cooks, and some of the moisture comes in contact with the walls of the drum which are cooler than the air inside the drum because the outside air cools them. The moisture condenses, runs down to the hot bottom where it evaporates again and some of it condenses on the relatively colder meat cooling it and wetting the surface so more smoke particles stick. There it picks up herbs and spices and sugar from the rub, and it drips onto the fire. This condensation cycle, coupled with the small exhaust holes, makes the PBC a humid sauna, so a water pan isn’t needed.”
On the negative side
On the negative side, we teach that 225°F is the ideal cooking temp for most things, and 325°F is better for poultry in order to render skin fat and make crispy skin. Almost all our recipes are pegged to those two numbers. But the PBC is not really designed for temp control and it likes to cook up north of 270°F. So don’t go nuts over trying to control its temp. Fiddling with the vents doesn’t always work. You cannot control bursts of heat from dripping fat, for example. So you will need to get used to different cooking times than in our recipes. If you must try, you can get the PBC as low as 200°F by preventing air from escaping around one or more of the rebar exhaust ports with crumpled foil or closing the intake port. But starving coals can sometimes produce acrid smoke so it is usually better to follow these instructions and let the PBC do its thing.
Pork butts, brisket, and most poultry can easily handle the higher temps. Ribs sometimes are a tiny bit chewier than they would be at a lower temp. But real barbecue lovers know that ribs should not not not fall off the bone, they should have the chew of a tender steak.
If you want to high temp grilling foods like wings, sausages, fish, steaks, etc., place the grill grate on the supports, add the food, and begin your cook, lid off to increase airflow and thus temp. The PBC does a respectable job of grilling, but is not very good at searing a steak. This baby is primarily a smoker and you can do a better job of grilling on a device designed for the purpose.
The flavor from meat juice smoke is different than the flavor from wood. But it is rare to find someone who doesn’t like it. It is just a different flavor profile.
The PBC uses 8 pounds of fuel for every cook. It’s very efficient when cooking a lot of food, but very inefficient if you just want to cook a couple of chicken breasts. You can outsmart it with a bit of effort. When you are done cooking just close the intake vent as much as possible and stuff aluminum foil in the holes the rods go through to starve the coals. Or trim a wine cork to fit the holes. But the best method for snuffing out coals is to use a rake or super heavy duty gloves to lift out the charcoal basket and lower it into a 10 gallon galvanized steel can and then put on its lid. While you’re at it, buy two, one for storing ash.
Setup is quick and easy
- Place the stand under the barrel. Don’t place the barrel on anything flammable like a deck or even on grass. Concrete or bricks or pavers only, please. Many people place it up on concrete blocks, especially if you grill on it with high heat. It will burn a deck!
- There is no need to season a new PBC. You can start cooking with it immediately. But you will discover that, as you use it, a flat black carbon coating will reduce the reflectivity of the inside and it will not cook as hot.
- Adjust the vent cap over the air intake port at the bottom according to your elevation. The bottom vent on your PBC is adjusted half way open upon arrival. If you live at sea level up to 2,000′ adjust your vent to 1/4 way open. 2,000-5,000′ 1/2 way open. 5,000 to 8,000′ 3/4 way open and 8,000′ and above all the way open.

- Interestingly, there is no adjustable exhaust. Smoke and combustion gases escape through the holes around the rebar hangars so you want to insert them for most cooks whether you are hanging meat or not. They are part of the airflow system.
- Fill the charcoal basket to the top and level it off (about 150 Kingsford briquets). Remove 1/4 of them (about 40), and put them in a charcoal chimney (not included). Put newspaper or a Weber paraffin chimney starter cube or a wad of newspaper under the chimney, light it, and when the coals are glowing and covered in white ash (about 12 minutes for elevations below 2,000 feet, and 15 to 20 minutes for higher elevations), pour them onto the cold coals in the basket. When you start cooking, the hot coals will provide the heat for a while and as they slowly burn out, they will ignite cold coals below. They will in turn ignite the coals below, like a fuse. This “Minion method” (named after the inventor) can go on for 8 to 12 hours keeping the temps pretty darn stable. Some folks find it awkward pouring the hot coals from a normal chimney onto the unlit coals while the charcoal basket is inside the barrel so they fill the basket outside the barrel, pour the hot coals on top, and then use a heavy duty garden rake to lower the basket into the barrel. Others buy shorter chimneys that fit into the barrel more easily.
- Thread the hooks through the meat, insert the rods through the holes, hang the meat, insert a digital leave-in food thermometer into the meat, hang a thermometer probe next to the meat to gauge oven temp, close the lid, and go watch the game on TV.
- Use a food thermometer to test doneness of most meats, and the bend test for ribs. Click here for our award winning Food Temperature Guide and click here for a thermometer buying guide.
- At first the temp can shoot up to about 400°F and then it will quickly settle back to 270 to 300°F. Experienced cooks are adamant that you want this temp spike. It evaporates moisture on the surface of the meat. This helps form bark and can caramelize rubs with sugar but won’t burn them.
- When the food is ready, open the lid slowly. Sometimes if you yank it off you will start a small ash vortex and the ash can stick to the meat. Then use the included hook remover to lift the hook and meat out. It is now ready to carve and serve.
- The key to great food on the PBC is to make sure the coals are properly lit, the vent cap is properly set, and the food is well-seasoned. If those boxes are checked, your best bet is to stay out of the way and let the PBC work its magic.
Tips and tricks
- Take good care of your lid. It fits fairly tight and that prevents too much air from escaping and allows the vent system to regulate temp. If you drop it and bend it you will have problems with temp control. A rubber mallet will help you get it flat again.
- Many cooks, shockingly, swear by lighter fluid. They all claim that if you let the coals turn white all the solvent burns off and you can’t taste it. That may be the case, but I hate the smell of it in the air, so I stick with the chimney.
- Once the cooker is doing its thing, relax and peek in every once in awhile to make sure things are on track. If not hooked securely, as meats cook and are tenderized they can fall into the coal basket. It’s rare, but if it happens rinse off the ash and put it back in there. To prevent this, some cooks use two hooks, some use butcher twine to tie the lower parts to the hook, and some move meat to the grate when they hit 170°F and start getting tender.
- Try to keep ribs a few inches above the coals. If you have a really long slab of ribs, consider cutting them in half.
- In winter you may need to leave a small gap in the lid or remove one of the rebars to allow more airflow and build more heat. But beware, fzxdoc warns “Whenever the lid is cracked, watch the temperature closely. That’s not the time to grab the beer and get back to the game. The temp can sometimes rise as much as 100 degrees in 3 to 4 minutes, it can really takes off, especially at the beginning of the cook.”
- If the temp gets too low, you can slide the lid off a bit to let more air escape and that will suck in more air stoking the coals.
- If you load it down with two or more good sized butts or briskets the temps will drop about 20°F when the meat hits the stall.
- When placing the lid down, be careful if you are standing near the intake vent. Fire can shoot out and singe your leg hair.
- After a cook, if there isn’t enough charcoal to bother salvaging, crack the lid and let ‘er rip. Burns off grease.
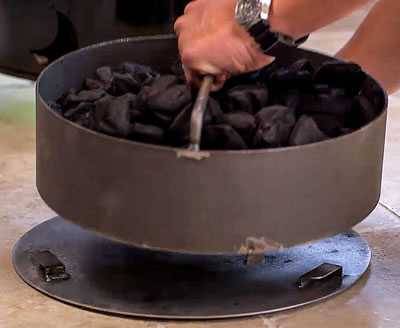
- Before or after each cook, it’s important to clean out the ashes to allow the proper airflow to reach the coals. When everything has cooled you can dump the ash or suck it out with a shop vac. Some folks line the bottom with foil before ignition to make ash removal easier. I use the optional attachable ash pan (shown below). It makes cleanup quick and easy. One reader built his own ash catcher with a 16′ pizza pan and four 2″ bolts with nuts and washers. Do not hose down the inside of the barrel.
- Another useful accessory is a stainless steel turkey hanger they offer separately. It allows you to hang whole turkeys, chickens and other birds in the ideal cooking position.
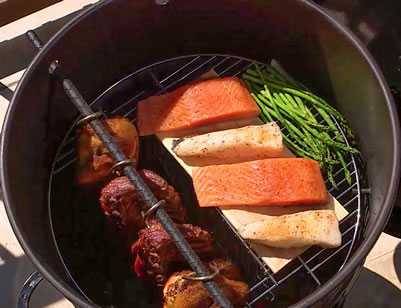
- PBC also offers an optional hinged grill grate that allows you to hang and grill food at the same time. This works great if you’re cooking things like ribs and corn or sweet potatoes.
- Want to take it on the road? No problem. Just save the original box. The PBC tends to draw a crowd at events, so make sure you bring enough food.
- If you purchase a cover, you can keep your PBC looking shiny, but even if you don’t the thing is pretty darn durable.
- One of my favorite modifications is drilling a small hole to hold a digital temperature probe. You can put a silicone grommet in the hole to prevent air from escaping (not really a problem) and to hold the probe in place. If you don’t drill a thermometer hole, and you use a thermometer with a cable like Smoke, or the Maverick ET-732. or the FireBoard, run the cable through the rebar hole not under the lid. You need that lid down toight.
- Another good mod is to drill four holes about 4″ above the top of the charcoal basket and insert four 2″ screws held in place with nuts on the inside. You can then lower the cooking grate to very close to the coals for searing.
- There’s an extensive library of step-by-step how-to videos on the company’s website demonstrating hook placement for different cuts of meat, as well as cook times, recipes and more tips for using the PBC.
- There is also a lively discussion among PBC owners in our Pitmaster Club. Click here for more info about The Pitmaster Club.
- If you really have problems, call them at 502-228-1222 during normal business hours in Kentucky. They actually answer the phone and are eager to help.
Click here to read the review from our full time grill and smoker tester, Max Good, and for more tips. The comments below the review from readers have some excellent tips. Click here to read Max’s review of the smaller and less expensive Pit Barrel Junior. Or click here to find out more about the oversized PBX and some other Pit Barrel product innovations. Or just click here to order one from the PBC website.


High quality websites are expensive to run. If you help us, we’ll pay you back bigtime with an ad-free experience and a lot of freebies!
Millions come to AmazingRibs.com every month for high quality tested recipes, tips on technique, science, mythbusting, product reviews, and inspiration. But it is expensive to run a website with more than 2,000 pages and we don’t have a big corporate partner to subsidize us.
Our most important source of sustenance is people who join our Pitmaster Club. But please don’t think of it as a donation. Members get MANY great benefits. We block all third-party ads, we give members free ebooks, magazines, interviews, webinars, more recipes, a monthly sweepstakes with prizes worth up to $2,000, discounts on products, and best of all a community of like-minded cooks free of flame wars. Click below to see all the benefits, take a free 30 day trial, and help keep this site alive.
Post comments and questions below
1) Please try the search box at the top of every page before you ask for help.
2) Try to post your question to the appropriate page.
3) Tell us everything we need to know to help such as the type of cooker and thermometer. Dial thermometers are often off by as much as 50°F so if you are not using a good digital thermometer we probably can’t help you with time and temp questions. Please read this article about thermometers.
4) If you are a member of the Pitmaster Club, your comments login is probably different.
5) Posts with links in them may not appear immediately.
Moderators