Click Here To Search Our Extensive Database Of Reviewed And Rated Gas Grills
Want to start a new business? I’ll tell you one to avoid: Manufacturing gas grills. Man, there are a lot of choices out there. But that’s good for us. Prices are very competitive.
The chief advantages of gas over charcoal is that there is no dirty charcoal to handle, no ash to clean up, they can get up to max heat faster than charcoal, and you have temperature control just by turning a knob.
Modern gas grills seem to have more bells and whistles to choose from than digital cameras. Some actually even come with the kitchen sink attached. In our searchable equipment review database we have tried to include the most widely distributed brands as well as those we think are especially interesting.
You need multiple burners
A good gas grill must have a minimum of two burners. This is a must for 2-zone cooking, the most important technique you need to learn for successful outdoor cooking.
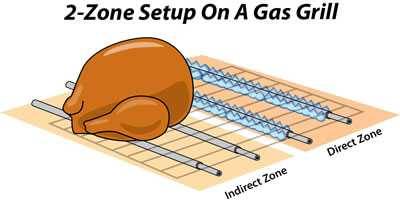
The more burners, the better. Some burners line up side to side and others line up front to back. With burners lined up from side to side you can then turn off one side, as in the picture, and slow roast over the indirect zone, and then crisp over the direct zone. You can also put meat in the indirect zone for holding. The bigger the cooking surface, the more flexibility you have. The best arrangement is when the burners line up from side for most cooking. Front to back is better for rotisserie cooking. If the knobs are on the front, that’s usually a good sign that the burners line up from side to side. If the knobs are on the side, then the burners probably line up front to back.
Beware, some of the new infrared grills may have multiple burners, but they deliver such even heat that it is almost impossible to get a hot and cool zone. Avoid these.
Learn more about the different heating methods, including infrared, in my article on the thermodynamics of cooking.
The best burners are made from quality stainless steel, cast aluminum, or brass. They can last for years. Thin stamped aluminum or steel burners corrode easily and often need to be replaced every three to five years.
You need a lid
A few grills, even some expensive ones, do not have a lid. Without a lid you are severely limited in the type of cooking you can do. With a lid you can set up in two zones. Without it, you really can’t do it. Without a lid you are forced to cook with direct heat from only one side. This is fine for burgers and dogs and some thin cuts of meat, but you cannot cook thick steaks, ribs, turkey, or even chicken properly. Some grills have a double layered lid that helps with heat retention.
You need a sear burner
I don’t care what the BTU rating is, most gas grills cannot properly sear a steak or burger. A proper sear is edge to edge dark brown, no grill marks, no tan in between the grill marks. Click here to read more about why you don’t want grill marks. To get a proper sear on a steak you need a special burner that puts out extremely high energy. Sometimes they have a single burner that does the job, or a zone for the task. Here is the sear burner on the Napoleon 500, my favorite sear burner. It is on the left shelf so it can be used as a sauce warmer on low. Alas, sear burners usually only show up on more expensive grills.
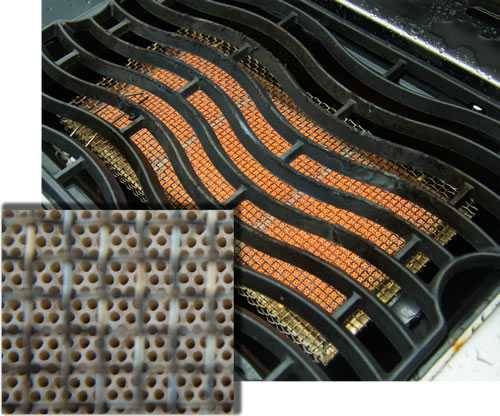
If your grill doesn’t have a sear burner, when the meat is just below your target temperature, toss it in a hot pan or griddle heated on the grill. Hot metal transmits much more heat than hot air. Another option is a $30 charcoal hibachi where the meat can sit right above hot coals.
Convection or infrared?
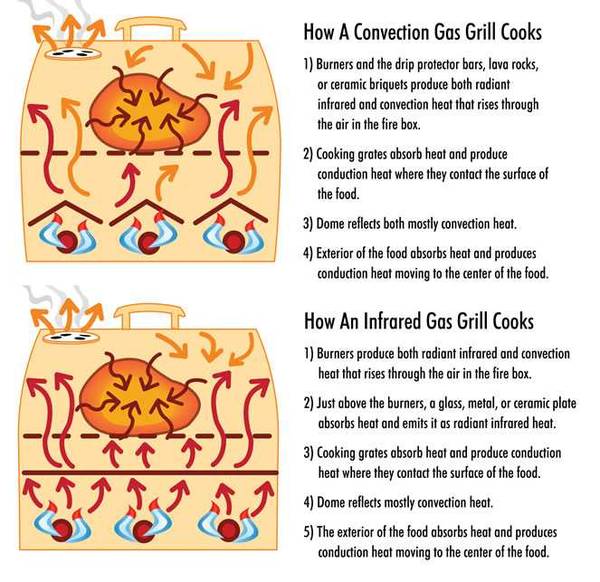
Gas grills can be divided into two categories, convection and infrared. To better understand these concepts, you should read my article on the Thermodynamics of Cooking.
Convection grills are the standard system of burners, usually tubes with holes, that sit below the grates upon which food sits. Between the burners and the grates are inverted V shaped drip deflectors, lava rocks, or ceramic briquets. The burners generate heat which is transmitted to these drip protectors and then to the food primarily by hot air flow, by convection. The grates also absorb heat and transmit it via conduction. Conduction is the most efficient method of heating, and that’s why the grates make dark brown marks on the meat caused by the Maillard reaction.
What’s all the fuss over infrared?
In the past few years a number of gas grills have been touting their superiority because they use “infrared” cooking. Well, if you took high school science, you might remember that infrared is simply another section of the wavelength continuum around us, just up the road from visible light and down the road from the radio in the car next to you.
Infrared grills use a special surface above the flame that absorbs the heat and radiates it to the food. These IR surfaces can be a plate of special glass, ceramics, or metal. Usually when a manufacturer says its grill has a “sear burner”, it is referring to a section of the grate that has a burner with a radiant plate to amplify heat.
The advantage of infrared heat is that it is more efficient than convection, it gets hotter than convection, often in the 500 to 700°F range, there is less dry air motion, which means less moisture evaporates from the food. Them’s steakhouse temps, pahdna. Also, the radiant surface is usually very close to the food so dripping juices or marinades incinerate and go right back up into the meat, adding flavor without flareups.
Worth it? Yup. Especially if you want good browning. And you do, because browning creates flavor.
If your grill doesn’t have infrared, you can add it with GrillGrates, a great product that replaces the manufacturer’s grates or sits on top of them and does the job wonderfully. Click the link for my explanation of how they work. Another option is to get a charcoal grill on the side for searing. Or use a griddle or frying pan with a thin coat of oil. Get it scorching hot, either indoors or on the side burner or on the grates. Add a light coat of oil, and sear the meat in the griddle or pan. No, it is not cheating, it is great technique.
Rotisserie kits
Rotisserie is a great method of cooking, especially poultry. A few grills come with the motor and accessories, but it is an extra cost option on most. I recommend you buy the optional kit. Some grills even have rotisserie burners. I recommend them too.
Liquid propane gas
With gas grills you have your choice of liquid propane (LP) or natural gas (NG). Propane gas is ideal for grills because, when pressurized, it compresses and turns to liquid, making it easy to store in tanks. It also contains more cooking energy than natural gas as measured in British Thermal Units (BTU). A BTU is the amount of energy required to raise the temperature of one pound of water 1°F. There are about 2,500 BTU in one cubic foot of propane and only about 1,000 BTU in one cubic foot of natural gas.
Manufacturers tout the number of BTU their grills can produce, but the number can be very misleading.BTU is not indicative of the heat it can generate. It just tells you how much fuel it burns, and naturally larger grills will burn more fuel. Heat delivery must be calculated by BTU per square inch, or “heat flux”, something they never tell you. We calculate heat flux for you in our searchable equipment reviews database. Typical flux is perhaps 85.
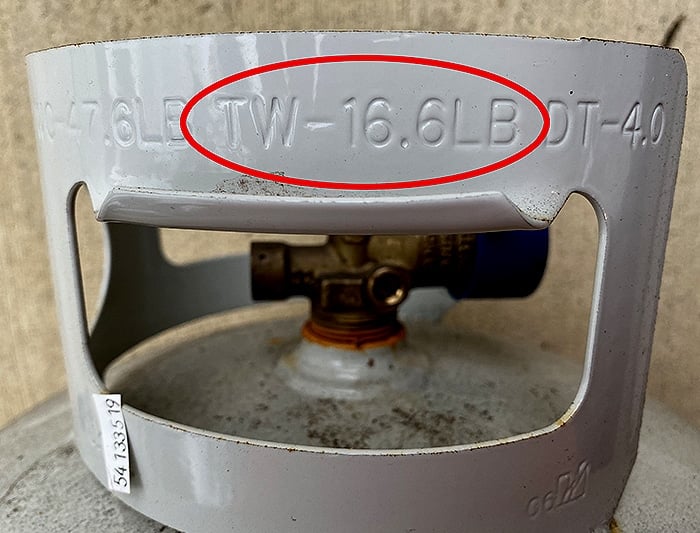
An empty LP tank weighs between 16 and 20 pounds. The tare weight (TW) is stamped on the side of the ring around the top of the tank that protects the valve. Most of the ones I get are 16.6 pounds. Unfortunately, used tanks are often painted multiple times and the numbers are filled with paint.
The standard tank is designed to contain about 20 pounds of gas, so a full tank should weigh about 36 to 40 pounds. So you go to the store (gas station, drug store, hardware store, etc.) and buy a full tank for about $40 to 50. When it is empty you bring it back and exchange it for a full one for about $15 to 20. The problem is, when you bring it back there is often a bit of fuel in the tank, perhaps as much as 10%, and they don’t credit you for it. The tank you get often contains as little as 15 pounds of propane, 25% less than full. So you think you are getting 20 pounds but your net can be as little as 13 pounds!
This underfilling has been the subject of several class action lawsuits against major tank exchange suppliers. The way to get your money’s worth is to go to a gas supplier who will fill the tank for you while you wait. Many U-Haul rentals, have refilling services. Look also for AmeriGas and Blue Rhino stores. Often their price per gallon is less than the exchange stores. I have even seen some big box stores that have self-filling stations.
If you have an LP grill you should always have a full backup tank on hand. Nothing is more annoying than setting a chicken on the grill, hopping on the lawn mower, and returning in 15 minutes to discover that the tank ran out and the bird is still raw.
Natural gas
Natural Gas (NG) is mostly methane, it is cheaper, and you never run out (unless you don’t pay your gas bill. Propane grills cannot be hooked up to natural gas without an adapter kit and the regulator may need to be adjusted. Some grills come with adapter kits, some sell them as options, and some just cannot be adapted. Many companies sell adapters for natural gas so make sure your choice of grill can be connected before you commit.
NG must be delivered to the grill by a pipeline from your house so a certified contractor (usually a heating or plumbing contractor) will be needed to do the installation. Because the NG line is a hard line, that means you cannot roll your grill around.
NG kits are designed to deliver more gas than propane, so if you set up NG and LP properly, the BTU ratings should be the same. In cold weather, however, the LP tank becomes quite cold and some BTUs are wasted getting the liquid to a gaseous state. NG, however, comes from your house in a gaseous state, so it is a bit more efficient in winter.
The mercaptan myth
Because natural gas and propane are colorless and odorless a foul smelling compound called mercaptan is mixed in to alert people of dangerous leaks. We occasionally encounter the myth that cooking with gas imparts a foul taste and aroma due to the mercaptans. The AmazingRibs.com science advisor Prof. Greg Blonder calls this “A complete falsehood.”
When gas burns, the mercaptans turn into sulfur dioxide, which becomes sulfuric acid due to the water produced by combustion. The small amount of sulfur deposited on your food when burning gas is orders of magnitude less than naturally present in food, or added with garlic or onion powder in rubs, or found in the smoke from burning charcoal or wood. Natural gas is a very clean burning fuel.”
The AmazingRibs.com equipment reviewer Max Good says “No one turns their nose up at Grandma’s holiday turkey and homemade pie because she cooked with gas. Likewise some of the best barbecue restaurants use gas burners as do many of the best steak houses. Clearly this is nonsense.”
Mythbusting the BTU mystique, and introducing “heat flux”
Grill manufacturers state the BTU, actually BTU/hour, of their grills. But the BTU rating is not indicative of the heat a grill can generate. BTU/hour is essentially a measure of how much fuel the burners can use in an hour derived from a calculation based on gas pressure, the size of the opening in the gas valve, and the type of gas. The more BTU, the more fuel used. It is really more like miles per gallon.
Heat delivery must be calculated by BTU per square inch, or “heat flux”, something they never tell you. To guesstimate how much punch a grill has, calculate the flux. Divide the BTU by the square inches on the primary cooking surface. Do not include “warming” racks. So the a four burner grill that produces 48,000 BTU and has 500 square inches primary cooking surface, produces 96 BTU per square inch per hour, or a heat flux of 96. Another grill with five burners generates 52,500 BTU under 650 square inches of grates, or 81 BTU per square inch per hour or a flux rating of 81. The bigger unit with higher BTU rating delivers less heat to the food. Typical flux is about 85.
But heat flux is not a perfect measure. If the burners on one grill are a lot closer to the cooking surface that another, the closer burners will deliver more heat, and there might be cool spots between the burners. And even that doesn’t tell the whole story, because infrared grills can generate more heat per BTU per square inch than convection grills because infrared grills are more efficient.
Cooking surfaces
You need to know the number of square inches of cooking surface. Remember that you do not want to crowd a grill, that you should leave at least 1/2″ between things being cooked, and that you need to use a 2 zone system which means you need twice as much real estate as you think. As a rule of thumb, allow 20.25 square inches for a hamburger (that’s a 4″ raw hamburger with 1/2″ space on all sides).
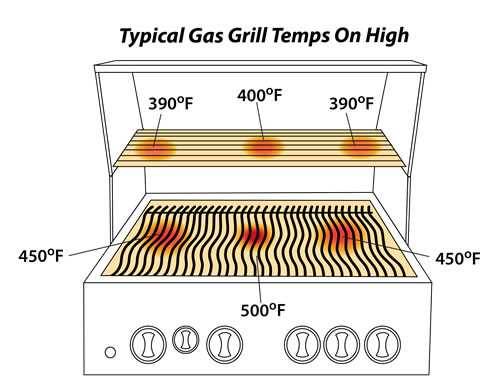
Most gas grills have a main cooking grate and an upper “warming grate”. Sometimes they combine the square inches in their brochure, sometimes they break them out. You need to know which is which. If you think that putting food up above slows or stops cooking, well I’ve got some well done steak to sell you. On some units the heat on the upper grate is almost the same as the temp on the lower grate!
Often, on high, the difference is only 50°F or less. But remember, it is further from the heat source so the temp is more convection air than infrared, and food cooked there will not brown as easily. On the other hand, if you are cooking indirect, depending on where the vents are located, sometimes it is hotter near the lid. And by the way, the thermometer in the lid of your grill? It’s located at about the same level as the upper grate, and that’s the temp it’s reading. The food down below is 50°F or more hotter. Here is a typical temperature chart of a gas grill on high:
The ignition system
Gas grills need a starter to ignite the gas. There are three basic ignition systems:
1) Electronic, which uses batteries, often just a single AA. Electronic ignitions occasionally fail, but it is usually just a dead battery.
2) Piezo electric ignition, which generates a spark by friction. When you turn a knob or press a button on a piezo electric ignition a small quartz crystal is struck by a small springloaded hammer that creates voltage that creates a spark that arcs from a wire to the burner tube. It makes a distinct clicking sound.
3) Hot surface ignition, which uses an igniter rod that gets red hot instantaneously to fire the burners. These slick systems are designed to be unaffected by moisture and perform reliably even in harsh environments. They show up on high end grills like Fire Magic and Kalamazoo.
Some ignite each burner when you turn the dial, and some use “crossover ignitions” which work by lighting one burner first, and the flame crosses over to other burners. Dedicated igniters for each burner are a nice feature included on most high end grills, but if they malfunction repair can be difficult and expensive. A good grill design should also have a manual ignition hole so if your igniter breaks you can insert a wooden matchstick or lonmg neck lighter. Keep one or the other on hand in case the ignition fails as it occasionally does.
Modifying the gas flow to get low temps
Some gas grill owners find it hard to dial the temperature down to 225°F, a temperature which I recommend for a lot of low and slow cooking. So they go looking for solutions. Some want to reduce the amount of gas, a method that can work, but it must be done properly and is potentially dangerous. I do not recommend this technique, but I publish it here just to give the you an idea of what is involved and with the hopes of discouraging a common mistake or two. Remember, fiddling with the gas supply system could create an explosion or fire resulting in death and destruction of your home. I strongly recommend that you use a professional if you wish to modify the factory setup. Your local LP gas company will be glad to help for a fee.
This regulator is specifically matched with your grill, so if something is wrong with it or the hose, don’t fiddle with it, just get the numbers off it and buy a new one of the exact same kind. No substitutions. It must match. The regulator is tuned for the pressure of the tank or natural gas supply, the needs of the grill. Experts tell me that the popular adjustable red regulator people buy on the internet is designed for high pressure gas sources and should not be used. If you use a high pressure regulator on a low pressure burner it can blow the seals from the valves and possibly explode. A low pressure regulator on a high pressure burner will produce a flame about the size of a kitchen match.
Bruce Swiecicki, Senior Technical Advisor of the National Propane Association says “You might be able to control the flame by turning the cylinder valve, but the flame may be unsteady. I don’t know of any safety issues to look out for by doing this.”
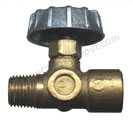
One expert says the best approach is to limit the volume of gas with a valve between the regulator and the burner with a brass needle valve like the one shown here. With a small valve after the regulator you can restrict the amount of gas going into the burner. It would still have the correct pressure but there would not be as much flow. Even though there are no marks on the valve, 1/8 turn knocks it back 15°F.
To complete the installation you will also need a high pressure gas hose. You would then take the regulator hose off the grill, attach the needle valve to hose, and attach the new hose to the valve on one end and to the grill on the other end. Be sure to use Teflon tape or pipe dope on the pipe threads to prevent leakage and test the connection by painting soapy water over the joints and watching for bubbles when the valves are open. Installation can be a bit of a pain. One reader reports that “Channel locks and vice grips failed at the initial unscrewing and I had to use a bench mounted vice to grip the parts.”
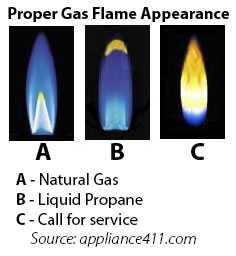
I asked Dr. Blonder about this kluge and he explained that “After installing the needle valve, the air to gas mixture is no longer the same. The amount of air depends on how quickly the gas is moving through the system because the gas pulls air in. So you will have to adjust the air mix by playing with the venturi. Looking for a nice clean blue to clear flame. Not yellow.” And beware, the less gas flow, the easier it is for the flame to blow out. Then you have a gas leak and a potential explosion. Take this path with great caution.
Frankly, if your grill is running too hot, I recommend you try to cool it with water pans, by leaving the lid slightly ajar, or just learn to cook at the higher temps. Better still, buy a dedicated smoker designed to cook at 225°F.
About that so called “thermometer”
Even top end manufacturers buy cheapo heat indicators (I refuse to call them thermometers) from the lowest bidder. These junky dials have ruined more meals and caused more tummy aches than flies on the potato salad. You absolutely cannot rely on them because they are often off by 50°F or more and the most important thing a good cook needs is a reliable thermometer. Please please please read and heed my brass needle valve.
Be careful with gas
Gas is explosive. It is dangerous. You must leave the lid open when you ignite it. If gas is under a closed hood, when it ignites it can blow that lid back with surprising force. Gas is heavier than air. If your grill flames out due to wind, a common occurrence, remember that the jets are still open and gas is filling the lower chamber. It can pool up and if you hit the ignition, even if the hood is up, there can be a violent explosion. Watch the video at right with Hannah Storm, an ESPN reporter.
She was severely injured when trying to ignite her propane grill after the wind blew the flame out. Unbeknownst to her, the gas continued to course through the jets and pooled in the lower chamber because it is heavier than air. Watch the short video here as a cautionary tale.
You also need to be careful with propane tanks in high heat. The pressure in full tanks is greater than the pressure in partial tanks, and as the air warms, the pressure builds. To prevent explosions, propane tanks have release valves set for about 375 PSI (pounds per square inch). Under normal conditions the pressure in the tank will never come close that number, but if you leave a full tank in your trunk in Florida on a hot day and the temp in there gets up into the 150°F range, the valve could release gas into your trunk and a spark could be catastrophic. Most of us will never face this problem, but it is something to be aware of.
Before you make up your mind, make sure to read these articles:
Click Here To Search Our Extensive Database Of Reviewed And Rated Gas Grills

High quality websites are expensive to run. If you help us, we’ll pay you back bigtime with an ad-free experience and a lot of freebies!
Millions come to AmazingRibs.com every month for high quality tested recipes, tips on technique, science, mythbusting, product reviews, and inspiration. But it is expensive to run a website with more than 2,000 pages and we don’t have a big corporate partner to subsidize us.
Our most important source of sustenance is people who join our Pitmaster Club. But please don’t think of it as a donation. Members get MANY great benefits. We block all third-party ads, we give members free ebooks, magazines, interviews, webinars, more recipes, a monthly sweepstakes with prizes worth up to $2,000, discounts on products, and best of all a community of like-minded cooks free of flame wars. Click below to see all the benefits, take a free 30 day trial, and help keep this site alive.
Post comments and questions below
1) Please try the search box at the top of every page before you ask for help.
2) Try to post your question to the appropriate page.
3) Tell us everything we need to know to help such as the type of cooker and thermometer. Dial thermometers are often off by as much as 50°F so if you are not using a good digital thermometer we probably can’t help you with time and temp questions. Please read this article about thermometers.
4) If you are a member of the Pitmaster Club, your comments login is probably different.
5) Posts with links in them may not appear immediately.
Moderators