The next time you hear a charcoal snob say gas is for wimps, the proper rejoinder is “Charcoal is for wimps. Real pitmasters cook with wood logs.”
Long before charcoal, early hominids lit logs and tossed the meat into the inferno where it promptly turned black. They soon learned that holding the food above the fire (direct heat) or to the side of the fire (indirect heat) made it taste better than burning it to a crisp in the fire.
Eventually four solutions evolved: Open pits, ovens, closed pits, and portable pits.
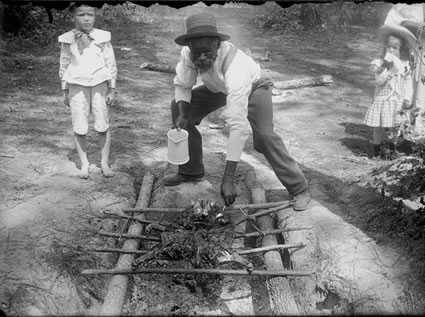
Open pits. As the centuries marched, cooks evolved their methods by digging holes, throwing in logs and setting them on fire, laying a grid of sticks across the pit, and placing the meat well above the intense heat. This “open pit” method had the advantage of slowly roasting the meat, with the added benefit of smoke, which improved flavor and preserved the meat.
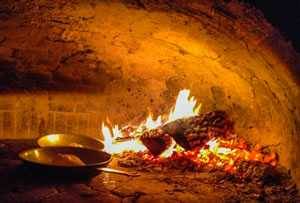
Ovens. Archaeologists have uncovered shallow caves that were used as ovens by early homonids. Eventually they built wood fired ovens from stone, clay, and brick. Some had an opening in the front, like a pizza oven, and others were fired up and sealed so the wood used all the oxygen and the walls were so hot that they continued to radiate heat for hours.
Closed pits. The problem with open pits was that the meat cooked only on one side, so it needed constant turning, and it used a lot of wood. Covering the pits solved the problem, bathing the meat on all sides with convection airflow.
Portable pits. In the 1970s, oil workers in Texas started building tubular portable pits from steel pipe sections, large propane tanks, and oil drums and hauling them from job site to job site on trailers. With the addition of a damper on one end and a chimney on the other, cooks could regulate temperature and smoke by controlling airflow. Eventually they built them with a firebox welded to the side to keep the burning logs isolated from the food.
In the late 20th century charcoal became the fuel of choice because it was faster and it allowed the pitmaster better control of temp and flavor, but cooking with logs remained beloved by a small number of artisans. It is hard to control heat and smoke with logs. There is a reason why they call them “pitmasters”. Beginners should not try to smoke meats with logs. But if you have mastered smoke roasting with charcoal (not gas or pellets), you may be ready to go back to your roots. Fun and flavor await the patient and practiced. There are two ways to approach “stickburning”: Old-style with direct heat or modern with indirect heat.
Old-style: Direct heat
Direct heat covered pits are still used extensively throughout Texas and Chicago, and I’ve seen them scattered around the nation in Alabama, Memphis, Kansas City, Southern California, and elsewhere.
In Texas the “pulley pit” is common. It is a large brick box with a steel cooking grate below a heavy metal lid that is hinged at the back. This weighty cover is tied to a rope that goes through a pulley hanging from the ceiling and is tied to a counterweight to help the pitmaster hoist it open.
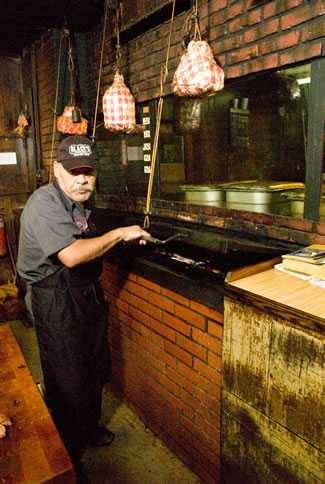
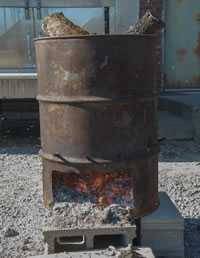
To fire a pulley pit, wood is burned down to glowing embers in a “burn box”, shoveled into the pit, and spread below the meat. The burn box shown here is simply a 55 gallon drum. Logs are dropped in the top and they rest on rebar that has been inserted near the bottom. The glowing embers fall through the bars, are removed from an opening cut in the side, and shoveled into the pit.
In Chicago, a variation of the brick pit, the “aquarium pit”, can be found in perhaps a dozen old establishments. A few have made their way out of town. The example in the picture here is at the famous Cozy Corner in Memphis.
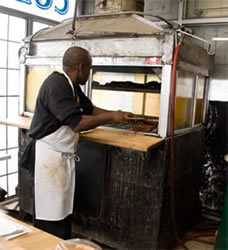
The aquarium pit has no lid. The meat is in a tempered glass enclosed cabinet, the aquarium, with a ventilation hood above and the firepit below. Pitmasters really earn their title with these babies. They toss whole logs or split logs in through a door on the bottom, rake embers around, shuffle the meat from hot side to cool side, to an upper shelf, and use a garden hose is to keep the flames tamed and produce humidity. You can see the garden hose hanging at the ready on the right of the picture.
Aquarium pits are built to order by Belvin J & F Sheet Metal or Avenue Metal Co., both in Chicago. If you want a pulley pit start by using my plans for a hog pit.
Modern: Indirect heat
If you want to smoke with logs, the best way to go is with a high quality “offset smoker”. Offsets are usually a section of pipe pretty close to the original design by oil workers. But after the pipe is cut, some complex engineering comes into play.
Modern units like Johnny Trigg’s Jambo, shown here, have two chambers, one for food and the other for the fire. The food chamber is a long pipe with a chimney and a door to access the food and cooking grates within. The firebox is attached to one end, offset slightly lower.
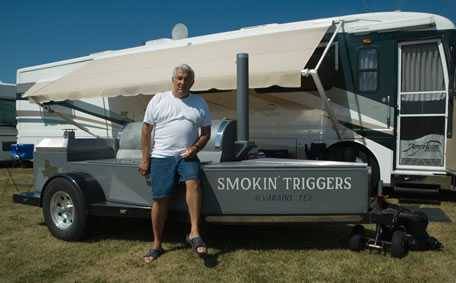
Offsets come in two broad categories: I call them Expensive Offset Smokers (EOS) and Cheap Offset Smokers (COS).
EOS start at about $800 for smaller backyard models and go up to $10,000 or more for the fancy ones on trailers with attached grills, holding ovens, and other bells and whistles. EOS are built from thick heavy steel that retains heat, and have precision dampers so you can fine tune airflow. Some even have a clever method of channeling heat and smoke to one end and back to the other, called reverse flow, to prevent hot spots.
Some of the best are made by Horizon, Jambo, Klose, Lang, Meadow Creek, Peoria, Pitmaker, and Yoder. Many come mounted on trailers and they are popular with caterers and competition cooks. If you buy one, you will need a way to lock it up because they are easily hooked up to a trailer hitch and can be three states away before you wake up in the morning. You can find out more on each in our equipment reviews database.
COS just don’t cut it for log burning. They can be found in hardware stores for under $200 sometimes. We cannot recommend these devices even for cooking with charcoal. People buy them because they look like the real deal, but they work so poorly that many folks give up on smoking after the first summer. Stay away from them, please. We know they look cool, but you will be cursing yourself if you buy one. There are plenty of other inexpensive designs that work better in our equipment reviews database. Click here to read more about cheap offsets and why they suck and how to make yours usable if you’re stuck with one.
Working with a stickburner
Each EOS works differently, but the procedure goes more or less like this: The firebox should have a grate in it to hold the logs above the bottom by several inches. This is so air can circulate under the logs and so ash can settle to the bottom. The goal is a small hot bed of glowing embers producing pale blue smoke, almost invisible. Lots of belching smoke is not desirable. The best EOS have an insulated firebox.
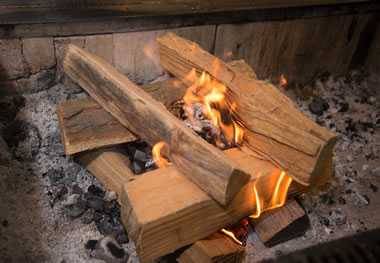
If possible, turn it so the wind is blowing into the firebox. Start a chimney of hot charcoal, wait til it is covered in gray ash, and pour it into the firebox. If you prefer, you can light some kindling instead. Some folks like to use a big propane flame thrower like the Red Dragon Torch. Starting with charcoal will get you a hot bed of coals and up to stable temp faster. Throw on three splits of well dried hardwood or fruitwood logs about the diameter of a beer can. Some pitmasters remove the bark first. Click here to read more about different types of wood. Open all dampers and doors, even the door to the food chamber, and let the dark black smoke pour out as the logs heat up and ignite.
After about 30 minutes, as the flames rise in the firebox and the smoke color turns to white you can close the cooking chamber and firebox doors and start the process of adjusting the temp. It takes 30 to 60 minutes to get the unit up to temp and load the metal body with heat, longer in cold weather. Feel the outer skin and start the process of learning what it feels like when it is loaded with heat. Some cooks like to spray the cooking chamber with water at this stage to create steam and loosen any grease that may remain from the last cook, but it is far far better to steam clean after the cook than before. Rancid oil will not improve your meat.
Now begin adjusting the firebox damper until the flames are smaller, your logs have turned black, cracked, and started glowing like embers. Then start playing with the chimney damper and try to get the temp in the center of the cooking chamber to about 275°F rather than 225°F at which most charcoal smoking is done. You need a higher temp when burning logs in order to create better tasting smoke. If you get it wrong, you will produce meat that is way too smoky, pungent, bitter, and reminiscent of an ashtray. Use a good digital thermometer.
Each pit has different dynamics, explains Ball “On a Jambo the major temp maintenance is with the smokestack. Very rarely do we touch the firebox damper once we get it to the spot we like. On a meadow creek or a reverse flow you rarely adjust the smoke stack you adjust at the firebox intake. Thermometers are important, but you eyes are your best tool. The color of the smoke tells you how clean your fire is.”
You can now throw on your meat. Until you are experienced with your machine, check the temp every 15 minutes or so. As the logs burn down continue to adjust the airflow with dampers and add a new log every 45 minutes or when you see the temp start to dip. If your firebox is insulated you might not need to add wood that often. Make sure ash doesn’t block airflow to the wood.
You need to keep these babies clean, so when you are done cooking, spray everything with water and let it steam. Scrub it down with a wire brush and drain away all grease. You can pressure wash, but that can remove the oil that is impregnated in the metal. No soap.
And the next time you hear some hotshot start ragging on gas grills, ask him he quit using lumber.
A note about the wood
My article on wood and smoke discusses wood in general, especially if it is added just for flavor, but if you are going to use wood for both heat and flavor your choice of wood is more crucial. When you are adding a chunk or three of wood to a charcoal smoke, the type of tree make little or no taste-able difference. But if you are using a stick burner, the type of wood can make a big difference.
In general, hardwoods like oak, and most fruitwoods give the mildest, most agreeable flavors. Hickory is stronger and more pungent, and mesquite stronger still. If you use air dried wood it should be cured for at least six months. Kiln dried wood can be too dry, so specify that you want wood 15 to 22% moisture. The AmazingRibs.com science advisor Prof. Greg Blonder says “Wood containing a bit of moisture creates a bit of steam during combustion, which causes smoke particles to clump together. And larger particles are less likely to flow around the meat so they stick more easily. Plus the water changes the nitrate/nitrogen ratio a bit, which affects the smoke ring, which has no flavor but adds eye appeal. The ring is typically larger with kiln dried wood. Kiln dried is considered to taste smokier.” Remember, smokier is not always better.
Most pitmasters start with their local woods and then try others until the find a combination that works with the pit and their palate.


High quality websites are expensive to run. If you help us, we’ll pay you back bigtime with an ad-free experience and a lot of freebies!
Millions come to AmazingRibs.com every month for high quality tested recipes, tips on technique, science, mythbusting, product reviews, and inspiration. But it is expensive to run a website with more than 2,000 pages and we don’t have a big corporate partner to subsidize us.
Our most important source of sustenance is people who join our Pitmaster Club. But please don’t think of it as a donation. Members get MANY great benefits. We block all third-party ads, we give members free ebooks, magazines, interviews, webinars, more recipes, a monthly sweepstakes with prizes worth up to $2,000, discounts on products, and best of all a community of like-minded cooks free of flame wars. Click below to see all the benefits, take a free 30 day trial, and help keep this site alive.
Post comments and questions below
1) Please try the search box at the top of every page before you ask for help.
2) Try to post your question to the appropriate page.
3) Tell us everything we need to know to help such as the type of cooker and thermometer. Dial thermometers are often off by as much as 50°F so if you are not using a good digital thermometer we probably can’t help you with time and temp questions. Please read this article about thermometers.
4) If you are a member of the Pitmaster Club, your comments login is probably different.
5) Posts with links in them may not appear immediately.
Moderators