


Create perfect pie crust even if you’re not a baker!
My wife is named Mary Lucille, but her friends call her Lou, so you can too. She’s a Ph.D. microbiologist and a food safety expert, but she’d rather you don’t call her Dr. Lou. She’s a mighty fine cook. Better than me. She is an iron chef who can improvise with anything you give her, doesn’t need to measure, and is brilliant at deciding which ingredients and flavors work together or clash. And there’s zero chance we’ll get food poisoning when she cooks.
Me? I need precise recipes, practically sleep with measuring spoons, and have been known to blissfully create some gawd awful concoctions. Just ask her about my first attempt at cauliflower soup. You won’t find it on this website. Let’s just put it this way, there is such a thing as too much lemon juice, and once your face forms that funny expression, well Mom was right, it might just stay that way. When she is cooking, we know we’re going to have restaurant quality food. When I’m cooking, we keep the Chinese carryout menu handy.
Among my wife’s repertoire is a full arsenal of breads, cookies, cakes, and pies. She knows her way around the different types of flour and I am intimidated by the stuff. Her pies are as good as any in the rotating glass case at the local diner, and much of the secret is the crust. She will be the first to tell you that baking is not the time for improvising. You need precise recipes because baking is much more about chemistry that any other form of cooking.
If you are not aware, pie crust recipes are the subject of heated debate, and the chemistry is the subject of whole books. One typical topic for heated debate is the lard vs. shortening vs. butter vs. a blend argument. It’s all about the flakiness vs. flavor tradeoff. The type of flour or salt or butter are also topics for debate.
Lou’s tried them all and agreed to share with us a simple recipe that we can whup up on short order for just about any kind of pie, even savory pies like quiches, or meat pies like pot pie. I’m not going to get into the debates here because I am far from qualified to report on them intelligently. I’m just going to report on Lou’s easy method.
The stuff freezes well so she usually makes several batches at once and that way we have some on hand whenever we need it.
As I write this on Sunday, 9/13/2009, she is preparing to bake a Grape Pie for our 35th anniversary, tomorrow, and I’m being a nuisance, asking a lot of questions, taking notes and photos. Thanks, for putting up with me, babe!
Note that when creating this recipe, it is for a single curst pie, i.e. a pie with a bottom crust that lines the pie pan but no crust on top. Lemon Meringue is a classic single crust pie.
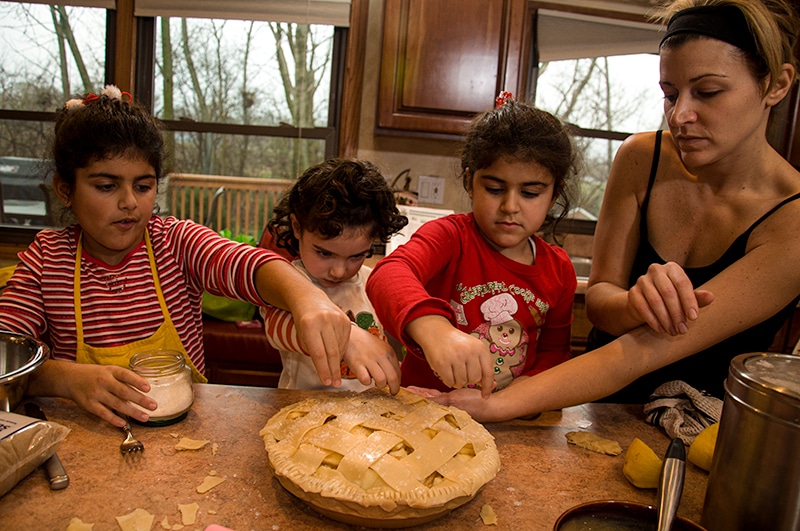
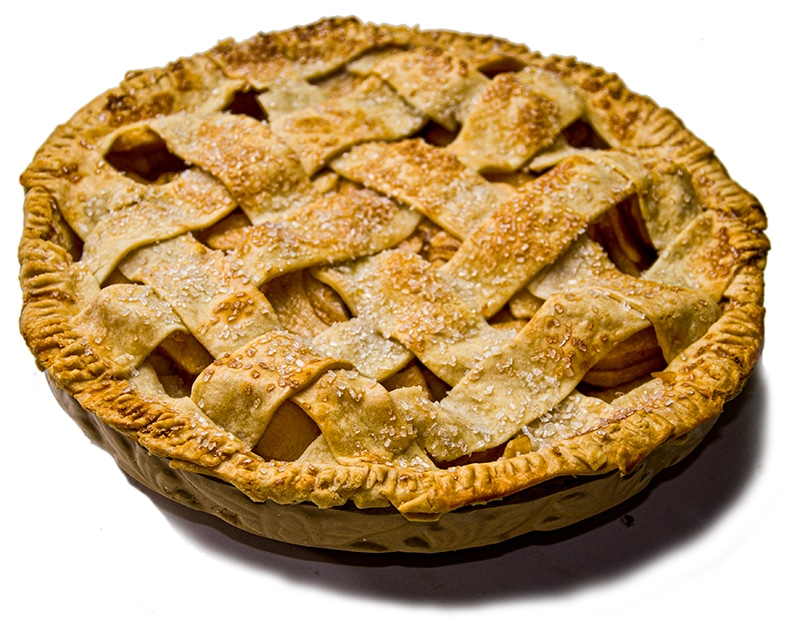
Alternatively, a double crust is a pie with a bottom crust and another crust on top. Apple and other fruit pies typically have a top crust. The top crust can take many forms. A crimped top covers the entire pie and it is fastened to the bottom crust by crimping them together with your fingers or a fork. A lattice top is made of strips of crust that are then woven so that some of the filling is visible through the top. It is recommended for pies that have very wet fillings because there is more surface for steam to escape. A floating top is a simple ring of crust that is just smaller than the diameter of the filled pie and it floats on top of the filling allowing the filling to bubble up and make a ring around the outer edge.
Here’s what the process looks like:

The flour after the butter has been cut in.

After the water has been mixed in the dough is formed into a disk and chilled.

After chilling the dough is rolled from the center out going in a circle.

Weaving a lattice top. Another technique is to make the lattice top on waxed paper on a plate and stick it in the freezer for an hour, then lay it on the pie, peel off the paper, and crimp when it warns a bit.

Fork crimping.

Finger crimping.

Simple And Foolproof Single Crust Pie Dough Recipe
Rate this RecipeIngredients
Method
- Prep. Fill a cup or glass with ice and water. Set aside.
- In a large bowl thoroughly mix the salt and flour.
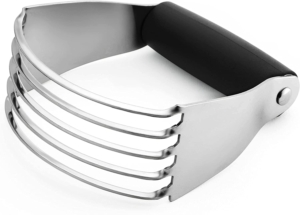
- It is important that the butter be cold and you do not handle it. Even though the butter is mixed into the flour, we do not want it thoroughly mixed in. Lumps in the dough the size of peas or even small marbles help make the crust flaky when baked. Start by cutting the butter into 1/4-inch (6.3 mm) cubes. Dump them into the flour and working quickly so the butter does not warm too much, "cut" it in with a pastry cutter (shown here). You can do this in a food processor with a steel blade, but my wife thinks it's just as easy to do it with a cutter and there's less cleanup. As the butter and flour accumulate on the cutter she just scrapes it off with a butter knife. She works the two flour and butter together for a few minutes until much of the flour has formed sandy granules, but there are still numerous pea sized lumps.
- Form a small fist size depression in the center of the mix, and add 2 tablespoons of ice water and cut it in quickly. Make another depression and add the rest of the ice water and cut it in. If the dough is too crumbly add another tablespoon ice water. Working quickly, form the dough into a large thick disk. If you are making a two crust pie, cut the disk into two parts, one about 60% of the quantity for the bottom, and one about 40% for the top. There may be some extra, but that's better than too little. Form the two parts into disks, and wrap with waxed paper or plastic wrap. But don't work the dough too much or else it starts to form gluten, the elastic stuff you need when making bread, but do not need when making a flaky pie crust. Neither do you want you hands to soften the butter. If you are going to bake the pie today, put the disks into the fridge for at least four hours to harden the butter and rest the dough. If you are not going to bake soon, these disks freeze well and can be used weeks later, so if you're feeling industrious, make a double batch and freeze some.
- When it is time to use the crusts, remove the disks from the refrigerator and let them sit at room temp for about 10 minutes to get soft enough to work. If they have been frozen, defrost them in the refrigerator overnight and them let them warm at room temp for about 10 minutes before you attempt to roll them.
- Find a smooth, flat, cool, clean, dry, work surface at least 3' x 3' for rolling the dough. The pros use a granite or metal surface, but wood and laminate will work fine. Table height is easier for rolling dough so you can put your weight into it, but a kitchen counter will work fine. Spread about 1/4 cup (32 g) of flour on the surface, and with your hand, get some on your rolling pin. Unwrap the disk, save the wrapper, and place the dough in the middle of the floured work surface. Now we're going to roll it, working from the center outward with some weight behind the downward pressure. Turn the dough 1/4 turn and repeat. Keep this up until the dough is about 2" (51 mm) larger than the pie pan. Pie experts say you should not roll back and forth, that this develops gluten. If the dough sticks to the surface, lift it with a dough scraper or a long flat carving knife. Put more flour on the surface if you need to. If there are cracks, don't start over. That will just make the dough tough. Patch cracks and spackle holes with your fingers by using a bit of dough from the edges.
- When the dough is the right diameter and about 1/8-inch (3.2 mm) thick, lay the rolling pin in the center and fold half the dough over the pin. Now lift the dough with the pin and lay it on the pan in the right position. Press it gently into the pan and along the sides with your finger tips.
- With a scissors, trim the overlap to about 1/4" (6.3 mm) and then roll the overlap underneath until it all fits neatly on the rim of the pie pan without hanging over. Take the wrapper that you set aside, and place it over the crust and put it back in the fridge. Now roll out the top. For a full crimped top or a lattice top, it must be about 1/2" (1.3 cm) larger than the pan. For a floating top, it must be about 1/4" (6.3 mm) narrower than the diameter of the pan with the bottom crust in there. Put the top on top of the bottom crust and the wrapper in the fridge until you are ready to fill it. If it's going to be in there for a while, slide the whole thing into a plastic bag so the crusts don't dry out. Or you can freeze it for later.
- Cook. When it's time to bake, add the filling and be careful not to fill it all the way to the top, leaving about 1/4" (6.3 mm) or more head space because the cooking can make the filling expand, and it will bubble up. Place the top on the filling, trim the edges to about 1/4" (6.3 mm) wider than the bottom crust. Roll the overlap under so the edge is nice and smooth, and crimp the top crust onto the bottom crust. You can do this with a finger, with a fork, or use the two finger crimp. Then remember to poke at least 3 cuts, each about 1/2" (1.3 cm) long, in the top crust with a sharp knife, near the center, so steam can escape and the crust will not expand and explode. You are now ready to bake according to the instructions in the filling recipe.


Why We Require You To Sign In Before You Can Post Comments
Before you can post a comment or question you must sign into our commenting partner, Disqus. This is helps make sure everyone hanging around the grill is civil. We do not tolerate nastiness, racism, porn, inappropriate language, or attacks on others. All comments are the property of AmazingRibs.com and we reserve the right to quote them, edit them, delete them, and block people from making future comments.
Please leave comments and questions on the page devoted to the same subject so others can see them and our answers when they are reading about that subject. You must enable JavaScript to use the comments section, and you must accept cookies to post comments. Note that the software that runs Disqus is different from the Pitmaster Club so members need to sign into that separately.
Moderators