


Let’s get some things straight right at the top:
1) Pizza is not not not junk food and it makes my blood boil every time I hear it so called. OK, some of the crap sold at pizza joints might be, but a real pizza, especially a home-made pizza with fresh ingredients, is a wonderful well balanced meal. You’ve got your crust, which is really a loaf of flat bread, and the toppings are mostly fresh veggies and herbs with just a little cheese and meat for protein.
2) A great pizza is incredibly easy to make from scratch at home, even the dough, whether you cook it outdoors or in your oven, but beware, once you get the hang of it, you’ll never be satisfied with eating pizza in a restaurant again. It has happened to me. Don’t bother asking me if I want to go get some za.
3) Pizza from the grill comes close to brick oven pizza, and it beats the snot out of the stuff that arrives steamed and soggy in the cardboard box. The heat and hint of smoke from the grill elevate grilled pizza into the stratosphere. I’ll show you how (with a lot of help from my Italian-American wife, the resident pizza maker). If you have a kamado, you’re in luck. It gets screaming hot on the bottom and the top, similar to the temps in a wood-fired pizza oven.
4) To make pizza on the grill you do not have to cook the dough on both sides before you add toppings as many cookbooks instruct. You can do it the way they do in the best restaurants: Make the dough, top it, and bake it.
5) It takes a little practice. The tricky part is getting the bottom and the top done at the same time, simultaneous pizzagasm. If the bottom finishes first, the sausage can be undercooked and the onions raw. If the toppings finish first, the crust will be wet and doughy. I’ll make temperature recommendations, but your grill will vary depending on how it is ventilated, how high the dome is, whether you use a stone or a pan, the type of stone, airflow, charcoal or gas. The moisture levels and thickness of the toppings all impact the thermodynamics. It may take a couple of tries to get your machine dialed in. A good thermometer helps.
6) Any recipe you read here can be cooked indoors in a regular oven.
About the dough
The dough is the canvas upon which pizza is painted. It should not dominate the toppings, but it should not be innocuous. There are many different styles of pizza determined mainly by the dough, not the toppings. Once you have a dough, then the topping options are limitless. Click here for more on the different styles of pizza.
The two most important doughs are Neapolitan and Roman. Yes, there are also deep dish doughs, New York dough, sheet pan dough, and so on, but let’s keep it simple at first.
Neapolitan couldn’t be simpler: Flour, water, yeast, and salt. It is poofy on the edges, and floppy at the tip. Here’s how to make a very good no-knead Neapolitan dough. And here’s a flavorful 3-day Naples style dough from Philadelphia chef, Marc Vetri.
Roman dough has a bit of olive oil in it, perhaps even a pinch of sugar, and that gives it more crunch, more rigidity, and a bit more flavor. My wife has taught me how to make her simple no-knead Roman style dough.
Yes, you can make pretty good pizza with frozen dough from the grocery, and some pizzerias will sell you a ball of fresh dough. A reader, Mark Davis, recommends using Naan bread dough. Naan is the bread they serve in Indian restaurants. He says “It stands up to the heat and cooks evenly with the toppings.” Another option is pre-cooked pizza dough like Boboli, but I don’t recommend it. Because it is pre-cooked it tends to dry out.
But making your own dough from scratch is far easier than you think, there are fewer ingredients and preservatives, and the smell is almost beer like. I especially like that part. The homemade dough does have a taste and texture edge called pride. Find a smooth work surface. Marble, granite, and quartz are best because they are smooth and cold, but wood or laminate are just fine.
Stoned or not
There are two commonly used surfaces for cooking pizza: stone and metal.

The pizza stone. The pizza stone is an attempt to replicate the floor of the old fashioned Italian pizza oven. It is slow to heat up, but it is good at distributing the heat evenly and reducing hot spots. Once hot, it holds the heat very well, so putting a room temp dough on it barely impacts its temp. It is also a great surface for serving your pie. It will keep it hot while it sits on the table. When we put a stone on our oak dining table, we put about 2″ of cloth placemats under it or it will ruin the finish on the wood it is so hot.
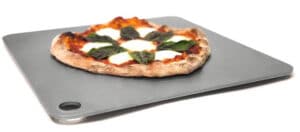
Modern pizza stones are made from a special heat tolerant refractory material that is poured into a mold and dried called cordierite. They should not crack if you handle them properly. Put the room temp stone on an unheated grill, close the lid and preheat the two together. This is no problem on a gas grill, and it is not much of a problem on a charcoal grill if you use a chimney to light the coals. The Pizzacraft 15″ Square Cordierite Baking/Pizza Stone is a stone I have been using with great success. It works especially well in a kamado. The innovative Baking Steel is a slab of specially formulated steel that heats rapidly and delivers heat extremely well. For that reason, a steel is best for baking pizza in a home oven (a little better than the steel), while the stone excels on the grill. Why? The total amount of heat. Home ovens top out at about 500°F. But grills get hotter. You can get the temp in a kamado up to 750 or 800°F, similar to the temps in a wood-fired oven.
To use a stone properly, you need a pizza peel, that large flat paddle they use in pizza joints. You dust the peel with flour and/or cornmeal to prevent the wet dough from sticking, assemble the topping, and then you slide it off onto the hot stone. I like cornmeal because the grains add flavor and texture, and they act like ball bearings that help the dough slide off the peel more easily. The cornmeal also helps keep the dough from sticking to the stone. As it ages, it gets dark and forms a patina.
Thick metal plates. There are now several heavy carbon steel metal plates that absorb lots of energy and transmit it efficiently to you pizza. They work very well and they are unbreakable.

Thin metal pans. We occasionally cook our pizzas on a thin metal round pan about 14″ diameter. You can even use rectangular sheet pans (for “square” or “grandma” pie) or cookie pans. They are very good at transmitting heat to the pie and you don’t need a peel. Once the dough is ready, put a thin layer of olive oil on the pan to prevent it from sticking and to aid browning. If you wish, dust the pan lightly with cornmeal. Roll out your dough, lay it in the pan, shape the edges so they don’t hang over, and add the toppings. You can even use frying pans, paella pans, and griddles.

Cast iron. Cast iron slowly absorbs heat, and because it is thick, it retains it. A cast iron skillet or griddle works just fine for making pizza, especially Chicago style deep dish pizza. A light coating of oil is important.
Controlling temp
When it comes to pizza, the temperature of the cooking surface is just as important as the air temp because that is what cooks the dough. The best way to measure the temp of your pizza stone or pan is with an infrared gun. Click here to see our reviews and ratings of infrared thermometers.
In order to get the top and bottom done at the same time, simultaneous pizzagasm, you may have to fiddle a bit and practice a bit. On one grill the sweet spot may be 500°F on the stone surface and 400°F air temp in the oven, on another 600°F stone temp and 350°F air temp. Air movement under the hood, how often you open the hood, air temp outside the grill, and thickness of the toppings are all factors in the equation.
Allow a good 30 minutes for the pizza stone as well as the oven/grill sides and dome to soak up energy. Every oven/grill is different and even the color of the stone can impact the cooking properties. One very useful technique if the bottom is cooking faster than the top is to place a second pizza stone above the pie.

Safety comes first, so you must get the sausages cooked through. At first, if you use sausage, chop or tear it into small chunks. As you get your system dialed in you can make them larger if possible. If some toppings overcook, then cut them thicker next time. You want a slight black and gray char on the bottom, but not burnt. It is a fine line.

With a charcoal grill
On a charcoal grill, there are several ways to attack the problem, depending on the type of grill. Here is how my friend Nate Maliwacki does it on a Weber Kettle:
Video: Grilled Pizza with a Weber Kettle
This video show you how to use your Weber Kettle to grill a great pizza.
Light a full chimney of charcoal briquets (about 80 briquets in a Weber chimney). When they are gray and covered with ash, dump charcoal and push them to one side of the grill in a C pattern. Add some unlit lump charcoal on top of the briquets. Adding the unlit lump charcoal will increase the grill temp by 50 to 100°F.
Place two bricks on the indirect side of the grill (not over the coals) and place the lid on grill. The Hovergrill also works great in place of the bricks. It raises the pie closer to the dome.
To get the dome temperature even higher, leave the lid slightly open on the indirect side of the grill. I easily reach the desired temperature of 550 to 600°F in the dome with this method. While the grill is coming up to temperature, and you want the metal dome hot, stretch the dough onto the pan and dress it with your favorite toppings, not too thick.
If you plan to cook more than two pizzas, place about 80 briquets in a C pattern in the grill and then pour the lit briquets on top of the unlit briquets. The lit briqs ignite the unlit ones slowly. This allows for a longer cooking duration.
As quickly as possible, open the lid and slide the pizza pan on top of the bricks. Cook for 10 to 15 minutes checking the bottom closest to the coals after about 5 minutes. Don’t let it burn. When it is golden, rotate 180 degrees and let it cook for another five minutes. Since the heat is only on one side of the grill, it is important to rotate the pan for even cooking. Watch closely. Believe me you can smell it burning from outside of the grill when it goes a bit too long.
On a kamado, you don’t have to monkey with things as much. The ceramic surrounds the pizza and delivers steady, even heat to the crust and toppings, achieving simultaneous pizzagasm effortlessly. Just put your pizza stone on an upper rack near the dome, your pile of hot coals beneath the grill’s heat diffuser, and when the stone gets to 650°F or so, slide your pizza onto it and close the lid. Simple. Click here for detailed instructions on making Kamado Grilled Sausage Pizza.
KettlePizza and other expensive adapters: You don’t need them

I have successfully made excellent restaurant grade pies on a wide range of grills from kettles to eggs to gassers with nothing more than a pan or a good stone. Several manufacturers have built elaborate gadgets and attachments for your grill that purport to make it more like the classic brisk oven. I have tried the grill attachments the Camp Chef Artisan Pizza Oven, the Mighty Pizza Oven, the KettlePizza. They all work, but none of them significantly improved the quality any better than a little fiddling and practice with a simple pizza stone. One gadget that has really caught the attention of the media is a product called KettlePizza. I am not a fan. Click the link for a more detailed review.
With a gas grill
A gas grill is a little easier to use than a standard metal charcoal grill. Preheat the grill with direct heat on all burners, put in a pizza stone, and let it heat up to about 600°F on the top surface. The stone may continue to build heat beyond your target, so when my gas grill hits the desired temp, I turn off the burners under the stone and leave on the burners on the side. The side burners will keep the air hot and moving, and don’t worry, the stone will stay hot. For a bit of wood fired flavor, use your smoke box or a smoke generator if you have one. You can even put a few charcoal briquets or lumps above the burners. There is one gas grill attachment that really works for pizza, the Bakerstone. I discuss it on this page.
Indoors
If you are cooking indoors, start by cooking on the lowest shelf. That will deliver a lot of heat to the underside. You may even want to put the stone on the stove bottom. Better yet, use a Baking Steel. It delivers heat faster and gives you a slightly better crust than a stone. If the top isn’t cooking properly, cook the next pie in the middle or the top shelf where it will get more heat reflective off the top of the oven’s inside. Or, use the broiler method: preheat the pizza stone or steel on a top shelf of the oven 4 to 6 inches from the broiler, then turn on the broiler right before you load the pizza into the oven. That way you get bottom heat from the stone or steel and top heat from the broiler.
But it takes practice
Unfortunately, even if you buy an Ooni or another great home pizza oven, you are probably not going to make a great pizza first time. First of all, it takes practice launching the pizza from the peel to the right spot in the o ven. Then you need to learn when and how to rotate it. Then you have to watch both the top and bottom in order to achieve simultaneous pizzagasm, when both sides are done at the same time. A lot of wet tomato sauce and the water will slow the cooking of the top of the dough. Cheese on top of the sausage may insulate it and keep it from cooking creating a health risk. If the cooking surface is too hot the bottom can burn before the cheese melts and the meats cook, or visa versa, if the heat from above is too great the edges can blacken before the bottom gains color and the desired dark “leopard spots” develop.
There is a balance of temperature, time, and ingredients that will dictate how well you do, and it takes a bit of practice. Pizza master Peter Reinhart of PizzaQuest.com calls it the Pizza Triangle:
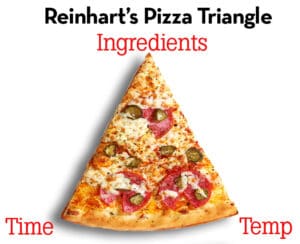 .
.
Toppings for pizza
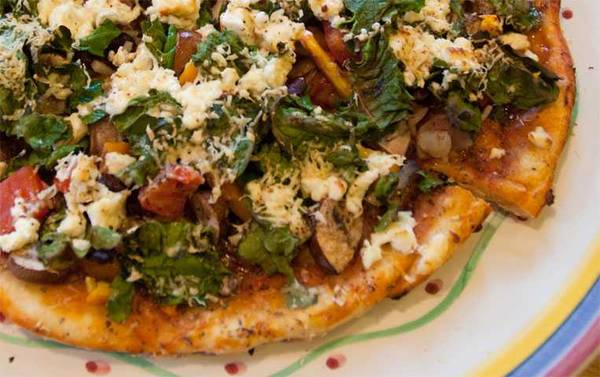
I am a believer in creativity in pizza design. Remember my motto is “no rules in the bedroom and dining room.” But I also believe in simplicity. If you want to use apples, nuts, and blue cheese, go for it. You’ll love it. But don’t go crazy with too many ingredients. Use just a few ingredients. Don’t pile them on too thick, and try to spread them out evenly. You want everything to have a chance to cook properly. You also don’t want to weigh down the dough or make it soggy with wet toppings.
Salt and pepper. Depending on the other ingredients, you may want to add salt and pepper. If you use salty cheeses like parmesan, anchovies, or canned sauce, you won’t need much salt. Skip it the first time. You can always add salt at the table, but you can’t take it away.
Olive oil, pepper oil, and garlic. We often paint the bare dough with a thin coat of olive oil to help keep water from the sauce and other ingredients from making the crust soggy. It also adds flavor. Some pizza joints use a pepper oil which you can replicate by adding 1 teaspoon of red pepper flakes to 4 tablespoons of olive oil, and then simmer them together on low for about 5 minutes. You can make garlic oil the same way. Crush 3 cloves of the stinky stuff into 4 tablespoons of olive oil and simmer them gently for about 1 or 2 minutes max. Make just what you need when you need it and don’t try to store it, there is a safety hazard in home-made flavored oils (for more see my article on food safety).

Tomatoes and tomato sauce. Beware of wet ingredients. If you use tomato sauce, use just a little. Don’t make it so thick you can’t see the dough. Put a few tablespoons in the center and swirl it outward towards the edges with the back of the spoon. Too much sauce makes the crust soggy and it can overwhelm other ingredients. Keep the sauce simple. In the picture, you can see a pizza maker in Rome assembling a pizza margherita, which is nothing more than tomato sauce, basil, and a little fresh cheese.
You can use plain old tomato sauce from a can, and there’s nothing wrong with that if you add herbs and other flavorings on top. Or try this simple Pizza Sauce. Or go for the gusto and use a rich home made marinara.
Herbs. Dried herbs are fine right on top of the sauce so they can reconstitute themselves, but fresh basil, oregano, or thyme really add a dimension. My wife adds a tablespoon of pesto to the sauce before putting it down and boy does that work well. We freeze pesto in the summer and that way we have some all year round. Spread the sauce all the way to the edge. The sauce on the edges not only tastes good, but it gives the whole pie a deeper color.
One way to elevate your pies over the storebought is to use fresh tomatoes when they are in season. No pink rocks in January. Often we use fresh tomatoes in place of sauce. The problem is that tomatoes are so full of water that they make the dough soggy. Choose meaty tomatoes like Romas. Then remove the seeds and jelly from the tomatoes. Do this by slicing off 1/4″ or more of the stem end so that the knife reveals the compartments in which the jelly lives. Then stand over the trash can and with the cut-end facing down, gently squeeze the guts out of the tomato. You can then slice the tomato or chop it by quartering it and then cutting the quarters into chunks. Another fun way to go is with cherry or grape tomatoes, cut in half.
Cheese. Go easy on the cheese, especially the standard indigestible grocery store mozzarella, which is one electron this side of wax. Yes, I know it is stringy and that’s fun. If you must have stringy, use whole milk mozz. The lowfat versions don’t pull well and brown badly.
Far better is fresh mozzarella which is usually sold from the deli counter with the milky water in which it is kept. Buffalo mozzarella is not from bison buffalos, but from the milk of domesticated water buffalos, and it is especially prized for its delicate creaminess by pizza lovers.
For a change of pace, get some Parmigiano-Reggiano, provalone, and asiago into the mix. My wife often uses a blend of all three and skips the mozz. Pecorino Romano or Grana Padano can be used as substitutes for the parm. Fontina or Gruyere are good, too. I like creamy goat cheeses like chevre lightly dotted on some pies.
Green stuff. Leafy greens like spinach are good. Arugula and other lettuces are especially good scattered on pies just before they are done so they retain some crunch. If you use leafy greens, pat them thoroughly dry and add them when the pizza ia almost done, like a minute or two left. Or add them to the finished pie raw.
Onions and garlic. I find room for onions on almost all our pizzas. For a thrill, try a Provencal Pissaladiere (Caramelized Onion Pizza). You can use raw garlic if you wish, but beware, it is going to be strong. You may want to roast it, microwave it, or boil it in water for about 15 minutes to defang it. And here’s a trick: Put it near the center. Then you will get it in the first bites and the flavor will remain in your mouth as you progress.

Meats. Pepperoni, Italian sausage, and anchovies are old standbys, but try branching out. Everything from Chinese duck sausage to Mexican chorizo is fair game. Try bacon and all thin sliced cured hams like prosciutto or Canadian bacon. Capicola is my all time fave pizza meat. If you want ground meat, go for the leaner grinds so they don’t make things too greasy. Popcorn shrimp are a pleasant surprise. Just go easy on the meats. Make them an accent not the star. A good pizza has several ingredients all playing together as a team with no stars. Meats should be the last thing to go on so they get plenty of heat from above.
Other toppings. Sundried or smoke dried tomatoes are super. The first time you taste smoke dried fresh tomatoes on a pizza you will weep.
Sweet red peppers are also among my favorite toppings. Thin sliced fresh mushrooms (not canned) are very popular. Try stylin’ with some of the exotic shrooms. I love oil cured olives such as Ni?oise, sliced in half. Try thin sliced zucchini or yellow squash. For the Californians out there, how about preserved artichokes, capers, eggplant, avocado, pine nuts, salmon, squid, and brie?

When it is done. After you finish cooking, a thin drizzle of really good extra virgin olive oil is a nice finishing touch. A lot of people like to sprinkle hot pepper flakes on their pizza. Try chipotle powder to amp it up to 11.
Cooking tricks for simultaneous pizzagasm
The trick is to get the dough and toppings cooked properly without incinerating the crust or leaving it uncooked in the center. Simultaneous pizzagasm. Some recipes call for you to pre-bake the crust on on the top side, then flip it, take it off the grill, put the toppings on the pre-baked side, and then put it back on the grill. This technique makes fine “grilled pizza” but not “pizza on the grill”. Pizza on the grill is real pizza just like you get at a restaurant, with whatever toppings you want. Grilled pizza doesn’t have enough time to cook toppings like sausage. Raw toppings (other than cheese) must be precooked in a pan on the side.
Thin crust is easier to cook on the grill because it bakes all the way through and is never doughy. Thick crust takes longer to bake and it must be cooked at a lower temp or with a 2-zone setup using indirect heat to prevent the bottom from burning.
When cooking in a tight cooker like a Weber Kettle or kamado, preheat the oven so the dome is hot and reflecting heat down. Get the pizza in quickly so little heat is lost and make sure none of the dough is right over the coals. Always cook pizza with the cover down and, to amp up the flavor, toss on a few wood chips or dried herbs on the fire before you put the pizza in for hint of smokiness. Check the color of the dough every five minutes by lifting it a bit with a spatula and peeking underneath. Pay close attention to the color of the crust nearest the heat. It can burn easily. Every five minutes rotate the pizza 1/4 turn so the edges don’t burn (kamado grilled pizza doesn’t need rotating because the heat is so even). Depending on your cooking temp and the thickness of the crust, you will be ready to eat in as little as 5 minutes (from a kamado) or 20 minutes (from a gas grill). It is done when the crust starts to brown on the bottom. A little spot charring is OK, even desirable.
If the toppings are not done when the crust is finished the first time you try, next time slow the cooking of the crust by turning down the heat or use a pizza stone under the crust.
Until you see how fast your grill and dough cook, pour a beer and stick close to the grill to keep an eye on things. In the words of Tammy Wynette, Stand By Your Grill! OK, maybe that’s not exactly her words, but click the link to see my version of the song…
Reheating leftover pizza
Moisture is the enemy of leftover pizza, so store it in a plastic container or wrap snugly in plastic wrap.
I’ve read a gazillion articles on reheating leftover pizza, but I have never read any esteemed chef recommend the way that works best, on the grill. In the microwave everything is limp and soggy. Yuck on sloppy seconds. You can reheat pizza in the oven, and that’s a bit better, but you never get a really crispy shell, even on a pizza stone.
Here’s how to do it. Just preheat your grill with a 2-zone system, but don’t get the hot side very hot, only medium. Place the pizza on the grates right over the heat, close the lid, and start checking the bottom every minute or so to make sure it does not burn. If it starts to burn, quickly move it to the indirect side and slip some foil under it. But most of the time, by the time the bottom is back to its original crispy self, the top will be warm and melty. And you’ll be starving.