


Renowned Philadelphia chef Marc Vetri shares his recipe for Naples style pizza dough from his book, Mastering Pizza.
The classic Neapolitan dough is about 60% water by weight. But that’s for pizza baked in a 900°F (482.2°C) oven. When you’re baking at lower temperatures than those in a wood-fired pizza oven, we found that a little more water in the dough helps create a classic Neapolitan crust that’s soft, foldable, and delicately crisp on the bottom.

Marc Vetri’s Naples Style Pizza Dough Recipe at 70% Hydration
This dough is meant to be baked at 500° to 600°F (260° to 316°C), perfect for a home oven and a kamado-style grill. Try this dough recipe when making Kamado Grilled Sausage Pizza. The real secret to flavor in this dough is giving it plenty of time to ferment low and slow.
Ingredients
Method
- Day 1: Make the starter. Mix everything together in the bowl of an electric mixer, crumbling in the yeast if it’s fresh or sprinkling the dry yeast over the water. Mix just long enough to make sure all the flour is wet. The starter will be wet and sticky. Cover tightly with plastic wrap and let the starter rest at room temperature, about 70°F (21°C) for 24 hours.
- Day 2: Make the dough. By this time, the starter should be bubbly and smell like sex. For the dough, pour the water into a small bowl, crumble in the yeast, and whisk them together until no lumps remain; or, if using dry yeast, you can just sprinkle the yeast over the starter.
- Mix and knead. Add the water (or water/yeast mixture) to the starter and then the flour, and then the salt. Attach the dough hook and mix on low speed for 8 minutes. Switch to medium-low speed and mix for another 4 minutes. The dough should be somewhat loose, since it has a fair amount of water in it. But if you’re mixer is less than 600 watts (600 J/s) and the mixer is straining, remove half of the dough and mix the dough in 2 batches to avoid burning out your mixer motor. Recombine the dough at the end of mixing both batches.
- Ferment. Cover tightly and let the dough ferment in the refrigerator until it proofs, rises, and almost doubles in size, at least 2 hours or up to 24 hours for more flavor. You could also let the dough rise at room temperature for 5 to 6 hours if you’re pressed for time.
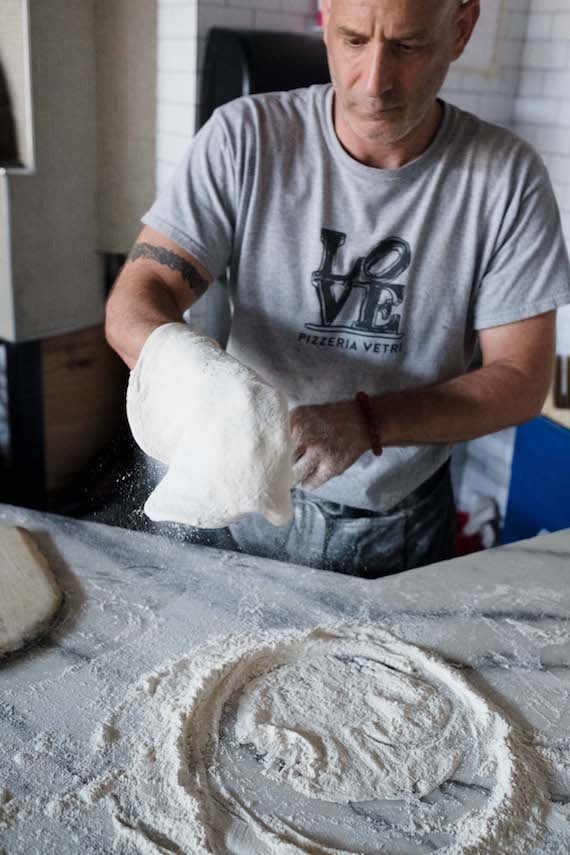
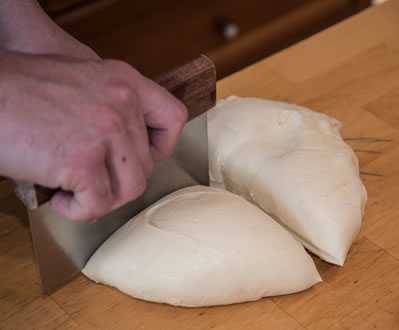
- Ball up and ferment again. Lightly flour your hands and a bench knife (the bigger the better). Resist the temptation to dust the dough or your work surface with more flour; that will just make the dough stiffer. You want to keep the dough soft. Use your hand to scrape and dump the mass of dough onto a dry work surface. Use the bench knife to cut and divide the dough into 6 pieces, each about 9.5 oz (270 g). Just cut and scrape away a 9.5-oz (270-g) piece from the dough, transferring the piece to a scale to weigh it (at least weigh the first piece so you can eyeball the rest). The dough will be loose, wet, and sticky—especially if you use some fresh-milled whole grain flour. Handle it with authority. Scoop it up with the bench knife and scrape it off with your fingers. Transfer the 9.5-oz (270-g) piece to a 2-foot-square (61 cm) area on the dry work surface. Then scrape and shape the dough into a ball. To do that, position the bench knife at one edge of the dough and then push the dough in the opposite direction, scraping and pushing the dough at least a foot or two away from you. It will swell up and form an oval shape. Remove the bench knife (using your fingers if necessary), reposition the knife on the pointy end of the dough, and proceed to push the dough in a direction perpendicular to the first, tilting the knife down a bit and scraping the dough with some pressure, swelling up the dough again. Repeat this process of pushing, repositioning, and scraping the dough in opposite directions all around the 2-foot (61 cm) square until the dough goes from a loose oval shape to a more organized round one. It’s almost like shaping a water balloon, so it’s a somewhat delicate operation. You want to gently squeeze all around the balloon to swell it up into a round ball, always increasing the surface tension. When the dough becomes a somewhat organized round ball, use the bench knife to quickly transfer the dough ball to a proofing box or a wide tray with a tight-fitting lid. It will flatten out quite a bit, so leave room for the other dough balls. Repeat the process with each lump of dough, transferring the dough balls to the container and leaving several inches between each—you don’t want the balls reconnecting themselves. I don’t dust them with flour. They get plenty of flour when you shape them. Cover tightly and refrigerate for 24 hours. Or leave at room temperature for up to 12 hours.
- Day 3: Use or chill the dough. After the dough balls have rested, use them immediately or chill them for up to 36 hours after that (until the evening of Day 4). Let the dough rest at room temperature for 1 hour before using to take the chill off. That will make the dough easier to shape.
Notes
About the flour. If you can’t find King Arthur bread flour, look for another bread flour that has about 12.7% protein.
Freeze it. To freeze the dough balls, dust them lightly with flour, place each one in a quart-size (946.4 ml) zipper-lock bag, suck out the air, seal, and freeze for up to 1 month. Thaw the dough in the refrigerator, and then let it warm up at room temperature for 1 to 3 hours before using.
Make it whole grain. To make Whole-Grain Naples Dough at 70% Hydration, replace some of the bread flour with any whole grain flour, preferably fresh milled. It can be whole grain wheat, spelt, einkorn, emmer, sprouted flour, or any other flour you like. When I mill it myself, I like to sift the flour through a fine-mesh sieve (a typical metal sieve for home use) to remove some of the larger bran flakes. You can use the sifted-out bran for another purpose—it makes a great yogurt topping! Sifting will create “high-extraction” flour because you will retain about 80% of the whole grain in the sifted flour. The more fresh-milled high-extraction flour you use, the more germ, bran, and earthy flavor you’ll get in the crust. The raw dough will also feel a little softer and looser. Handle it carefully when shaping it. For dough with 10% whole grain flour, use 35 grams whole grain flour + 319 grams bread flour in the starter; then use 64 grams whole grain flour + 574 grams bread flour in the dough. For dough with 20% whole grain flour, use 71 grams whole grain flour + 283 grams bread flour in the starter; then use 127 grams whole grain flour + 511 grams bread flour in the dough. If you experiment with higher percentages of fresh-milled whole grain flour, you’ll need to add slightly more water because whole grain flour absorbs more water. The extra fiber can give the dough a heavier texture as well, so you may want to use a little more yeast for extra lift. Either way, dough made with fresh-milled whole grain flour is so much more flavorful. It’s also more perishable, so use the mature dough balls within a day or two.
Approximate Nutrition
Tried this recipe?
Let us know how it was!
This recipe has been adapted with permission from Mastering Pizza by Marc Vetri and David Joachim (Ten Speed Press, 2018).
Before you can post a comment or question you must sign into our commenting partner, Disqus. This helps make sure everyone hanging around the grill is civil. We do not tolerate nastiness, racism, porn, inappropriate language, or attacks on others. All comments are the property of AmazingRibs.com and we reserve the right to quote them, edit them, delete them, and block people from making future comments.
Please leave comments and questions on the same page that is devoted to that subject so others can see questions and our answers when they are reading about the subject. You must enable JavaScript to use the comments section, and you must accept cookies to post comments. Note: the software that runs Disqus is different from the Pitmaster Club, so members need to sign into the Pitmaster Club separately.