


If you like your meat juicy, tender, and flavorful, there is one simple ingredient that can improve all three: Salt.
Salt, which is another name for the mineral sodium chloride (NaCl), is probably the oldest way to flavor food and essential to all living things (click here to learn more about The Science of Salt and the different types of salt). Our bodies require salt, and the only way to get it is to ingest it.
Here’s how salting and brining can significantly improve your cooking, how to make wet brines, and how to use them. I’ll even throw in a little myth busting and some cool science about how salting works.
Salt and juiciness
When we are cooking meat, a significant amount of water evaporates from the surface and some is squeezed out by cells and connective tissues that contract under heat. Lean cuts, like chicken breasts, turkey breasts, or pork loins can dry out easily when heat is applied, especially if you overcook them the tiniest bit. So you are faced with the problem of how to heat these meats to proper temps without making shoe leather. Surprisingly, salt can help.
Meat proteins are complex, long, and coiled. When sodium and chloride ions get into the muscles, the electrical charges mess with the proteins, especially myosin, so they can hold onto moisture more tenaciously. As a result, less is lost during cooking.
When my favorite food mag, Cook’s Illustrated did a test, they discovered that a chicken soaked in plain water and another soaked in a brine both gained about 6% by weight. When they cooked both as well as an un-soaked bird straight from the package, the chicken straight from the package lost 18% of its original weight, the chicken soaked in water lost 12% of its pre-soak weight, and the brined chicken lost only 7% of its pre-soaked weight. Add to that the 6% water gain of the brined bird, and you have a hen that is 11% more juicy than straight out of the package.
The problem is, if you have ever brined meat, the osmotic pressure in a brine actually draws meat juices out. That’s why a clear brine turns milky in a short time. These meat flavored juices are replaced by salt water. Worst trade since the Saints swapped eight draft picks for Ricky Williams in 1999.
According to research the AmazingRibs.com science advisor Prof. Greg Blonder conducted for us, the brine and the moisture it retains are concentrated near the surface unless the meat is brined for a long time.
This counteracts one of the biggest problems of cooking. The meat on the surface is hotter and is almost always overcooked and dry by the time the center is properly cooked. The added moisture near the surface helps the area that needs the most help.
Salt and tenderness
Chewing takes energy and can give you a headache. Some meats, like the muscles the chest or rump of a steer, are tougher than others. Some of that toughness comes from connective tissues that wrap around muscle fibers and bundles, but some of it comes from the structure of the proteins themselves. Cooking meat to the proper temperature can tenderize it by relaxing the proteins, a process called denaturing. Salt can also denature proteins even before the heat hits them (click here for more on meat science).
Salt and flavor
Salt is a flavor amplifier, it suppresses the impression of bitterness, and it actually expands your taste buds. Many of us sprinkle salt on meat when it is served because it just makes meat taste better. Brining helps bring the benefits of salt to every bite, not just the surface.
On the other hand, and there is always another hand, too much salt can make food unpleasant. So the trick is to not make the brine too salty and not leave the meat in too long. Overbrining is just as bad as overcooking. If you overbrine, you then are, essentially, pickling or curing the meat. That’s how corned beef is made, soaking beef brisket in salt and flavored water for a week or more.
Many brines also include sugar and spices, but few of them penetrate very far in the short times usually involved, like a few hours. The molecules are just too large and many do not dissolve in water. Instead, they stick to the surface much like a dry rub. Yes, if you soak in a sweet and spicy brine for days, some can work their way in, but that is closer to pickling, and the rate of ingress is very slow. Sugar, for example, can dissolve and move inward, but it takes days since their molecules are so large.
Sugar in the brine
Although sugar molecules take days to penetrate meat, adding sugar to a wet brine in about the same quantity as the salt, does have some benefits. According to the AmazingRibs.com science advisor Prof. Greg Blonder, sugar sticks to the surface and aids in the browning by speeding up the Maillard reaction, especially at lower temps. “Without absorbed sugar working in tandem with muscle protein, you would have to overcook a porkchop by hours to provide enough time for browning to occur.”
How to bring salt to the game
Brines do not penetrate very far in short periods, the rate of penetration slows with time, but, surprisingly, speeds up during cooking (see sidebar).
There are several techniques that you can use to bring the benefits of salt to meat: Wet brining, marinating, dry brining, and injecting. This page will focus on wet brining. Click the links below for more on the other techniques.
Wet brining. Somewhere back in time, a primordial hunter felled a dear and it tumbled off a cliff into the ocean. By the time he and his buddies clambered down to the beach and pulled the waterlogged carcass up on shore it had soaked in the seawater, a brine about 4% salt, for several hours. They butchered it and schlepped the salted meat back to the camp where the women waited with a wood fire smoldering (yes, the first pitmasters were women). Dinner that night was memorable.
You can replicate the process by following the wet brine recipes here. But I’ve gotta tell you, I no longer wet brine anything. It is a lot of work, a waste of ingredients, and it just dilutes the meat flavor.
Marinating. Another solution (get it?) is to soak the meat in a flavorful marinade. Add salt to your marinade, and you have a brinerade. Read my article on marinades for more on the subject.
Dry brining. I prefer dry brining to wet brining. Dry brining is simply sprinkling dry salt on the meat in advance of cooking. The salt absorbs moisture from the meat which dissolves the salt (NaCl) into sodium (Na) and chloride (Cl) ions. They then penetrate the meat and work their way towards the center.
The good news is you know exactly how much salt was added and diffused into the meat, it requires less space, and uses much less salt. This is a matter of guess work in a wet brine. The bad news is that it is hard to be sure the salt got into every nook and cranny uniformly. A problem with a turkey, less of an issue on a steak. Read my article on dry brining for more on the subject.
Rubs. Another form of dry brining is to apply a spice rub and salt a few hours before cooking or even a day in advance. It is a good strategy to work the rubs under the skin of chicken and turkey.
Injecting. Another effective method is to inject meats with brine, broth, even butter, or another flavorful fluid. If you do it right, you can add moisture and flavor. If you do it wrong your meat tastes totally weird, or you get pockets of liquid and hunks of dry meat.

Commercial meat packers inject brines into turkey, chicken, fish, and pork with rows of tiny needles like the ones at right from a Ruhl Brine Injector. These systems drive the brine deep, there is no waste, and it is fast.
Nowadays it is getting hard to find chicken or turkey that has not been pumped up with a brine. Injection is faster than soaking in a brine and also means processors can inflate the weight by 10% or so and charge the same for salt water as they do for muscle. Meat that is labeled “enhanced” or “flavor enhanced” or “self-basting” or “basted” has been injected with a salt solution at the packing plant. Kosher meat has also been treated with salt at the plant. Do not brine these meats. You risk making them too salty.
Injecting has become omnipresent on the barbecue competition circuit. Almost everyone does it. Read my article on injecting for more on the subject.
Brining vs. pickling vs. curing
There are two other variations on the theme of brining: Pickling and curing.
Pickling is a brine that is higher concentration and it is strong enough that it can discourage microbial growth and preserve the food. Pickling brines often include sugar, spices, vinegar, and the soak can last for a wek or more because it can take that long for some of the larger molecules to dissolve and enter the meat. Obvious examples are pickled cucumbers. Click here to read more about pickling and the different types of pickles.
Curing is a high concentration brine for meats that usually includes a salt with nitrites. Nitrites are effective in killing the stubborn botulism bacterium. Like pickling, curing often lasts days, even weeks, and can include sugar and spice and everything nice. Curing can be done wet, with the salt dissolved in water, or dry, just applied to the surface. Because the salt content is so high dry curing can dehydrate the meat. A classic example is bacon or corned beef. Click here to learn more about nitrites and nitrates.
Busting a myth: Osmosis plays little role in the process
Almost all the cookbooks tell us that salt is pulled out of the brine and into the meat by osmosis, a well known phenomenon we all learned about in high school when we were not napping and passing notes. Osmosis plays a role, says the AmazingRibs.com science advisor Prof. Greg Blonder, but it is of far less importance than another process, diffusion.

Meat cells are encased by membranes that are semi-permeable. Salt gets into the meat simply by going through wide open pores, sliced muscle fibers, capillaries, intracellular myowater and other channels which allow the saline solution to march inward.
Now that doesn’t mean there is no osmosis at work at all, says Blonder. “In the early stages of brining, water does come to the surface to dilute the salt, and salt ions do leapfrog from cell membrane to cell membrane. Inside the cell they encounter water and other large molecules, and the fluids are already about 0.1% salt. The larger molecules can’t leave through the cell wall so as the salt enters the internal pressure rises like a balloon. Eventually, the osmotic pressure gets so high the salt ions are either pushed back out as fast as they enter, or the cell ruptures. In other words, the amount of osmosis is small and osmotic pressure sometimes opposes the diffusive motion of ions from the surface into the meat.”
Blonder can only speculate why conventional wisdom says that osmotic pressure is the driving force. “Perhaps this is because because the word ‘pressure’ sounds, well, so forceful compared to random, aimless diffusion.”
For more technical discussion on the topic, read Blonder’s article on brines on his website. For more on osmosis, click this link to down a PDF that explains it in detail how osmosis can be used in cooking and preserving food.
A revelation: Brines don’t go far until heated
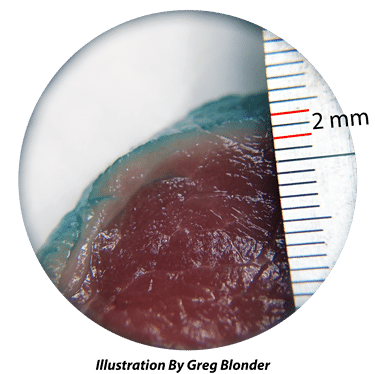
Research by the AmazingRibs.com science advisor Prof. Greg Blonder on brines is fascinating. He took a pork loin about 3″ (7.5cm) in diameter and submerged it in a strong brine, colored it with a dye, and refrigerated it for an hour. As you can see, the brine penetrated only 2 mm, a bit more than 1/16″. It didn’t pull the larger dye molecules past the surface. And the weight of the meat increased very little. His tests of less concentrated brines produced even less penetration and weight gain.
So then he decided to see how penetration would be impacted by time using a milder brine, like the type cooks use. So he took a 12″ (30.5cm) long section of pork loin and soaked it in a 6% brine for 24 hours in the fridge. Periodically he lopped off a cross section and treated it with an indicator. detects the Cl part of NaCl. Here’s how far the salt penetrated:
30 minutes: 3-4 mm (just more than 1/10″)
1 hour: 5-6 mm (just under 1/4″)
2 hours: 7 mm (just over 1/4″)
4 hours: 10 mm (2/5″)
8 hours: 13 mm (1/2″)
24 hours: 17 mm (2/3″)
That’s right, after 24 hours the salt still hadn’t traveled 1″ (2.5cm) deep in the pork. Now that actual penetration can vary on different meats. Chicken is more porous and it will probably penetrate further, and fish more porous still. But you get the picture. When you brine, the salt remains pretty close to the surface, and this is good because it binds water and helps combat overcooking in the zone that overcooks most easily.
Another revelation: Brines penetrate during low temp cooking
He then took a pork loin and rubbed it with a high concentration of a curing salt, a salt with an additive that would react with a chemical he put on some coffee filters. It sat for an hour in the fridge. He washed it off and cooked it at 230°F (110°C). When the internal temp hit 100°F (37.8°C) he cut off a slice, applied the filter paper, and you can see the result below, a nice thin pink kiss. As the internal temp rose, you can see that the salt migrated further and further inward, far faster than it does when simply soaking in brine, forming thicker kisses.
“Brine diffusion is an exponential process with the most dramatic movement early on. This is why a 30 minute soak is nearly as effective as a two hour soak. More penetration takes place during cooking than during the brining process because the heat excites the sodium chloride ions,” says the scientist.

What to wet brine
Wet brining works best on salmon, chicken breasts, turkey breasts, and pork loin chops. Chicken thighs, turkey thighs, other cuts of pork, and white flaky fish usually are moist enough from fat that they don’t need wet brines. I never wet brine red meats unless I am making corned beef. The added water tends to dilute their rich flavor. And beware, wet brines can make poultry skin soggy and harder to crisp.
Lately I dry brine almost all my meats including all my steaks and chops, both beef and lamb, as well as many veggies. They almost all can benefit from the flavor boost and water retaining properties of salt. And dry brining helps poultry skin crisp while wet brining softens it. Dry brining is as simple as putting salt on the food and tossing it in the fridge for an hour or so.
Beware of skin and fat caps
Wet brining is a good method, but keep in mind, chicken and turkey skin is more than half fat, loosely attached to the meat, and a semipermeable barrier that blocks some but not all salt penetration at first. Blonder says that “When you brine a skin-on poultry, little moisture or salt makes it past the skin into the meat because it is high in fat. But, the skin will absorb salt, and in the oven, release the salt into the meat”. See the sidebar “Another revelation: Brines penetrate during low temp cooking” for more on this fascinating mechanism.
Some other meats have a fat cap which is thick enough to block salt penetration. If there is skin or fat cap, the wet brine will enter and penetrate the non-skin side more easily.
Beware of double salt jeopardy
Rubs and spice blends are a great way to add flavor to meat. But rubs almost always contain salt because it amps up flavor and helps form a crust. You can use a rub on home-brined or factory-brined meats, but beware of double salt jeopardy. A salty rub on top of brined meat can make it unbearably salty. If you use brined meat or kosher meat and then a rub, you should make your own rub and leave the salt out of the blend. That’s why I leave salt out of several of my rub recipes like Simon & Garfunkel Rub which is formulated for for chicken and turkey. This way you can dry or wet brine and use the rub without over salting.
Also, remember that the drippings from a brined meat will be slightly salty, so if you make a gravy from drippings, be sure to taste before you add salt. Remember, you can always add salt, but you can’t take it away.
Making a wet brine
Most wet brines are 5 to 10% salt by weight. The typical cookbook brine recipe calls for 1 cup of table salt to 1 gallon of water for a 7.7% brine by weight.
The problem is that there are different types of salt: Table salt, kosher salt, pickling salt, sea salt, etc. Some experts recommend you not make a brine from table salt because it has small quantities of other compounds such as iodine mixed in, but I think too much is made of this. I can’t tell the difference in taste in the cooked food and the iodine is said to be needed by humans. So I say good old table salt will do.
But the size and shape of the grains is different for each type which means the air spaces between each grain is different which means that the actual amount of salt by weight can vary drastically from one type to another if you measure by volume. For example, one tablespoon of table salt has almost twice as much NaCl as one tablespoon of kosher salt.
Furthermore, if you mix a cup of water (236.6mL) with a cup of table salt (292g), you don’t get two cups because of the air in the salt. You get more like 1.75 cups (414mL). If you use Morton’s kosher salt you get more like 1.5 cups (355mL) because there is more air. Read my article on the Science of Salt for more info about different salts.

But a pound of any of these salts contains the same amount of NaCl. For that reason, salt is best measured by weight, not volume. When you are making a brine, go by weight and you’ll never go wrong. At this juncture, permit me to recommend my favorite new toy, the OXO Good Grips Scale with Pull-Out Display. It is also valuable for measuring flour, sugar, chopped onions, and other foods which also have the problem of airspaces that make it difficult to measure by volume.
My brine recipe
This is my standard simple all purpose brine for everything except salmon. For salmon I have a different recipe. I know all the cookbooks and websites throw all kind of goodies in their brines, like apple juice, pepper, garlic, and more. But even if you soak pork, poultry, or other meats overnight very few of these large molecules get past the surface. A few may stick to the exterior, but all the rest go down the drain when you are done (the exception being seafood). It is far more efficient, and cheaper, to sprinkle seasonings on the surface of meat than to soak the meat in a dilute solution.
Try this experiment: Stir 1 tablespoon each of garlic powder and black pepper in a cup of hot water and let it sit for 30 minutes. Then pour it through a coffee filter, you get a dark potent liquid, but if you dry out the residue in the filter you discover that about 2/3 of the original weight is left behind. In other words, only about 1/3 dissolves. The rest is wasted. A colossal waste when you consider that a gallon of amped up brine can have three or four tablespoons each of salt and pepper. Instead, when the meat comes out of the brine, sprinkle a little salt and garlic on the surface and away you go. If you want apple juice flavor in your turkey (why, I don’t know), then inject it. Now that is effective and efficient. If you want garlic, sprinkle it on the surface. Same effect.
Recipes that use fruit juice, wine, beer, or even soft drinks instead of water, have a potentially hazardous side effect: Acidity. Acid can make your meat mushy, especially if you leave the meat in it for long.
So we recommend a really simple brine: Salt and water. That’s all you need to get juicier, tastier meat.
In general you want the total wet brine to weigh at least two to three times the weight of the meat so there is enough salt to do the job. This means that if you have 1 pound (453.6g) of meat you should make 2 to 3 pounds 907.2g to 1.4kg) of brine. A pound (453.6g) of water is about 2 cups (473.2mL). So if you have 1 pound (453.6g) of meat, you need 4 to 6 cups (946.4 to 1.42mL) of wet brine.
Blonder realized that one of the problems in making a wet brine is that all recipes must specify which kind of salt you must use. But if the recipe calls for Kosher salt and you only have table salt, you need to use a conversion table because kosher salt is made of flaky crystals and 1 tablespoon contains about half the salt as a tablespoon of table salt.
1 cup (288g) Morton’s table salt = 1.8 cups (518.4g) Morton’s Kosher Salt
Substitute one for the other without converting properly and you could badly oversalt your food. It gets weirder because different brands of salt have different volumes.
But Blonder knows that a pound (453.6g) of salt, regardless of type, regardless of volume, contains the same amount of sodium chloride. So if you don’t own an accurate scale, here’s a foolproof method he devised using Archimedes’ Principle of displacement:
Add one cup (236.6mL) of hot water to a two cup (~500mL) measuring cup. Then pour in salt, any salt, until the water line reaches 1.5 cups (355mL). That will be about 1/2 pound (226.8g) of salt by weight. “You’ll end up pouring in nearly two cups (~1kg) of Morton’s kosher salt — it seems like it will never end — but once it enters the measuring cup, the water infiltrates the voids between the grains of salt, and compensates for the lower density” he says. “Then dump this slurry into a gallon of cold water and away you go. Easy to remember. Impossible to screw up.” This recipe results in a 6.4% brine.

The Simple Blonder Brine (6.4%) Recipe
Rate this RecipeIngredients
Method
- Prep. Add one cup of hot water to a two cup (~500mL) measuring cup. Then pour in salt, any salt, until the water line reaches 1.5 cups. (355mL). The water will swallow up almost exactly 1/2 pound(226.8g) regardless of whether you use table salt, kosher salt, pickling salt, or sea salt.
- Pour the slurry into a very clean non-reactive container large enough to hold the meat and 1 gallon (3.8L) of water. Then add the sugar. Chose your container carefully. It needs to be food grade, large enough to hold the meat and the brine with the meat submerged, and it cannot be made of aluminum, copper, or cast iron, all of which can react with the salt. Do not use garbage bags or a garbage can or a bucket from Home Depot. They are not food grade. Do not use a styrofoam cooler. It might give the meat an off flavor and you'll never get the cooler clean when you're done.
- Zipper bags work fine. For large cuts get Reynolds Brining Bags, Ziploc XL, and XXL bags. If you brine in a zipper bag, periodically grab the bag and squish things around and flip the meat so the brine can get in from all sides. Place the bag in a roasting pan to catch leaks. You can also use bowls, pots, and Tupperware.
- A 5 gallon (19L) drink cooler will handle turkeys and whole raw hams. If the cooler is larger, you may need to scale up the brine recipe to make sure the meat is submerged.
- The beauty of using a cooler is that you don’t need to put it in the fridge. To keep the brine and the meat safe, toss in a gallon zipper bag filled with ice. Or two. The bags should be tight so that when the ice melts it doesn’t dilute the brine. Don’t use bags of ice from the store because they often have holes and leak and they are dirty. People often walk on them in the factory and on the delivery truck (I know, I worked in and ice factory in college – best job in Gainesville, FL).
- Another option is to fill a quart (950mL) juice or soda bottle with water and freeze it. Then screw on the cap. Wait until after the bottle has frozen because water expands when it freezes and it can blow off the cap. Wash off the outside of the bottle thoroughly and toss it in the brine.
- Brining. Submerge the meat in the brine and refrigerate. Keep the brine under 40°F (4.4°C), adding more ice when necessary. If you can see unmelted ice, it is probably below 40°F (4.4°C). You may need to weight the meat down to submerge it. If you cannot submerge it, make sure you turn it periodically and extend it's time in the bath. All you need is 1 to 2 hours for meats 2" (5cm) thick or less. For a piece of meat 3". (7.5cm) thick or more, go 8 to 24 hours. Brine turkeys breast side down. Move the bird around and get the air bubble out of the cavity. Most of the brine will enter the meat through the cavity, since the skin is like a water-resistant jacket. But keep in mind, brines move very slowly at refrigerator temp. When you cook, they move fast if you cook low and slow.
- Prepare to cook. When it is time to cook, remove the meat, rinse with cold water to wash excess salt off the surface, and thoroughly pat dry with paper towels. Patting dry is important or the surface might steam and not brown properly.
- Shortcut: Use metrics to make brinesMaking brines is easiest using metrics and a scale.1 liter = 1000 gm = 1 kilogram6% brine: 1 liter water with 60 grams any salt (easy to scale up or down)4% brine: 1 liter water with 40 grams any salt (easy to scale up or down) Wet brine meat in a ratio of 2.5 parts brine to 1 part meat. So for a 3 pound chicken (about 1.4 kg) use 3.5 kg of a brine or: 1/2" (1.3cm) thick meat should be brined for about 1/2 hour in the refrigerator 1" (2.5cm) thick meat should be brined for about 1 hour in the refrigerator 2" (5cm) thick meat should be brined for about 4 hours in the refrigerator 3" (7.5cm) thick meat should be brined for about 12 hours in the refrigerator


Why We Require You To Sign In Before You Can Post Comments
Before you can post a comment or question you must sign into our commenting partner, Disqus. This is helps make sure everyone hanging around the grill is civil. We do not tolerate nastiness, racism, porn, inappropriate language, or attacks on others. All comments are the property of AmazingRibs.com and we reserve the right to quote them, edit them, delete them, and block people from making future comments.
Please leave comments and questions on the page devoted to the same subject so others can see them and our answers when they are reading about that subject. You must enable JavaScript to use the comments section, and you must accept cookies to post comments. Note that the software that runs Disqus is different from the Pitmaster Club so members need to sign into that separately.
Moderators