


Don’t Be A Victim of Barbecue Fubar
A few years ago, we ran a contest called Barbecue Fubar. Fans of AmazingRibs.com sent in pictures and stories of their worst barbecue disasters. The pictures were hilarious!
We called the contest Barbecue Fubar after the WWII term that means “F***ed Up Beyond All Recognition” because, when you’re playing with fire outside, lots can go wrong. A few common themes emerged. And we thought, let’s save a few dinners and singed eyebrows by putting together a simple list of dos and don’ts.

Ditch The Lighter Fluid
We’ve all been to a cookout where the grill master drenches the charcoal in lighter fluid, squeezing every last drop from the bottle before igniting a mini bonfire. These petroleum solvents do get the fire going, but they also splash all over the grill and soak into charcoal, leaving behind an unpleasant odor that smells like a gas tank. And that eau de fuel eventually finds its way to the food. Yuk. Instead, we think charcoal chimneys such as this one from Weber are the best way to start a charcoal fire. The chimney is just a tube with upper and lower compartments. You stuff newspaper into the bottom, add charcoal to the top, then light the paper, and after about 10 minutes, the coals are lit. Put on a glove, grab the handle and give a shake so the unlit coals on top will turn over. In another 5 minutes or so, all the coals are glowing hot and ready to use. And they smell great!

Never Run Out Of Gas
All too often gas grill owners fire up the grill without checking how much gas is in the tank. While they often win this game of grilling roulette, imagine the frustration when the grill shuts down minutes after the steaks hit the grates! We’ve been there! Before your next grill session, make sure you have enough gas to finish the job. You can buy all sorts of gas grill gauges, but we like this no-cost trick: Get a cup or two of really hot water. Pour it over the side of the tank, then run your palm over the tank from top to bottom. The metal will feel hot at the top, where the tank is empty, and cooler toward the bottom, where it’s full of propane. You’ll also see condensation form where there is propane, showing you the propane level in a line between empty and full. Easy peasy.

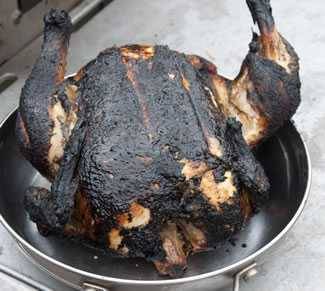
Maybe You Don’t Need A Blazing Inferno
The guests have arrived, and it’s time to get the grill going. All too often that means building a massive charcoal fire or turning all the gas burners to high and getting the grill as hot as humanly possible. OK, we’re pyromaniacs, too, and we’ll admit that an extra hot grill is perfect for certain dishes such as searing a steak. But it’s also the reason why so many grill parties feature platters full of overcooked, burnt food. Grilled food isn’t burnt food. It’s beautifully browned, caramelized morsels of deliciousness. Instead of setting the grill ablaze, set up a 2-zone fire by placing the majority of coals on one side of the grill, thereby allowing you to move food to the cooler side if it’s cooking too quickly. On a gas grill, just light the burners on one side only, and the leave the others off. When you put the lid down, this technique allows you to grill big roasts like a whole turkey without it burning on the outside before the inside is properly cooked. Click here to find out more about controlling heat and smoke with a 2-zone setup.

Skip the Soak
Woods like cherry, hickory, apple, and pecan are a great way to add smoke flavor to meat, fish, and other food cooked on the grill. Yet, as popular as they are, so too is the belief that the wood should be soaked prior to adding it to the grill. Supposedly it helps you get more smoke out of the wood. Poppycock. You won’t get any smoke at all until the wood starts burning, and that won’t happen until the water evaporates. All soaking does is make you have to wait longer for the flavorful smoke you’re looking for (and you have to wait for the wood to soak in the first place). What’s worse, soaking doesn’t even result in much water penetration, as revealed in our tests (see the photo). A better strategy? Use wood chunks and place them near the cooler edge of the coals or over a burner set to low so the wood will smolder longer.

Tame The Flames
Flare-ups happen. Fats melt and drip into the fire and, poof! You get a flare-up. It’s not uncommon to see grill masters reach for a spray bottle of water to douse the flames. But that doesn’t usually work because the water just spreads out the burning fat, causing a wider area of flames. And on a charcoal grill a spritz of water also stirs up clouds of ash that rise up, land on your food, and make your burgers taste like an ashtray. There is a simple solution. Fire is oxidation. Without oxygen, a fire dies. So smother it. Use the grill lid and vents to cut off the oxygen flow and tame the flames.

Use A Thermometer
You’ve procured the most delicious looking steaks from the butcher, seasoned them just right, and then taken to the grill to cook them to perfection. Toward the end of cooking, you cut in to them to “check for doneness.” Not only does cutting into a steak (or chicken for that matter) release tasty juices from the meat, it also makes for a less-than-perfect presentation due to the big old slice you’ve made. And you can’t really go by color. Some young bone-in chicken meat can appear pink near the bone even when the meat is cooked to a safe temperature. Don’t mess around here. Take the sure bet on this one. Invest in a good digital instant read thermometer such as the Thermapen from ThermoWorks. This is the kind of thermometer that most pro chefs keep right in their pockets and use regularly. There is absolutely no shame in checking for proper doneness with a thermometer. Beats a lawsuit or a trip to the emergency room due to undercooked chicken!

Sauce At The End
At backyard cookouts, grill jockeys often stick to the belief that it’s best to sauce meat early and often. Yes, barbecue sauces add that sticky sweet element we all love on grilled chicken, pork, and beef. But they also contain loads of sugar that cause them to quickly burn over direct heat. That’s why we don’t advocate marinating in barbecue sauce. We greatly prefer brining to marinating. And we only apply barbecue sauce near the very end of cooking. Brush the top side of the meat with sauce, cover the grill, and allow the sauce to set for approximately 5 minutes. Flip the meat and repeat before removing it from the grill and serving. That’s how you get a perfectly caramelized and glistening glaze on BBQ ribs.
 Sign up for a free trial of the AmazingRibs.com Pitmaster Club and experience everything that the world's largest membership-based BBQ and grilling community has to offer!
Before you can post a comment or question you must sign into our commenting partner, Disqus. This helps make sure everyone hanging around the grill is civil. We do not tolerate nastiness, racism, porn, inappropriate language, or attacks on others. All comments are the property of AmazingRibs.com and we reserve the right to quote them, edit them, delete them, and block people from making future comments.
Please leave comments and questions on the same page that is devoted to that subject so others can see questions and our answers when they are reading about the subject. You must enable JavaScript to use the comments section, and you must accept cookies to post comments. Note: the software that runs Disqus is different from the Pitmaster Club, so members need to sign into the Pitmaster Club separately.