
People love sharing photos of their food but getting the perfect shot like the pros do can be a real challenge. Until now!
I am always hesitant to cook a recipe without a picture. A picture tells me what it looks like and provides evidence the author actually tested the recipe!
I am often asked, especially by food bloggers, about my food photography since I shot almost all the food and travel shots on this site, and almost all 400 photos in my book. I have an advantage. I actually have a Masters in Fine Arts from the School of the Art Institute of Chicago and I have been mentored by some greats such as Jerry N. Uelsmann, John Paul Caponigro, Harold Ross, and Dave Black.
My style for the site and the last book was pretty simple and uncomplicated. I practice food verite. I didn’t do any fancy food styling. That’s because I wanted you to see what the recipe actually looks like and because I didn’t have the time or the expertise. Besides, I’m not making photos for an ad designed to make you buy something. That means the grill marks come from the grill, not a hot electric wand in my studio. I do a recipe, shoot it, serve it to my team or my wife, and we discuss it. So my motto is shoot fast and eat the model. And that’s the way most food bloggers work.
I am working on another book now titled “The Meathead Method: Barbecue And Grilling Science Meets Culinary Art.” Notice the last word. So for this I have amped up my game. I am using a technique called lightpainting. These images are shot in the dark with small hand-held lights and multiple images are sandwiched in Photoshop. Each image takes hours. The results are quite striking. Here’s a sneak peak. Watch the video. This is not for the average cook, but I am very proud of them and I wanted to share. More on how I do lightpainting below.
But first, let’s go back to basics and talk about normal food photography for bloggers and authors. I’ll start by discussing the different types of food photography. Then some tips, then some technical stuff about aperture, shutter speed, depth of field etc, then my tools.
Types of food photography
- Foodporn. People gobble up pictures of beautiful food. They love looking at food they cannot make at home, like looking at the bodies of models and athletes they cannot have at home. Alas, most foodporn is like real porn, low production values. Most are bad pictures of fabulous dishes on food blogs and message boards, often shot in a restaurant, often taken by a cheap point-and-shoot digital camera with head-on flash, usually annoying everyone in the dining room. Sadly foodpron also appears on many restaurant websites.
- Food sculpture. These are the photos that appear in ads, on packaging, menus, and some cookbooks and magazines, often created from non-edible products to look super realistic. Photographers spend hours on a shot with the help of food stylists, prop stylists, art directors, and assistants. They use chemicals, paint, and non-edible products to get the effects they want.
- Food verite. Thankfully these pix are becoming more popular, especially in cookbooks and magazines. They are carefully arranged, lit, and composed, but the food is real. They may spritz some water or oil here and there, but everything is real. We look, and we drool on our keyboards like voyeurs watching our beautiful neighbors in the hot tub. This is what I try to do on AmazingRibs.com.
I have come to realize that food photography is the craft’s most difficult discipline and, although I am climbing the learning curve rapidly, I am still an intermediate. Why do I call food photography the hardest photography? Because the line between appetizing and disgusting is very very fine. Especially when it comes to red meat. Think of those snapshots of rare beef, duck breasts, or lamb, where the meat is purple and slimy looking. Getting it to look mouthwatering is the whole trick.
Tips for shooting food
- Love food. If you love it, your love will show.
- Carry a camera everywhere. I don’t lug my backpack fully loaded with me when I run errands or go out to dinner, so I carry an iPhone.
- Learn your camera. Modern digital cameras have a lot of bells and whistles. Read the manual and experiment until you have mastered the different settings and controls.
- Shoot a lot. Shoot several times from several angles and distances. That killer shot will surely have a fly on it when you look at it up close, so have backup shots.
- Have a big storage chip on your shoulder. The memory cards that come with cameras are almost always too small to hold more than a few dozen high resolution images. Buy a bigger one. Buy more capacity than you think you’ll ever need. These chips are relatively inexpensive, and you don’t want to have to stop what you are doing to go back and delete images.
- Carry spare batteries. Nothing is more aggravating than a battery going dead in the middle of a shoot.
- Don’t use auto mode. In auto mode, the camera makes all the choices. If you switch to P (program) mode, it is almost the same as auto, but you can override the settings in order to let in more light or to improve depth of field.
- Use natural light or available light whenever possible. When shooting outdoors, bright sun is usually too bright. It casts harsh shadows. The best light outdoors is open shade. Open the umbrella on the picnic table to get open shade.
- Avoid using built-in flash whenever possible. It casts harsh shadows, makes ugly reflections, and flattens contour. If you are going to shoot a meal in a restaurant, go for lunch and get a window seat.
- To shoot without flash you usually need to use a higher ISO setting. But beware, the higher you go in ISO, the grainier or “noisier” the image. Noise is not a big problem when viewed on a computer screen, but it can show up in prints. If you are shooting in bright light, set the ISO for 100 to 400. If you are shooting in low light, set the ISO for 400 or more.
- Consider buying another flash. If your camera has a flash shoe, use a flash that you can bounce off the ceiling or walls. This light is much softer and prettier. Modern flashes are mini computers. They can think for you.
- If you are shooting in a restaurant, don’t be a jerk. Respect your dining companions and the people sitting around you. That means one burst of light is all you get. Make it count. Better still, skip the flash and use a mini tripod or use your water glass, a wall, or a chair back as a tripod.
- Use a tripod at home. Away from home, carry a pocket tripod so you don’t have to use flash.
- If you are not using a tripod, pull your elbows in to your side, breathe gently, exhale, press the shutter gently, and hold steady until the picture is shot.
- Study the pros. Look at the pix in food mags and try to figure out where the light is coming from and how the lighting was done. You’ll notice that most of the best pix, the light comes from behind the food or over its shoulder, not overhead or in front.
- Trust your camera’s auto white balance. White balancing is like putting a filter on the lens because there are different colors of light. Incandescent bulbs are yellow or orange and give everything a warm hue. Fluorescents are green to blue. They make people look sickly and food looks yucky. Most modern digital cameras can figure this out and compensate. If you need to you can often adjust the white balance later, especially if you shoot in RAW mode.
- If your camera has it, shoot in RAW mode. It captures more info and allows you to adjust white balance and exposure later. Otherwise shoot the highest resolution you can. You can always make it smaller, but not larger.
- Get a photo editing program. Photoshop is the industry standard, but there are others that will allow you to crop, shift the color balance, sharpen foregrounds and blur backgrounds, and remove crumbs. Adobe Lightroom is a less expensive and very powerful option. iPhoto is free on new Macs and it is remarkably good.
- Shoot fast before sauces get opaque and fresh greens droop.
- Move in tight to shoot, but not too tight. Leave room around the subject. In the computer, crop tight. Really tight. Make the food look huge.
- Step back a bit and zoom the lens in. That flattens the image and gives you greater depth of field.
- Get the object closest to you in focus. If the background blurs, that’s usually OK.
- Make it sparkle to convey the impression the food is moist. Move the lights or put up reflectors made of white cardboard, called bounce cards, to make little white reflections called specular highlights. Keep a spritzer bottle of water in the studio to add moisture if the food begins to dry out.
- Shoot fast while the food has life. As it cools and dries out it gets dull.
- Move the lights in close. When the light is close to the subject it is actually softer than when it is far away, like the sun. Far away light casts harder shadows. I know this is counterintuitive, but it’s true.
- Open up the shadows. Try to illuminate dark shadows with a bounce card to throw some light into the shadows. A bounce card is just a piece of white cardboard that you place on the dark side of the food to bounce light into the shadows.
- Paint your kitchen and dining room ceilings white so you can bounce flash off them. Red walls will add a red cast to the food.
- See things in 2 dimensions. Previsualize and think about how the composition will look. Move things around if necessary.
- Asymmetry looks better than symmetry. Don’t just put everything in the center of the plate or the center of the image.
- Beware of details such as drips and splatters on the plate or lipstick on wine glasses.
- Edit ruthlessly. Find the one best shot. Not three. Be ruthless. Save the best, trash the rest. This goes for family shots. You don’t have to upload everything you shot to Flickr. Nobody wants to see 10 shots of the birthday cake.
- Use the tulip. Most point and shoot cameras have a close-up or macro mode. It’s usually a little tulip icon. You need it for shooting in close because other modes don’t focus up close. Read your manual and find out how close you can get before switching to macro. It’s usually 12-18″.
- Watch out for the background. Learn to look at everything in the viewfinder, not just the main subject. Get rid of distractions in the background and include things that tell the story. “Previsualize” the final image.
- It doesn’t have to be perfect. Sometimes spatters, splashes, mishapen pieces make it look real. Don’t over-style.
- Make backups of your work and keep a copy off premises in case of a fire or flood. Download images to your computer and use one of the many backup services to make a copy off premises in the cloud. If you are in a hotel, download before bed and make sure Carbonite backs up overnight.
- Keep shooting until you drool!
Photography basics: About aperture, shutter speed, and ISO
On a digital camera, in program or manual modes, you can control important variables, like the aperture, shutter speed and the ISO settings. These three settings work together to give you control of the outcome and learning how they work is important.
Your camera has a digital sensor that captures the image. It is like digital “film”. Think of the sensor in your camera as a bucket. To get the right exposure, not too much light or too little, you need to fill the bucket to the rim but not over or under.

Aperture is the size of the hose. The aperture is like a peephole that controls how much light gets from the lens to your sensor. The smaller the hole, the longer it will take to make the proper exposure. It’s like flling the bucket with water. The smaller the hose, the longer it takes to fill the bucket. Why does this matter? Because the smaller the hole, the greater the depth of field or depth of focus.
This means that with a smaller hole more of the picture will be in focus. If the hole is larger, only a thin slice of the world in front of you will be in focus. You can use this to your advantage. Sometimes you want the background out of focus, sometimes you don’t. The larger the number, the smaller the aperture. So 11 is a smaller hole than 4. That’s because the numbers for aperture is just the lower number of a fraction, the denominator. So 1/11 is smaller than 1/4.

Shutter speed is the spigot. Your camera has a shutter between the lens and the sensor that opens and closes to control how much light is admitted. It is like a spigot. You open and close it for a precise time to fill the bucket but not overflow it. If you shoot at slower than 1/60 of a second, an eyeblink can blur, and there is a greater chance that you or the subject will move and be blurred. You want fast shutter speeds to capture motion, like a pancake flipping in the air.
Like the aperture number, the shutter speed number is the denominator of a fraction. A shutter speed of 100 is really 1/100 of a second. So the larger the number, the faster the shutter speed: 1000 means the shutter will be open only 1/10 the time of 100. Aperture and shutter speed work together. If you close the aperture to get more depth of field (use a smaller hose), you will need a longer shutter speed (longer spigot opening) to fill the bucket. If you make the aperture larger, you need to reduce the shutter speed or the bucket will overflow.
ISO. There is a third variable in this relationship, the ISO or the sensitivity setting of the sensor as measured by the International Standards Organization (ISO). By using a higher ISO, you are making the sensor more sensitive to light. That’s like using a smaller bucket. An ISO of 800 is more sensitive than an ISO of 200. The tradeoff is that the “faster” the ISO, the more sensitive the setting (the higher the number), the sensor sometimes struggles to get the job done and the image might be “grainy” or show tiny pixels of the wrong color.
My setup
The answer, as with anything photographic, begins with light. Remember the word photograph comes from Greek words meaning light (photo) and drawing (graph). Below is a description of my setup and gear.
Alas, they never taught me studio lighting when I was getting my Master of Arts degree, so I had to teach myself. Books came in handy, and some of my faves are on this page below. I promptly figured out that any light from the built-in flash is just plain awful. Horrible. The worst.
The biggest problems are light placement and color balance. Strobes are the industry standard because they pump out a lot of perfectly balanced light and they don’t melt chocolate and ice cream. The problem with stobes is that it is really hard to visualize what the light will look like. Poof and the light is gone. Continuous light bulbs are so much easier to work with, but incandescents get too hot and are too yellow.
At first I chose not to invest in big studio strobes and used small portable strobes that I could also use in the field. Since I’ve used Nikon single lens reflex (SLR) cameras for 30 years, when Nikon introduced its SB-800 strobes, I went out an bought three immediately. These are amazing devices that can be fired wireless from their high end digital cameras. But they were still tricky to use in the studio to get exactly the right light (I laughingly call my basement my studio). I have since added one of the newer model, an SB-900.
In 2008 Scott Kelby turned his readers on to the Westcott Spiderlite 5. It has changed my life. The reason: It uses special Compact Fluorescent (CFL) light bulbs that are beautifully balanced at 5500 kelvin (that’s the color of the light) and exude an elegant soft light that wraps around the food and caresses it lovingly. No more guessing what the light will look like. It’s WYSIWYG.
Nowadays my main camera is a Nikon digital single lens reflex (SLR). I often attach the camera to a computer with a USB cable and download immediately in order to view the image on a real monitor. That’s a lot better than viewing the image on the camera back. When I’ve got what I want, I eat the model.
For shooting in my kitchen or dining room, on my grill deck, on location, or on road trips, I typically use my camera with a Nikon flash fitted with a pocket size softbox. I can hold the flash in my left hand and shoot with my right. Or I can set it on a table and walk away. It talks to the camera without wires. Great light, quick and easy.

In my camera bag
Here are the products I use and recommend. I have been a Nikon man since 1967 so don’t tell me about your Canon, OK? I know it’s a fine camera. But I like Nikons, Macs, ribeyes medium rare, Miracle Whip, vanilla ice cream, and ribs with only one layer of sauce. No need to make a religious argument out of this, OK?
I am serious about my photos, and I am into gadgets, so you may call my toolbox overkill. You can do very well with less.

Nikon D750. This has been my main camera for several years. It is full frame equivalent to a 35 mm film SLR (called FX) with 24-85 mm f/3.5-4.5 Nikkor Lens. This is not a top of the line digital SLR, and yes, I lust after one of Nikon’s fancier units, but this baby does everything I need and it costs a lot less money than the slightly more tricked out high-end Nikons. A key feature is that it can control my flash units with the pop-up flash but the pop-up flash does not illuminate the subject when an external flash is being used. I have a second D750 mounted to a tripod in my studio.
Nikon D600 This is my backup camera. I almost always carry a backup in case my main camera croaks or if I drop it.
Nikon 10.5mm f/2.8 DX Fisheye Nikkor Lens.I adore this lens. It is perfect for panoramas or interiors. But it doesn’t work on my D750 which is full frame, so I leave it mounted to my D600.
Nikon 70 to 300 mm f/4.5 to 5.6G Zoom Nikkor Lens. I rarely use this lens, but it’s good for sports and I like to shoot my friends’ and neighbors’ kids at play.
Nikon Micro Nikkor 105 mm 1:2.8 lens. This lens lets me get in very close to food to make it look mouthwatering.
Nikon SB-900 AF Speedlight Flash. The Nikon Creative Lighting System (CLS) is amazing. With my cameras I can control all three of my SB-900 flash units wireless (and more if I had them). You should get a good book or DVD on the CLS if you buy one of these. I use rechargeable NiMH batteries, and I carry a dozen fully charged. I use a Rayovac 1 hour speed charger.

LumiQuest ProMax SoftBox. These inexpensive plastic diffusers fold flat, fits in my back pocket, and takes little space in my bag. The greatly soften light from your flash. When I am in the field I typically put one of these on a flash and hold it in my left hand and use it as fill or a main light source. You usually cannot tell I am using artificial light.
Giottos Mini Compact Tabletop Tripod/Monopod with Ballhead.I always have a mini tripod with me to hold the camera steady in low light (any shot slower than 160 second), if I want to fire the camera from a distance, or to hold a flash. I even will rest it against my chest or a wall or a handrail with the camera at my eye. This one telescopes from 4 to 16″ and supports 11 pounds.
Kata KT DR-466 DPS Digital Rucksack with Laptop Compartment. This is the well-padded comfy backpack I carry. It has plenty of loops and is stitched well. The zippers can be locked with a small padlock I bought.
Apple iPhone. The iPhone has a high-quality point-and-shoot camera that’s with me wherever I go.
Beastgrip. The Beastgrip is a clever housing for a smartphone and I use it for a lot of my video work. I find it easier than my DSLR video. It fits iPhone and Android devices and has a handy mount for lenses, filters, lighting, microphone, and more. It is easily attached to a tripod (I have a Manfroto quick-release plate on mine) and you can even mount a DSLR lens. It is lightweight and easy to carry (I added a strap to mine). Click the link and get 10% off of your order.
In my office
Both my computer and monitor are on articulated arms because I work standing up.
Apple MacBook Pro Besides Apple’s legendary user-friendly operating system, think about this: There are no, zero, zip viruses in the wild on the Mac OS. OK, one or two relatively benign viruses have been created for bragging rights, but they were rapidly defeated. And Macs never, ever crash. Lots of RAM and no hard drive makes Photoshop happy.
NEC MultiSync PA 272W. My laptop is hooked up to this 27″ monitor. It weighs too much, but I guess that is needed to produce the spectacular color it does.
Apple Airport with Time Machine for backup on premise. This is my wireless router and it has a huge hard drive built in so my computer backs up every hour in the background. Sweet. I use an off-premise cloud backup too.
OWC Mercury Drives. I have several of OWCs drives and none has failed yet. I use some for image storage, and some for off-premise backup.
X-Rite Eye-One Display LT. Every now and then you need to adjust the color and contrast of your monitor and you cannot do it with the naked eye. This baby looks at the monitor and the software sends it flashing colors, and it makes appropriate adjustments.
Wacom Cintiq 16-inch. I finally broke down and bought a tablet for the new book. It lets me touchup and edit images with a pen rather than a mouse. It makes a huge difference when I want to erase backgrounds.
Epson Perfection 2400 Photo Scanner. Not a high end unit, but it’s good enough since I don’t need high quality prints.
In my studio
Westcott 48″ Softboxt with fluorescent lights, 10′ Lightstand, Carrying Case. Lovely soft light that wraps around the food. Make sure to get the 900w light kit. It is bright enough to allow you to stop down the lens and increase depth of field. Add a bounce card and you’re all set. Then again, it seems like softboxes with CFL bulbs are going away and being replaced by LEDs.
Lowel Pro Pak, Pro-Light Kit with 250 watt 3200k, Lightstand, Barn Doors, & Accessories. I use this hotlight occasionally when I need lots of light or for video.
Westcott Ice Light is like a Star Wars light saber. A straight tube CFL with 1,600 lumens at 5300k it is a wonder. Camera in right hand, Ice Light in left, and I can shoot anywhere. Move it in close to make it the main light source, move it back to make it a fill light. Move it up down, front back, Click click click, just rip off shots, each with different lighting. It’s not cheap, but it’s amazing. I keep it in the kitchen.
Manfrotto 3090 Super Boom with Stand. I use this rather than the light stand that came with the Spiderlite. It lets me fine tune the location of the light and with the crank I can change the angle of the light.
Manfrotto 055XWNB Aluminum Wilderness Tripod with Leg Protectors and Spiked Feet. Tripods are the cure to blurry photos. Get a solid one.
Manfrotto 222 Joystick Head. I love being able to control the camera angle with one hand rather than two knobs. Fits better in the carrying case, too.
Apple MacBook Pro. I hook the laptop to this big monitor and then I have two screens and with a cable connect to my DSLR. I use lightroom so I can press the shutter on the computer and view the picture on the big screen.
Software
Adobe Lightroom and Photoshop bundle. I use this Adobe suite of software. I download the images from my camera with Adobe Lightroom and convert them to Digital Negative (DNG) format. I do most color correction and editing in Lightroom. This software allows me to quickly sort and organize my images after a shoot. It allows me to hook my camera to a computer with a large monitor (called tethered shooting) so I can see what I am shooting in detail right now. Food photography is all about detail and selective focus and sometimes you just can’t see the detail through the viewfinder.
Viewing it on a big screen can save you from having to re-cook and re-shoot the next day because there’s a fly on the meat. Adobe Photoshop is the undisputed king of photo editing tools and I use it too. I’ve been using it for two decades and I still haven’t mastered it. Lately I have been able to do most of my editing in Adobe Lightroom, and it is a fine datgabase that makes organizing and storing images semi-easy.
Smugmug. This is the online service I use to display images to clients or family and friends. I think it kicks Flickr’s butt (and all the other services). Loaded with features a pro needs. Click the link to see how I use it.
KelbyOne.com. Scott Kelby and his team have created superb tutorials for photographers. The membership fee is worth it.
My studio lighting setup
These two images are typical of my standard studio (basement) shots with the Spiderlight 5 shown above and described at left. Click on the image to see an enlargement.
Single light. This is with the light above and at about 10:00. Pretty much a straight shot. Nice color and specular hilights. Click on the picture to see it larger.

Single light with bounce card. You can see from the shadow the light is to my left at about 8:00 and above. A white card at about 3:00 puts some light into the shadows. Click on the picture to see it larger.


My field lighting setup
Window light. Window light is often all you need, although if it is too bright it can leave the shade side a bit dark and without detail. In these circumstances it is important to bracket your exposures, take one at the settings your camera choses, and then you should chose a setting one f stop above, and one below. You will be surprised that sometimes one of the brackets is better than the others. Here’s a calzone pizza at the famous Mystic Pizza restaurant. As I entered the restaurant I saw a bank of east facing windows and told the hostess that I’d wait for a table by a window.

Strobes. Here are two examples of how my Nikon SB-900 and the Nikon Creative Lighting System works for me. Click on each picture to see it enlarged.
Main strobe at 11 o’clock. This is the cutting board behind the counter at House Park Bar-B-Que in Austin, TX. It was very dark there, so I took my SB-800 flash with LumiQuest Softbox and placed it on an upside down pot to the left and slightly behind and slightly above. The result looks like window light or a Dutch Renaissance painting of a groaning board. Click on the picture to see it larger.

Fill light. The pitmaster at Mt. Zion barbecue in Texas (below) would have looked terrible without fill from the front. His face would have been featureless because the background was bright and he was in a darker part of the room, his skin is dark, and his hat brim further shaded his face. The food would have been discolored by the fluorescent lights. So I took an SB-900 flash with a LumiQuest Softbox and held it at shoulder height so it would get under his hat brim. I set the camera on manual aperture and shutter, metered the background before he walked into the picture, and locked in the shutter speed and aperture so the background would be properly exposed.
My camera is usually pre-set on Commander flash mode and through the lens (TTL) metering, so I pointed the spot meter on his face and fired. The camera controls the duration of the flash to correctly expose at the shutter speed and aperture I selected so I don’t blow out the foreground. I only had time for one shot and I nailed it. Even the seersucker stripes in his shirt are properly exposed. Click on the picture to see it larger.

Below is famous pitmaster Chris Lilly preparing a beef brisket. With available light over his left shoulder and behind him, his face is in shade. With a small portable Nikon SB-800 for a fill flash we can see his face.

The Foodio
Here’s a rig I setup when I was teaching at Le Cordon Bleu in Chicago. It was pretty easy to build and it might just work for you.

I called it a Foodio, for portable food studio. I designed it so students could shoot their dishes for their portfolios. It was on wheels so future chefs could roll the Foodio into the various kitchens in the school. Using it was a cinch and they took great pix even with point and shoot digital cameras.
It was simply a four shelf stainless steel wire shelving unit on wheels, the kind found in most restaurant kitchens. I removed most of the wire from the middle two shelves and set thick Plexiglas on them. I enclosed the top two shelves with thin plywood painted white making it like a Softbox. I put two sockets in it so I could use either regular light bulbs, compact fluorescents, or slaves, and a small fan in the side. The front was hinged at the top so it could be opened, as it is above, to change bulbs. On the back I hung two rolls of paper, one black and one white so the students could have professional looking seamless backgrounds. If they didn’t use the paper the plate would sit on the plexi making it float.
If you start manufacturing Foodios, remember to send me a royalty check now and again.
Lightpainting
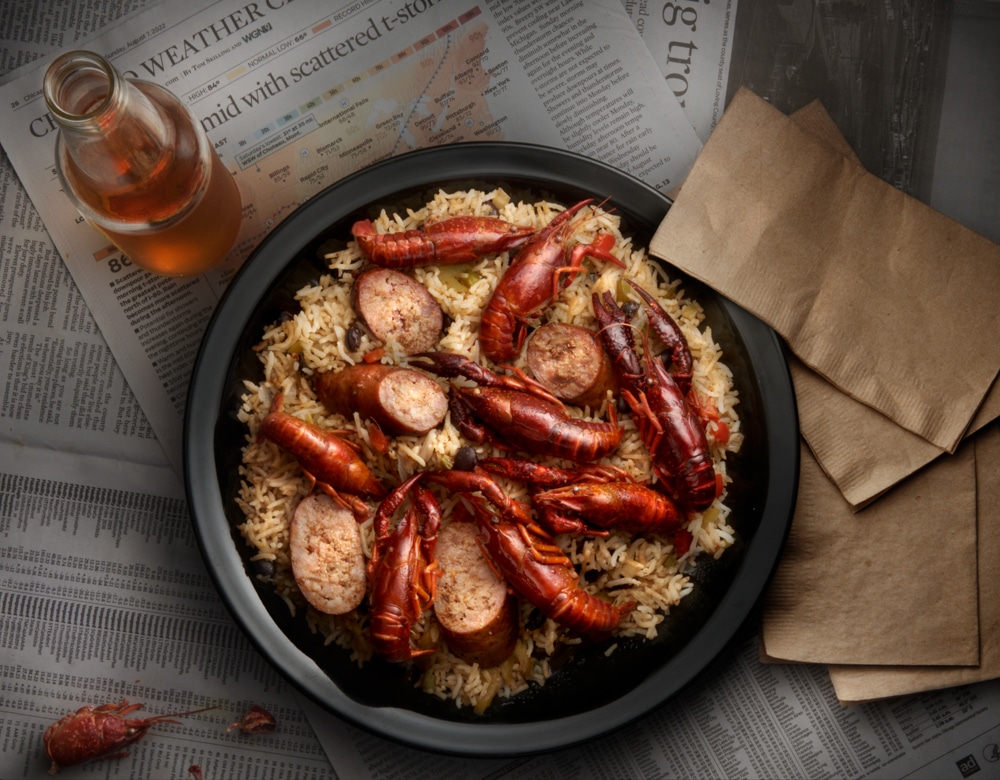
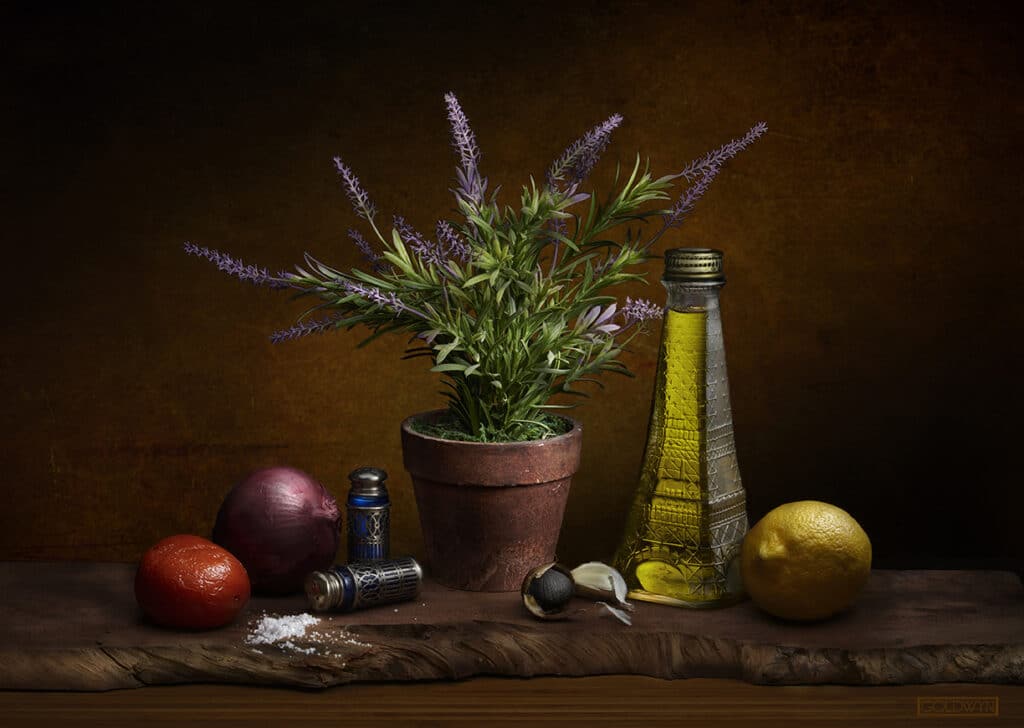
As I mentioned at the top, most of the photographs of the recipes for my forthcoming book “The Meathead Method: Barbecue Science Meets Culinary Art” were shot using a technique called lightpainting. For a book with art in the name I wanted to do something unusual and creative with the images and I wanted to challenge myself in the same manner I am challenging barbecue cooks with these recipes. Here’s an example:
To achieve the chiaroscuro look reminiscent of Rembrandt still life paintings that I wanted I first had to black out my studio. The lens of my Nikon D750 DSLR was opened for 20 to 30 seconds and the light came from a penlight flashlight that I moved across the set, pushing the light in close to brighten an object, pulling it back for other objects, changing the angles, swooping in low for long shadows, from behind for halo effects, all in the same image. Lighting the food was 20 second dance, stepping around it, moving my hands in and out. The still life, “Lemongrette” (above) was at least 10 exposures assembled in Photoshop.
It is as much a dance as it is photography since I am moving around the set with the light. I made several exposures of each object and then stacked them in Photoshop to get a double, triple, even a quintuple exposure.
Special thanks to: Rick Longhi, food stylist, who worked by my side for many days cooking, styling sets, and critiquing.
Here is a video showing how I shot the recipes. Turn on the sound to hear the narration.
For chapter titles I scanned closeups of seeds, fruits, and vegetables on my Epson Perfection 2400 Photo Scanner..

How Jaden Hair does it

Jaden Hair writes the Steamy Kitchen website. She is an accomplished cook with a popular cookbook and a column in the Tampa Tribune and she also does lovely food photography of her recipes with just the inexpensive Lowel EGO Tabletop Fluorescent Lights. The salad above is her shot. I have two EGOs and use them for fill lights, but she uses them for main lights and does one heckuva job. These little guys are especially well-suited for eBay shots. Click here for an interesting article on how she shoots.
My photographic background

Grandpa Dave gave me my first camera in 1965 at age 16. Within a year I was a yearbook photographer in high school (above).
My first mentor: Jerry N. Uelsmann

As an undergrad I took classes at the University of Florida from the brilliant artist Jerry N. Uelsmann, considered by PDN magazine as one of the 20 greatest photographers of the 20th Century.
Yes, he is a great technician, making perfect negatives and prints with conventional film and silver paper since the 1960s. Yes he is a magician in the darkroom, creating techniques that allow him to combine images with as many as eight enlargers. No, he does not use Photoshop.
He is a visionary who can create images in our heads with stirring juxtapositions and scenes from our dreams. His work has been the subject of several books by critics and poets.
He taught my first photography class at the University of Florida. One day he asked if I wanted to see something cool, and he invited me to sit on the lawn outside his office while he opened a portfolio or Edward Weston original prints that he bartered with a gallery for a portfolio of his own prints. I remember his glee in discovering a dustspot on one print, proving Weston was not more perfec than he. I have an original print of the image above, which he gave me for helping him with his website years later. His work is inspirational.
I still dream of coming close to him as a story teller with my more personal images. You can see for yourself how far I have to go by visiting CraigGoldwyn.com.
Uelsmann is a man ahead of his time (that’s one of his images above). Check out these books about him.
- Uelsmann: Process and Perception (Text by John Ames).
- Photo Synthesis (Introduction by A.D. Coleman). Great images accompanied by the deep thoughts of the respected critic.
- Uelsmann/Yosemite: Photographs. Definitely not Ansel Adams’ Yosemite.
- Jerry N. Uelsmann Photographs 1975-1979 Out of print but available used.
- Approaching the Shadow. Magnificent retrospective.
My second mentor: Sonia landy Sheridan

I went on to get a Masters of Fine Art from the School of the Art Institute of Chicago in 1977. There I took classes from Ken Josephson, Joyce Neimanas, and Harold Allen, but my greatest influence was Sonia Landy Sheridan. She sucked me into her orb and I became the first grad student in her nascent Art and Technology Department where a handful of us worked with computers, lasers, copy machines, and fax machines. Well, it turns out that my MFA was the world’s first in this field of study, now standard at almost all art schools.
My third mentor: John Paul Caponigro

I have taken two weeklong workshops from John Paul Caponigro, the renowned maestro of Photoshop artistry, and I remain active in his online group of acolytes, NextStep. His blog is a creative well, deep with ideas and inspiration.
My fourth mentor: Dave Black
I met Dave at a Photoshop conference and when I expressed interest in his work he came up to my room with me and we closed the drapes and did my first lightpaintings. Check out his work here.
My fifth mentor: Harold Ross
To perfect my lightpainting skills, I took an intensive one-on-one class with the estimable Harold Ross. He is incredible. Please look at his work.
My commercial work
Kevin O’Connor is another important influence. He is a commercial photographer, and a consultant to many companies whom he teaches how to get quality color output. He helped teach me artificial lighting.
I’ve also done a bit of commercial photography. I’ve sold to TIME magazine, AP, shot sporting events, graduations, dog shows, and even a QuickTime Virtual Reality immersive 3D shoot of nudes for Playboy.com. That job was much easier than foodporn.

High quality websites are expensive to run. If you help us, we’ll pay you back bigtime with an ad-free experience and a lot of freebies!
Millions come to AmazingRibs.com every month for high quality tested recipes, tips on technique, science, mythbusting, product reviews, and inspiration. But it is expensive to run a website with more than 2,000 pages and we don’t have a big corporate partner to subsidize us.
Our most important source of sustenance is people who join our Pitmaster Club. But please don’t think of it as a donation. Members get MANY great benefits. We block all third-party ads, we give members free ebooks, magazines, interviews, webinars, more recipes, a monthly sweepstakes with prizes worth up to $2,000, discounts on products, and best of all a community of like-minded cooks free of flame wars. Click below to see all the benefits, take a free 30 day trial, and help keep this site alive.
Post comments and questions below
1) Please try the search box at the top of every page before you ask for help.
2) Try to post your question to the appropriate page.
3) Tell us everything we need to know to help such as the type of cooker and thermometer. Dial thermometers are often off by as much as 50°F so if you are not using a good digital thermometer we probably can’t help you with time and temp questions. Please read this article about thermometers.
4) If you are a member of the Pitmaster Club, your comments login is probably different.
5) Posts with links in them may not appear immediately.
Moderators