YOU ARE HERE >> AmazingRibs » Ratings & Reviews » Ratings Reviews And Buying Guides » BBQ Tools Toys And Accessory Reviews » Small Appliances » Breville Pizzaiolo Smart Pizza Oven, Review And Rating
Breville Pizzaiolo Smart Pizza Oven, Review And Rating
All of our reviews are done independently by our team of testers and are in no way influenced by advertising or other monetary compensation from manufacturers. Click here to learn more about our unbiased product review process.
Published On: 9/9/2019 Last Modified: 12/23/2025
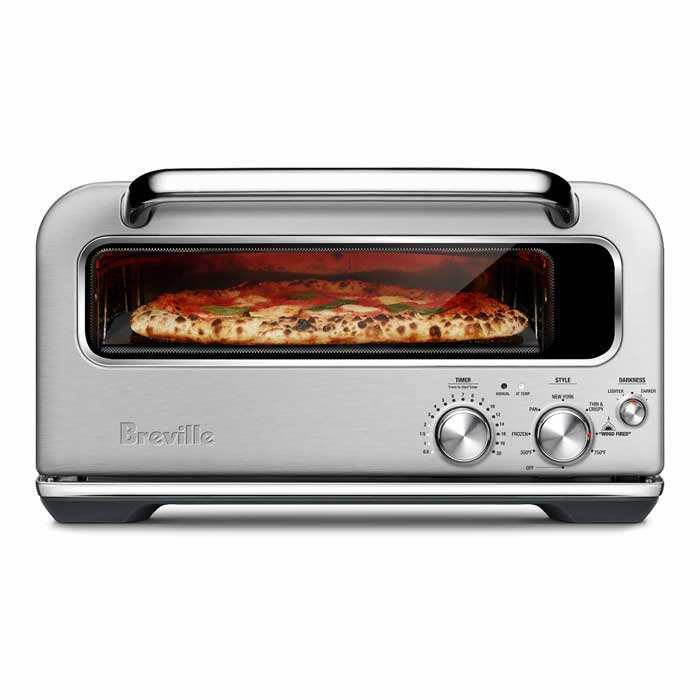
A portable, countertop, plug-and-play pizza oven that gets above 750°F. Yes, you read that temp right!
Cooking pizza at home can be a challenge because most home ovens don’t get hot enough. They also struggle to deliver the right amount of heat to the right places on the pie. You often end up with undercooked dough, undercooked toppings, and unsatisfying pizza. You can employ all sorts of tricks like using your oven’s broiler to crisp up the top along with a baking stone, a baking steel, or better yet, a heavy cast-iron pan or griddle, to crisp up the bottom. They work reasonably well.
Even so, in a home oven, it’s difficult to replicate the complex thermodynamics of a wood-fired oven or the constant, even heating of the professional electric deck ovens and convection ovens that turn out thousands of New York-style pizzas throughout America every day.
The Breville Smart Oven® Pizzaiolo pizza oven makes it easier. This oven allows you to fine-tune your thermodynamics to achieve the kind of pizza you like best. While writing the cookbook Mastering Pizza with Philadephia chef Marc Vetri, I baked pizzas in all kinds of ovens, from wood-fired brick ovens and electric deck ovens to electric home ovens, coal ovens, convection ovens, gas grills, charcoal grills, and outdoor charcoal kamado grill-ovens like the Big Green Egg. I even deep fried some pizzas. All of these methods cook pizza a little differently.
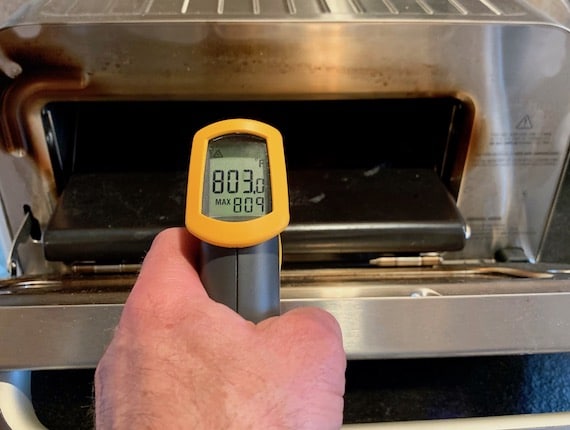
The Breville Pizzaiolo is no exception. It’s the world’s first countertop electric oven that heats to 750°F. Just plug it into a standard 120-volt outlet, the kind found in most homes, and it draws up to 1800 watts to reach peak temps. On my infrared laser gun thermometer (which, admittedly, is not 100% accurate), I measured temps over 800°F on the surface of the oven’s built-in pizza stone. That’s wicked hot. The high heat is one of the most remarkable things about this oven, along with its near-infinite thermal adjustability.

Setup
A few practical notes: setting up this oven is almost as easy as unboxing a toaster oven. It’s about the same size (18.5 x 18.3 x 10.7″) and comes with a custom-fit 12″ diameter cordierite pizza stone that fits over the oven’s bottom heating element. You also get an 11″ carbon steel deep-dish pizza pan with a removable handle and a stainless steel pizza peel for moving pizzas in and out of the oven.
Before your first bake, you run the oven on high (750°F) for 20 minutes to burn off the manufacturer coatings. What’s that smell? Don’t worry. The mild odor is similar to that of overheated oil, and it burns off quick. Then you season the carbon steel pan like you would a cast-iron pan: rub it with lard or shortening and stick it in the oven for 20 mins, preferably twice (with a cool-down in between) to get a good nonstick layer of seasoning on the pan.
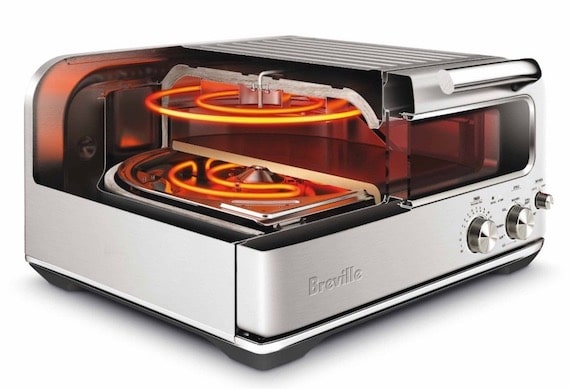
How It Works
Inside, the oven has electric heating elements on top (like a broiler) and below the pizza stone (the deck). The heating elements are constructed from Incoloy®, a so-called “super alloy” made with nickel, chromium, and other metals that help the heating coils withstand high temperatures. Incoloy® is more commonly used in industrial heaters, which gives you an idea of the temps they can handle.
When you power on the unit, two temperature sensors in the oven’s cavity and below the deck feed temperature data to a PID (proportional, integrative, derivative) thermostatic controller. That’s the brains of the operation. This technology is similar to what’s used in sophisticated outdoor pellet smokers. The PID maintains consistent temperatures in the oven by pulsing different levels of power to the heating elements in short bursts. If you watch closely, you can see the elements pulsing red as the oven adjusts the heat.
Firing Up
To bake in the oven, you have two options: “automatic” mode or Manual Mode. Think of it like an automatic or manual car, but you get both in one machine. In automatic mode, you select preset temperatures according to the style of pizza you’re baking. In Manual Mode, you’re in complete control and dial in the top and bottom temperatures. Automatic mode is the default. Either way, you have three main control knobs shown in the photo above:
1) Timer/Deck Temp
2) Style/Top Temp
3) Darkness/Top Control
In automatic mode, you set the Timer, Style, and Darkness. This mode is super convenient, so you don’t have to think much. Choose from 7 different pizza styles that have the following preset temps: reheating pizza (350°F ambient temp), Frozen pizza (400°F), Pan pizza (475°F), New York pizza (550°F), Thin & Crispy pizza (625°F), Wood Fired pizza (700°F) and 750°F, the max temp. When you turn the knob to your chosen Style, the oven turns on and the Timer automatically lights up blue with a suggested doneness time. You can change this countdown Timer if you like, and the Timer beeps when the set time has elapsed, letting you know the pizza is done.
As the oven heats up, a blue-white indicator light flashes until the oven is At Temp, at which point the At Temp light stays on, showing you that it’s ready to bake pizza. You can also turn the Darkness knob to increase or decrease the heat delivered by the top heating elements to the toppings and rim of your pizza, allowing you to control the amount of char you get. Basically, automatic mode is set-it-and-forget-it. Most decisions are made for you, so you can bake pizzas quickly and easily.
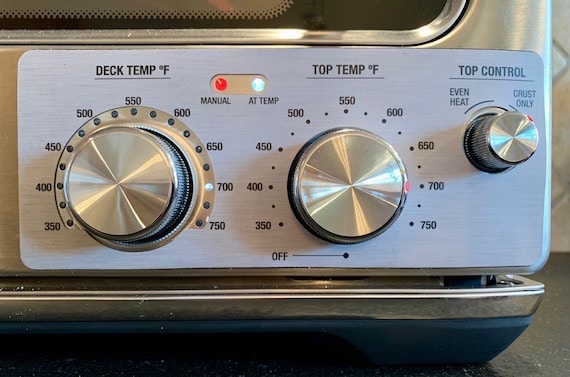
In Manual Mode, you have a lot more control. First, you slap a handy magnet over the control area so you can see and adjust the temperatures top and bottom. To activate Manual Mode, you push and hold the Deck Temp knob (your clutch), while turning on the Top Temp knob (your accelerator) to your desired temp. When you let go, a red light indicates that you are in Manual Mode. The timer function disappears, and instead, you dial in your desired Deck Temp and Top Temp from 350 to 750ºF each, allowing for umpteen different configurations so you can get your particular pizza just right.
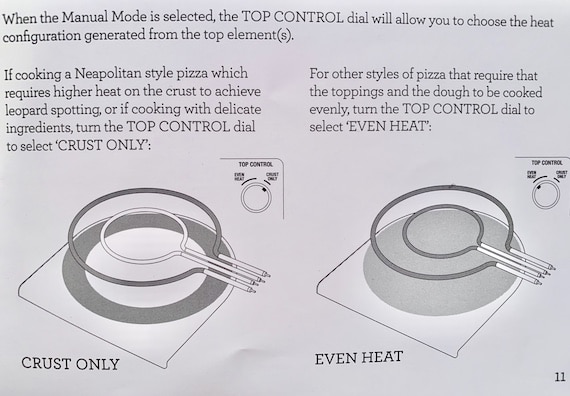
Here’s the coolest thing about Manual Mode: you can control which top heating elements are on or off. The outer top element is shaped in a ring over the rim of the pizza. The inner top heating element is a smaller ring positioned in the center over the pizza toppings. (See the diagram above from the instruction booklet showing the top elements lit or unlit.) Let’s say you want a big, poofy, charred rim and have some delicate toppings on your pizza, as on many Neapolitan style pizzas. In that case, you can turn the Top Control knob to the right for Crust Only, which heats only the outer heating element over the rim of the pizza, but leaves the center heating element off.
Conversely, if you want the entire top of the pizza heated from edge to center, turn the Top Control knob to the left for Even Heat, which heats both the outer and inner heating elements.
Bottom line: for pizza nerds, Manual Mode is a godsend. These three knobs give you an unprecedented level of heat control, allowing you to dial in precise temps for the bottom crust, top crust, and toppings on any given pizza.
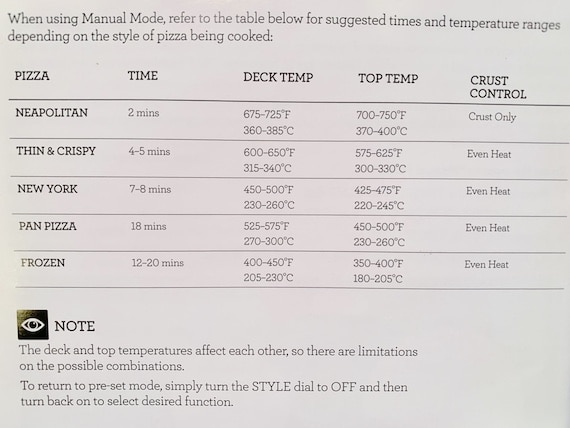
To get you started in Manual Mode, the instruction booklet includes a handy chart of pizza styles and typical Deck Temps, Top Temps, Crust Controls, and Cooking Times for various Pizza Styles. From there, you can play around with what works for you. To return to “automatic” mode, you just turn the Style/Top Temp knob to off (the red Manual Mode light goes off). Then turn the Style/Top Temp knob back on and the blue-white At Temp light will flash, showing that you are back in automatic mode and the oven is heating up. (Don’t forget to remove the Manual Mode magnet.)
Once you get the hang of switching back and forth, these two modes make it pretty easy to, say, choose a pizza style with automatic temps when you’re busy and don’t want to mess around, or go totally manual when you want to fiddle with the knobs and fine-tune your pizza to get it baked just right.
0 to 60
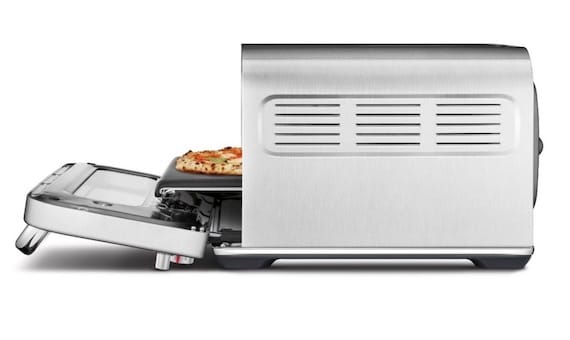
How long does it take this baby to heat up? In my tests, the oven went from 0 to 750°F (max temp) in about 25 minutes. Heating to 350°F only takes 7 minutes, to 500°F takes about 10 minutes, and to 700°F (Wood-Fired style) takes 20 minutes. That’s pretty quick compared to a wood-fired brick oven, which usually takes about an hour. That quick heating is partly why the oven was designed to be compact. Smaller spaces heat faster. It’s also why the oven cavity itself is rather small, about 12 inches in diameter and 3 inches tall between the pizza stone and top heating elements when the oven door is closed.
Note that, as you close the oven door, the deck automatically rises, bringing the pizza closer to the top heating elements.
Bake Results
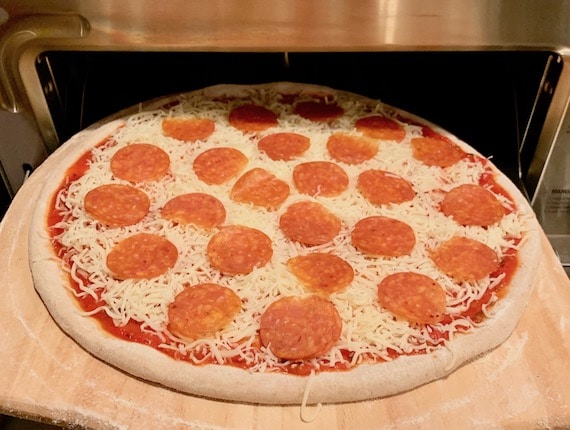
Like any good pyromaniac, I cranked the oven to its max (750°F) for the first test drive. What can I say? I love pushing the limits! For the first test, the pizza was a simple pepperoni pie with 60% hydration dough (and 20% whole grain flour). I stuck with automatic mode at first to get used to the controls. I also built the pizza on a small wooden peel instead of using the steel one provided. Load-in was simple.
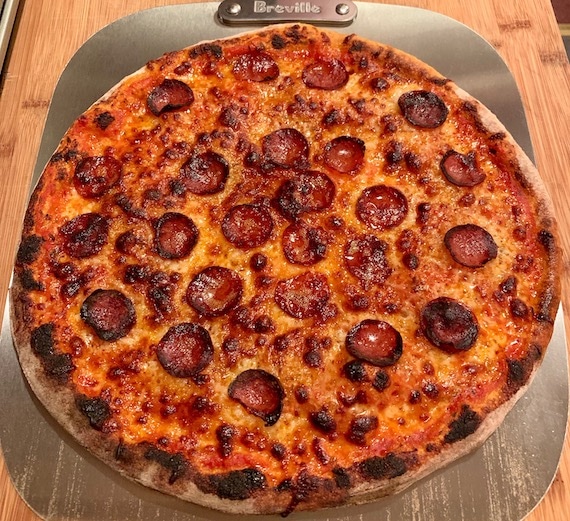
The pizza cooked in about 2 minutes, and the top got a little burnt. I mean, I did have it cranked! The bottom came out nice and crisp, but the rim got browned a little too evenly and darkly for my taste. It didn’t have much leopard spotting, those little bits of char that bring such great flavor to pizza. Still, it was a fine pie.
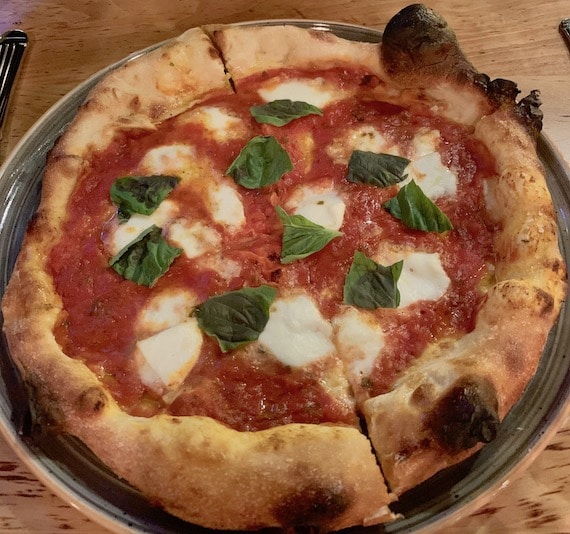
Next, I switched to the Wood-Fired pizza style (700°F) and tested a Margherita pizza with a different dough that had no whole grain in it, just refined white flour. On the rim, that pizza, at that setting, got some nice, random blisters of char bubbling out from the lightly cooked dough. I love those. Wood-Fired is a good setting for your typical Neapolitan style pizza because it’s preset on top to heat only the outer element, which puffs up the rim, while the inner heating element remains off, keeping your toppings from overcooking.
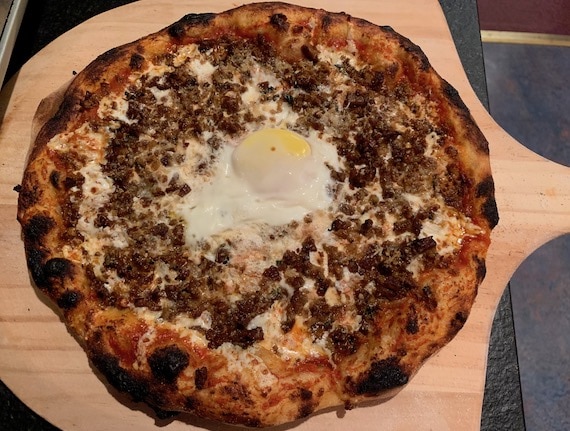
I also tested a Lombardy pizza with sausage, tomato sauce, and an egg in the center. For this one, I switched to Manual Mode. I set the Deck and Top Temps to 700°F and the Top Control knob to Even Heat. I wanted the inner top heating element lit and hot to cook the egg in the center of the pizza, and I also wanted the outer element lit the puff up the rim. Even top heat. Check the results in the photo. The rim got some nice char blisters, and the egg cooked perfectly. When we sliced the pizza, the egg was still nice and runny.
In the photo, it looks like the yolk may be overcooked, but that’s just because there was very little egg white over that area of yolk. Believe me, it was a runny egg yolk when sliced. Should have snapped a pic but I couldn’t stop eating!
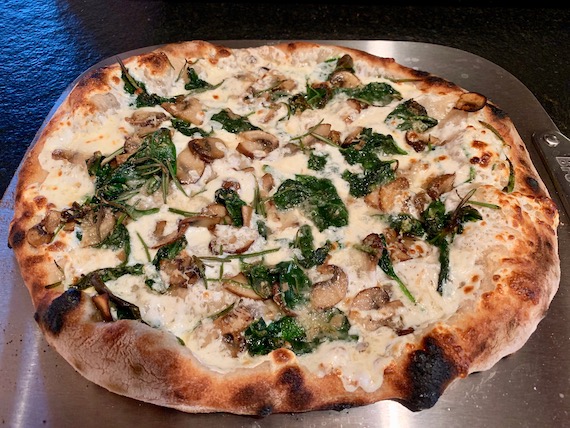
Next, I made a spinach and mushroom white pizza with mozzarella, Parmesan, and fresh rosemary. I sautéed the mushrooms and spinach ahead with a little chile flake on the stovetop (could have done it in the pizza pan in the oven I suppose). Since the toppings were already cooked for this pizza, I only wanted to melt the cheese and puff up the rim.
Again, in Manual Mode, I set the Deck and Top Temps to 700°F but turned the Top Control to Crust Only, so only the rim of the pizza got strong heat, not the toppings. As you can see, the crust bubbled up nicely and the pre-cooked toppings didn’t get overly browned, just as planned.
I also tested a pan pizza, some other Neapolitan pizzas, a few NY style pizzas, and a thin and crispy Roman style pizza, all using the automatic settings. Oh, and I cooked a frozen pizza (Amy’s spinach and tomato) for my kids, which turned out fine.
Oh, and another bonus of this oven: the heating elements are round, so you don’t have to rotate the pizza as it cooks. Of course, if you like to fiddle, you can.
Overall, I have been very happy with the bake results from this oven. Heat recovery time between pies is only a few minutes, about the time it takes to shape and build another pizza. And even though the oven gets rip roaring hot inside, the steel exterior remains relatively warm to the touch. A couple spots felt hot, but not hot enough to burn you on contact. It’s a very well-insulated oven meant to sit on a residential countertop near a back wall.
Since pizza dough chars and blisters in this oven, it does emit some smoke. No cause for alarm, but you may want to place the oven near an open window when using the higher temperature settings. If you have any problems with the unit itself, it comes with a 2-year warranty on materials and workmanship.
Conclusion
After weeks and weeks of cranking this thing to the max, reheating pizzas at low temps, trying just about every configuration in automatic mode, and fine tuning some more finicky pizzas in Manual Mode, I’m pretty impressed with the Breville SmartOven® Pizzaiolo. No, this Pizzaiolo can’t proof dough for you, but it can bake just about any pizza you’d ever want (12″ diameter or less). For what looks and feels like a stylish countertop toaster oven, it gets ridiculously hot and delivers more than enough firepower. It also allows dedicated pizza fanatics to dial in dozens of different heat configurations according to the desired results for any given pizza and its particular toppings.
Keep in mind that the Pizzaiolo does not meet VPN standards (Vera Pizza Napoletana). According to those standards, true Neapolitan pizza must be cooked in a wood fired oven at 905°F. (Psssst: don’t tell anyone, but the dirty secret is that many fantastic Neapolitan-style pizzas are baked in ovens at temps closer to 700°F, which is the setting for this oven’s Wood-Fired pizza style).
Of course, all that raging heat means it takes a little while for this oven to cool down. But only about 15 minutes. Compare that to a wood-fired oven cool-down of several hours. On a personal note—and this is coming from a pyromaniac—using this oven is not quite as much fun as playing with live fire. But it does offer incredible convenience and superior heat control, which have been the central themes of cooking’s evolution ever since we discovered fire.
Another note: this is pretty much a dedicated pizza oven, so it’s kind of a one-trick pony. You can roast vegetables and do some light cooking in the carbon steel pan or another suitable pan. But Breville warns against searing steaks in the oven, due to the rendering fat and high heat and potential flare-ups and fire hazards…and litigation. Stick with pizza. Maybe some shrimp.
Does it lack versatility? Not for a pizza oven. It’s the pizza nerd’s countertop dream machine. The only other knock is the price tag. The MSRP of $999 may give some home cooks sticker shock, but I can see a lot of devoted pizza freaks shelling out for this kind of convenience and firepower at home. I have never seen any home oven plug into a residential outlet and achieve temps in excess of 750°F. Add to that all the pizza baking tweakability built into this small appliance, and you get one pretty exciting machine. A well-deserved Platinum medal.
We thank Breville for providing an oven for our tests.
UPDATE MARCH 17 2025: In late 2024, after 5 years of reliable home use on Pizza Fridays, this test unit fell prey to the “three blinking lights” error. Do a web search on it, and you’ll see a few threads on this issue. Most users on those threads contacted Breville customer service, explained the issue, and had their units repaired or replaced (for a somewhat modest fee if the unit was out of warranty). I did the same, and after some back and forth with Breville’s customer service, the company has thankfully replaced the unit (for a fee). Kudos to Breville for doing the right thing with any faulty units.
Click the buttons below to search our complete database of reviews:
Product Information:
-
Model:Smart Oven Pizzaiolo Review
-
Item Price :999.00
*Price Subject To Change -
Where to buy: ** buying from one of these suppliers will help support this website.
-
Review Method:Cooked On It
We have hands-on experience testing this product. We have also gathered info from the manufacturer, owners and other reliable sources. -
Primary Function:Pizza Oven
-
Fuel:Electric
-
Main Burners:2
-
Primary Capacity:Small (about 5 burgers) : 113 square inches
Manufacturer:
-
Breville

Founded in Sydney in 1932, Breville has become an iconic global brand that enhances people’s lives through thoughtful design and brilliant innovation, delivering kitchen products to more than 70 countries around the globe. Breville is the kitchen appliance brand that delivers innovation based on consumer insights, empowering people’s potential to do things more impressively or easily than they’d thought possible in their own kitchen.
Related reviews
- Ooni Volt 12 Electric Pizza Oven Review And Rating
- Ninja Woodfire 8-in-1 Outdoor Oven Review And Rating
- Culinary Chef Pizza Maker Review And Rating
-
Dave Joachim, AmazingRibs.com Editorial Director - Editorial Director of AmazingRibs.com, David Joachim has authored, edited, or collaborated on more than 50 cookbooks, four of them on barbecue and grilling, and his Food Science column appeared in "Fine Cooking" magazine from 2011 to 2019. He’s a perfect match for a website dedicated to the “Science of Barbecue and Grilling.”

High quality websites are expensive to run. If you help us, we’ll pay you back bigtime with an ad-free experience and a lot of freebies!
Millions come to AmazingRibs.com every month for high quality tested recipes, tips on technique, science, mythbusting, product reviews, and inspiration. But it is expensive to run a website with more than 2,000 pages and we don’t have a big corporate partner to subsidize us.
Our most important source of sustenance is people who join our Pitmaster Club. But please don’t think of it as a donation. Members get MANY great benefits. We block all third-party ads, we give members free ebooks, magazines, interviews, webinars, more recipes, a monthly sweepstakes with prizes worth up to $2,000, discounts on products, and best of all a community of like-minded cooks free of flame wars. Click below to see all the benefits, take a free 30 day trial, and help keep this site alive.
Post comments and questions below
1) Please try the search box at the top of every page before you ask for help.
2) Try to post your question to the appropriate page.
3) Tell us everything we need to know to help such as the type of cooker and thermometer. Dial thermometers are often off by as much as 50°F so if you are not using a good digital thermometer we probably can’t help you with time and temp questions. Please read this article about thermometers.
4) If you are a member of the Pitmaster Club, your comments login is probably different.
5) Posts with links in them may not appear immediately.
Moderators