


Curing a ham is fun and the results are often better than store-bought. Here’s how to do it properly and safely.
Curing is very different from any other recipe because you are using a preservative, sodium nitrite. You must read and thoroughly understand my article on the Science Of Curing Meats before attempting to cure a ham or before you ask any questions. If your ham is bigger or smaller, you need to go to the curing calculator to determine how much water and Prague Powder #1 you need and it will also tell you how long it will take.
Want to create a smoked ham at home but aren’t sure how to do it? The key to creating a ham like the ones you normally purchase during the holidays is the process for curing a fresh ham. Without knowing how to cure a fresh ham, you won’t achieve the same flavor or deep red color of a traditional holiday ham.
How to Cure
This is the simplest of all cures. Just salt, nitrite, water, and time. A lot of recipes call for garlic, spices, celery, and more, but they just don’t penetrate. I debunk this myth in my article on marinating.

You also need a large container for curing a fresh ham. You can use something like a large stainless steel or enamel coated stock pot. Do not use an aluminum pot. It can react with the salt and create off flavors. If you only have an aluminum pot or if your bucket is not food grade, you must line it with a food grade plastic bag such as the Ziploc XL or five gallon food grade bucket liners. A very clean beer cooler will also work.
NOTE ON INJECTING: Once upon a time this recipe recommended injecting the meat with cure, but that made it difficult to use the Curing Calculator properly and we were getting reports from readers who had spots of meat in the center that were not properly cured because of improper injection. If you are interested in curing a ham but want to speed things up, you can inject with the cure. But inject a lot and make your injections about 1″ apart. This will knock about 30% off the curing time, but I can’t guarantee that.
You should also read my articles on the science of hams and my article on cooking ham on the grill.
Up your game: Join our Pitmaster Club. Try it out for free for 30 days. No credit card is needed. No spam. Join now and Be Amazing!
Wet Cured Smoked Ham Recipe
Takes:
Ingredients
Adjusting Curing Ingredients
Cure time: 0.8 days
These recipes were created in US Customary measurements and the conversion to metric is being done by calculations. They should be accurate, but it is possible there could be an error. If you find one, please let us know in the comments at the bottom of the page
Method
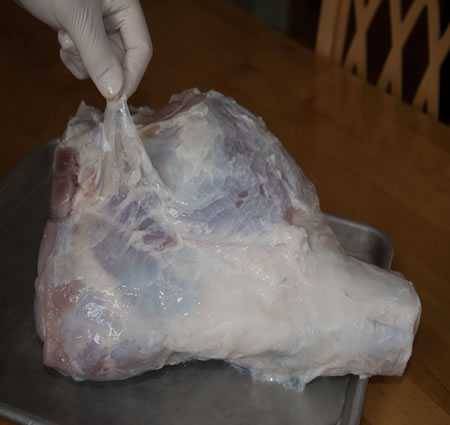
- Prep. If your ham has skin, remove it and all the fat cap. You can use the skin to make cracklins. Skin and fat just do not add flavor. I debunk this myth in my article on fat caps. Besides, fat on a ham only slows the penetration of the cure and will get gelatinous after curing like this image.
- Get a 5 gallon (19.5 L) food grade bucket and clean the heck out of it first with soapy water. Rinse thoroughly with ounce (30 mL) of bleach per gallon (3.9 L) of water. Dry thoroughly. Then and add the distilled water, kosher salt, and Prague Powder #1. Stir til they dissolve. Chill it.
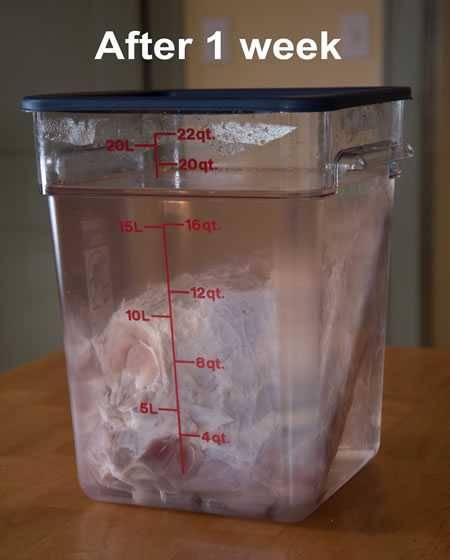
- Scrub the exterior of the ham thoroughly to remove as much bacteria as possible (don't use soap). Put the meat in the bucket and submerge it. If a piece of bone sticks out, get the hacksaw and cut it off or add more cure to cover it. If necessary, weight the meat down under a clean plastic container filled with water. Put the bucket in the refrigerator and let the meat cure for as long as the calculator tells you. If it is larger or smaller, use our curing calculator on this page to determine how long it needs to be in the cure. It must remain cold. After curing the water should remain transparent, but slightly pink, like this image.
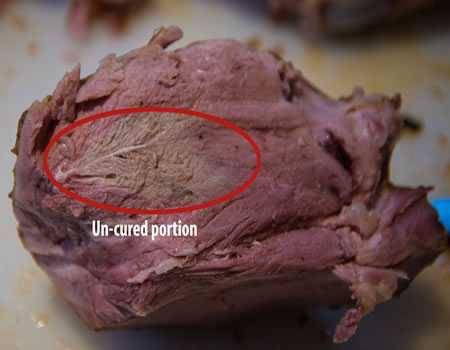
- If you don’t keep it in the brine long enough, you might have a tan spot that will taste like pork, not ham, like this one.
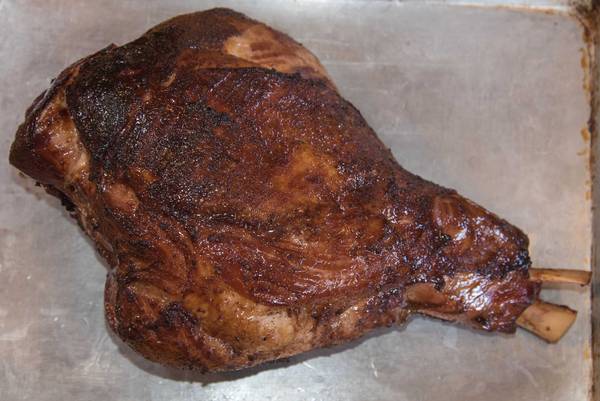
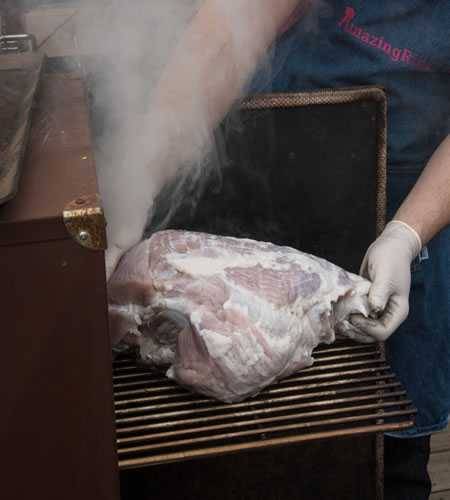
- Cook. After the cure, it is time to smoke. Before smoking, rinse the surface since there will be a heavier concentration of salt on there. All hams are salty and we think this one is just right, but if you are sensitive to salt, soak it for about 6 hours in iced water to pull out some salt. Then, if you wish, you can apply a salt free spice rub like my Meathead's Memphis Dust just before smoking. If you want to serve it immediately, and I strongly recommend it, smoke the ham at 325°F (163°C) until it is 145°F (63°C) in the deepest part of the center. This will take up to 5 hours depending on the meat's thickness. Rule of thumb: 30 minutes per inch of thickness at the thickest part. Your mileage may vary depending on a lot of variables such as your cooker's airflow, humidity, how much moisture in the meat, etc. The reason we cook at 325°F (163°C) is to prevent the stall which will happen at lower temperatures and that can result in a 12 hour or longer cook. During the last hour, paint it with a glaze. My favorite glazes are Chris Lilly's Spicy Apricot Glaze or Danny Gaulden's Brown Sugar Mustard Glaze. Make sure it doesn't burn. There is no substitute for a ham fresh from the smoker.
- If you don't plan to use it within a week, smoke it at 325°F (163°C) until it is 165°F (75°C) in the deepest part and it will be safe for up to two weeks in the fridge. Then when you reheat it cook it up to 145°F (63°C) and lay down your first layer of glaze when it hits about 130°F (54°C). Reheating can take almost as long as the initial smoking.
- Serve. Slice and serve immediately or refrigerate until ready to use. Leftovers can be stored in the refrigerator for a week or so, or frozen. If you vacuum seal, it will keep longer. You can cut slices and grill ham steaks, or just warm it in the oven. Also be sure to check out this video for our maple bacon recipe to learn even more about the curing process.
Why We Require You To Sign In Before You Can Post Comments
Before you can post a comment or question you must sign into our commenting partner, Disqus. This is helps make sure everyone hanging around the grill is civil. We do not tolerate nastiness, racism, porn, inappropriate language, or attacks on others. All comments are the property of AmazingRibs.com and we reserve the right to quote them, edit them, delete them, and block people from making future comments.
Please leave comments and questions on the page devoted to the same subject so others can see them and our answers when they are reading about that subject. You must enable JavaScript to use the comments section, and you must accept cookies to post comments. Note that the software that runs Disqus is different from the Pitmaster Club so members need to sign into that separately.
Moderators