


Planning on serving up a smoked ham or leg of lamb to guests? Here’s how to remove the bone for easier carving!
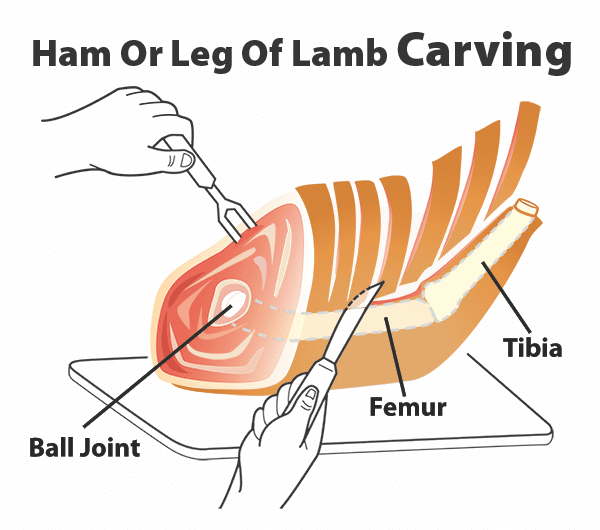
Carving legs is always a puzzlement until you learn the secret. A whole leg of lamb or ham is a lot like yours. There are three bones, the femur, which is the larger thigh bone, and the tibia, the shin or shank bone, and the pelvic bone, also called the aitch bone.
Precooked hams rarely have an aitch bone but raw legs often do. It is funny-shaped (think of your hip bone) and it is connected to the femur with a ball joint. The best thing to do is to get it out of there when the meat is raw so you can easily carve it. Getting it out is a bit of a pain. It is impossible to describe with words or even still photos. The best solution is to have your butcher do it with the raw meat or try it yourself with the braille system. Find the bone with your fingers and trace along its odd shape you’re your knife until it lets go. There are videos on YouTube.
The femur has several muscles wrapped around it but the biggest and most important one is the one to the rear, the biceps group. The muscle group to the front is the quadriceps group. The muscle fibers run parallel to the bones.
To carve a cooked whole leg, lay it on the cutting board on its side with the knee facing away from you. Cut several slices from the quads above the knee parallel to the femur. Don’t go all the way to the bone yet, we want to use the cut surface to make a base. Now roll it over so the cut surface is facing the board and the leg is stable. The knee should be facing down so the shin bone can flex upward.
Slice straight down across the muscles facing you all the way to the bone with 1/2-inch between cuts. Slice only as many as you need because whole unsliced muscle on the bone will stay moist longer than slices. When you are done, lay your blade on top of the femur parallel to the cutting board and perpendicular to the cuts you made, and slide it forward so the cut slices come off like a stack of cards. If you want you can now carve off the chunks remaining on the bone.
Before you can post a comment or question you must sign into our commenting partner, Disqus. This helps make sure everyone hanging around the grill is civil. We do not tolerate nastiness, racism, porn, inappropriate language, or attacks on others. All comments are the property of AmazingRibs.com and we reserve the right to quote them, edit them, delete them, and block people from making future comments.
Please leave comments and questions on the same page that is devoted to that subject so others can see questions and our answers when they are reading about the subject. You must enable JavaScript to use the comments section, and you must accept cookies to post comments. Note: the software that runs Disqus is different from the Pitmaster Club, so members need to sign into the Pitmaster Club separately.