We cook too hot and too fast. Yeah, I know we like fire and we like to put the pedal to the metal, but your food is already dead. You don’t have to kill it again.
OK, I’ll admit, sometimes hot and fast actually is the best way to cook, but most of the time low and slow is better, and more often still, a combination of both methods, and a vital technique called reverse sear, is best of all. Let’s discuss when to use each method, and how.
Cooking the exterior and the interior separately
The goal in most outdoor cooking is to get a nice dark exterior enriched with the countless complex flavors caused by the Maillard reaction and caramelization, and an interior that is cooked from edge to edge as close to the temperature that is optimum juicy and tender. This is true on both meats and vegetables. See my award-winning Food Temperature Guide for more about ideal temperature targets.
To accomplish this it is important to understand that heat from outside the food cooks the exterior, but it is the exterior of the food that cooks the interior. The hot air molecules inside the cooker transfer energy to the molecules in the exterior of the food and they pass their excitement along to the interior, like a bucket brigade of heat. So we must look at the exterior and interior as two separate projects. For more on how this works, read my article on the thermodynamics of cooking.
When to use hot and fast
Rule of thumb: The thicker the meat, the lower the cooking temperature. The thinner the meat, the higher the heat.
Hot and fast works for thin, skinny foods like skirt steaks (shown here), asparagus, and shrimp because skinny foods cook quickly. If you want a good dark brown sear (and you do) you need high heat to make that sear without overcooking the interior.

To cook hot and fast, you need to get the food directly above the heat source so infrared radiant heat can go to work on it. I call this cooking at Warp 10. This is when you crank your grill to “Give ‘er all she’s got, Scottie”. In the Star Trek series this was about as fast as any starship could go. You won’t find the expression used in a culinary context anywhere but here, so don’t ask a chef for steaks cooked at Warp 10. She won’t know what you want. Then again, she might…
When cooking at Warp 10 you usually want the lid up so heat is being applied only to the bottom surface, and you want to turn the food often, like a rotisserie, so the hot side cools quickly, to keep the serious direct radiant heat focused on the surface and not allow weak reflective heat to cook the top and thus overcook the center.
Here’s a trick for skirt steak and other really skinny pieces of meat: Put it in the freezer for about 30 minutes to get it cold. The extreme high heat of an infrared burner on a gas grill or charcoal lifted close to the cooking surface will thaw the exterior rapidly and brown it. But the heat takes time moving inward and the cold center will heat more slowly and won’t overcook. Just make sure you don’t freeze the meat because the ice crystals can puncture cell walls and liquid will escape making the surface wet and impede browning.
When to use low and slow
Hot and fast will carbonize (burn) thicker meats and make thick foods and tough cuts of meat into jawbreakers.
Water is a good insulator so heat slogs slowly through the watery interior of foods, especially meats which can be up to 75% water. Large foods, more than 1″ thick, like beef brisket, prime rib, turkey breast, or baked potatoes need a lot of time to get warm in the center. Turning up the heat loads up the outer layers with heat before it can be transmitted to the center and as a result you get a rainbow of temperatures. On the outside edges, the meat may be more than 200°F, just below the surface 180°F, just below that 170°F, and so on.
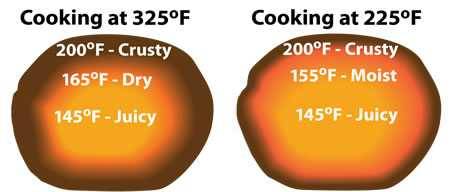
Look at this table and drawing based on an experiment by the AmazingRibs.com science advisor Prof. Greg Blonder. He took two pork loin roasts about 4″ wide and 3″ tall and roasted one at 325°F and the other at 225°F. By the time the center of the meat hit the desired temp of 145°F, the outer layer of the one cooked at the higher temp was a parched 170°F while the one cooked at the lower temp was a still moist about 160°F. That means that the one cooked at the higher temp had a lot more overcooked dry meat in the outer layers of the meat. Now imagine what would happen to a thick prime rib?
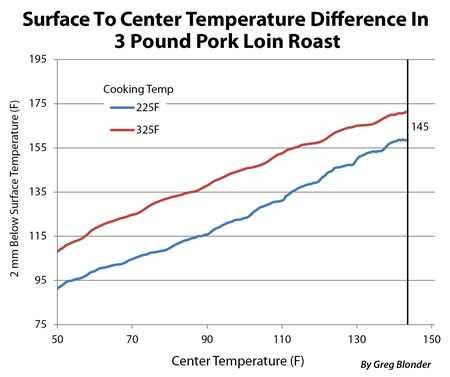
But if you lower the temp and lower the lid, the heat has time to move to the center, the buildup of heat in the exterior is less, so more of the meat is cooked to the target temp.
Low and slow is also essential for tough cuts like beef brisket, pork shoulder, and ribs. These cuts are too tough to eat at medium rare, 130 to 135°F, the optimum temp for most other cuts of beef and pork. They have lots of tough connective tissue. But if they are cooked long enough to a mind boggling 203°F or so, magic happens. Fats melt and the tough stuff softens up like Marshall Dillon in Miss Kitty’s arms (now you know how old I am).
There is another very good reason to cook low and slow. It is easier to hit the bullseye of a slow moving target. You stand a better chance of getting the food done to the proper temp without overshooting the mark. You widen the window on perfection. Food can go from succulent to sucky in a hurry at high heat.
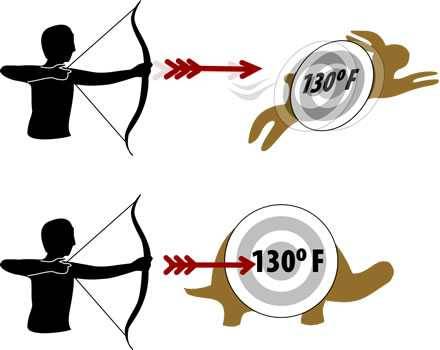
Also, when you cook low and slow, you give salt time to migrate towards the center seasoning the meat throughout. That’s because if you salt or brine meat, even if it sits in a brine overnight, the salt takes its time moving towards the center and stays mostly at or near the surface. But when meat heats up, the salt moves faster as demonstrated in this original research for AmazingRibs.com by Dr. Blonder.
You also give the food more time to bathe in smoke. On a steak, for example, if you sear it first and cook it quick, you don’t get much chance for smoke to flavor the meat. Starting low and slow give you more smoke flavor.
So how do you cook low and slow?
You cook low and slow with warm convection air instead of cooking directly over radiant heat. To do this, you need to master the single most important technique for the backyard cook: The 2-zone setup.
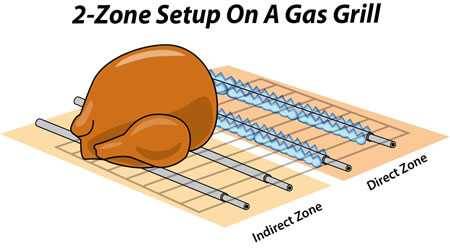
The short explanation of the 2-zone setup is this: You need a hot radiant “direct zone” where you can put the food directly above the heat, and a warm convection “indirect zone” off to the side where the warm air circulates around the food in a convection flow. The illustration above is for a gas grill. On a charcoal grill you push the coals to one side. Your exact setup will differ if you have a different type of grill. My article on 2-zone setup has links to pages devoted to different setups for different cookers.
You need to experiment with your grill so you can stabilize the indirect zone at about 225°F and 325°F with the lid down. These are two special numbers and almost all the recipes on this site are pegged at one or the other, with occasional calls for Warp 10 in the direct zone for searing.
At 225°F you can roast low and slow with indirect convection heat, perfect for making tough cuts with lots of connective tissue, like brisket, tender and juicy. This is also a great temp at which you can slowly and gently rise the interior temp of thick steaks and roasts, maintaining their moisture. At 325°F you can crisp chicken and turkey skins better than at 225°F if you are roasting whole birds. You need to practice hitting these marks in your cooker in different weather conditions without food. Cold weather, rain, and wind can significantly impact the temp inside your cooker.
The challenge: Cooking the interior and exterior separately
If you are cooking tough cuts like pork butt, beef brisket, or ribs, you must cook them up to 203°F or so, a temp at which fats melt and connective tissue gelatinizes (read my article on meat science). Getting these cuts cooked to such a high temps can take up to 12 hours or more at 225°F, so there is ample time for the crust to develop (see my article on bark). The problem with low and slow is, if you are cooking something like a thick steak, which you remove at a lower temp so it cooks much faster, you don’t get a dark crust.
The solution for thick steaks, chicken, even potatoes, is to combine both methods, low and slow plus hot and fast.
Consider a special occasion meal, a 26 ounce, 2″ thick, bone in, prime grade, ribeye steak to be shared with someone special. These babies can cost about $60 each. You don’t want to screw this up.
OK, so maybe that’s a bit rich for you. Let’s say you have a really plump fresh pastured chicken that you got from the grower at the Farmer’s Market. Or even a mass produced turkey breast. Same challenge.
The challenge is to get the outside dark and crispy, yet not overcook the interior. We know that meats are best when crispy and GBD (Golden Brown and Delicious) on the outside, and tender and juicy on the inside, yet warm enough to kill all microbes.
Searing, it has been proven, does not seal in juices, contrary to popular opinion. Searing is a method of developing spectacular flavor and texture when the Maillard reaction starts to alter amino acids on the surface and caramelization of sugars joins the party.
To steakmasters, the perfect sear is a uniform whiskey brown surface with perhaps a little black charing of the fat on the edges. When that occurs, you have so changed the composition of the muscle and fat, that you have reached steak Valhalla. They secret is getting the steak, especially the fat as dark as possible without burning it.
The problem is that if you take a 2″ steak and just plop it down over high heat, you can get that dark mahogany crust, but just below it is a band of meat that is brown, then a band that is tan, then a band that is pink, and finally, a band in the center that is medium rare, reddish pink, the temperature at which steak is juiciest and most tender. Same thing with the chicken. If you yank it before the skin starts to burn, the center is usually raw.
So the challenge is to cook both the interior and the exterior perfectly, and to do that, you need to cook them differently, you need to master two stage cooking.
So let’s consider an indoor cooking technique where you can always get the interior perfect every time: Sous vide. Sous vide was invented in the 1970s and is now catching on as home sous vide machines come down in price. Here’s the idea: It’s hard to catch a moving bus. In a hot grill or oven, if you want to cook your steak to medium rare, let’s say 135°F, you have a small window of time at which the meat is the perfect temp. As a cook, you have to jump on a moving bus because the temp is steadily rising inside the steak. Then you have to worry about carryover, because the thermal mass, the energy trapped inside the meat, continues to cook the meat even after you take it out of the heat, and the temp can rise another 5°F on thick cuts, creeping up to overcooked.
Sous vide stops the bus. To cook a steak sous vide, you place the steak in a plastic bag and suck out the air. Then you slip it into a water bath with a precision digital controller set for precisely 131°F. The meat slowly rises to 131°F and stops. It cannot get any warmer. You can leave the meat in there for hours, even a day if you wish. At 131°F in the center, enough bacteria are killed in about two hours that it is safe. Even a hamburger. Yes, you can cook a burger to medium rare and be perfectly safe. There is another benefit.
Remove the bag, cut it open, and the interior of the meat is the perfect color from edge to edge. There is only one problem. It is repulsive on the outside. The exterior is pale gray and totally unappetizing. So sous vide cooks take the meat out of the bag and throw it in a scorching hot pan or on a grill for a few minutes per side, and you get all that magnificent Maillard color and flavor. It is now a two step process, one for the interior, one for the exterior. So when you cook sous vide, you no longer have to run to catch the moving bus. It just sits there at the bus stop waiting for you at whatever temp you pick.
The problem is sous vide machines cost about $200, the food takes hours to cook long enough to be pasteurized and tenderized, and frankly, not all foods benefit from the process.
So what’s this got to do with grilling? Well, you can cook sous vide and throw the meat on a grill, even a cheap hibachi, and get a pretty good sear. A lot better than just tossing it on a scorching hot pan. And the steak is awesome! Works for chicken, turkey, pork chops, you name it. We call it Sous-Vide-Que. Click here for more.
Reverse Sear, a.k.a. Redneck Sous Vide, to the rescue
Redneck Sous Vide as my grilling buddy John Dawson of PatioDaddioBBQ.com dubs it is the solution. He is riffing on the sous vide technique that so many great chef use. Other folks call it reverse sear or sear in the rear, and it is pretty simple.
If you have experience cooking indoors, you know a lot of recipes call for you to brown meat in a pan before finishing in the oven or in a pot. Two steps. Two temps. Sear over high heat, finish at low heat. This is the recipe for pot roast (brown in a hot pan, braise slowly in a covered pot), even for pan roasted chicken (brown in a hot pan, slow roast in the oven). So it is deeply embedded in chefs and cookbooks that the order of things is brown, then finish.
But that approach is backwards as demonstrated by the sous vide cooks! When you start with high heat, you load up the exterior, and by the time you are done you have a thick band of overcooked meat. If you reverse the order, start the food in the indirect zone at a lower temp, warm everything until it is close to uniform on the inside, and then hit it with Warp 10, you get both a better interior and exterior. That’s reverse sear, and this is another technique you should master. It is the best approach for many foods.
Start by setting up your grill for 2-zone cooking. Try to get the indirect zone down to as close to 225°F as you can with the lid on. Put the meat on the indirect side, toss a little hardwood on the flames, close the lid so the meat will roast slowly with smoky convection air. The bus is not stopped, but it is moving slowly. Roast it slowly until the center temp is about 10 to 15°F below your target temp. You absolutely positively need a good instant read digital thermometer like the Thermapen for this. Flip it once or twice while it is slow roasting. You may have to experiment with technique to keep the temp down. Here’s how I do it on a Weber Kettle. The meat is under the pan.
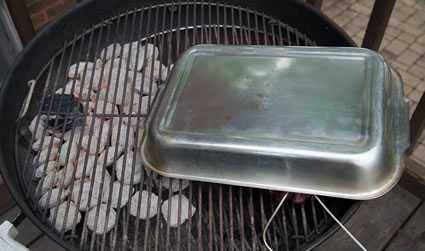
So when your steak hits 115°F in the center, take it off and put it on a plate for a moment. You are done working on the center. Now go to work on the exterior. If you are cooking chicken or turkey, take it up to 150°F because your finished target is 165°F. Pork chops or roasts, 130°F for a finished temp of 145°F.
Take the lid off, and crank up the heat on the other side as hot as you can get it. If you have a charcoal grill where you can adjust the height of the coal bed, get the coals right below the cooking surface. If you want, dump more pre-lit coals on the direct side of the grill. Or set up a hibachi with a thick bed of hot coals. If you have a gas grill, turn the burners to high or turn on your sear burner. Whatever you do, get to Warp 10.
Put the meat on the hot side and leave the lid off. Just like hot and fast cooking, we want all the heat focused on one surface at a time. We don’t want any heat reflecting off the lid down onto the top of the steak further cooking the interior. You want to cook the surface until the moisture steams off and it turns deep and dark bourbon brown, but not black. You do not want carbonized protein or fat, but take it right to the edge because it is at that edge when dazzling things happen.
Flip often and move it around a bit so the grates, which are going to be searing hot, don’t make black grill marks. Flipping often allows the surface that is being superheated by direct infrared radiation to get away from the heat and cool off by allowing energy to escape into the air. It is the same idea as rolling over on the beach. Grill marks may look pretty, but we want the entire surface as dark as the grill marks. If you started with high quality meat, when you are done, you will have finally produced a restaurant quality steak at home. Reverse sear is the best way to get edge to edge medium rare on a thick steak without that thick band of battleship gray meat under the crust, Check out the incredible method of reverse sear used at Stripsteak in Las Vegas in my article on extreme steak.
Here’s a video of me demonstrating both methods.
Here you can see a sirloin, 1.25″ thick when raw, cut into two steaks. The top half was cooked entirely over hot coals, where the air temp was about 600°F. The bottom steak was reverse seared. Both steaks were turned every three minutes. The top steak reached 130°F in 13 minutes. It achieved a very dark but not quite burned crust, and, as you can see, much of the meat was overcooked (tan). The bottom steak also had a dark crust, but just a shade lighter, but as you can see, the overcooked portion is much smaller.
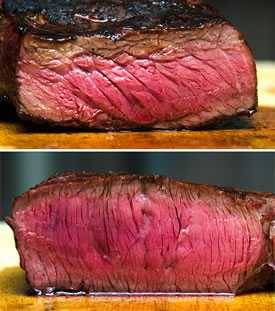
The flavor of the two steaks was practically identical, but there were two very big differences: The reverse sear steak was noticeably more tender and juicy.
Click here for more on the Secrets of Great Steakhouse Steaks and how I have perfected the method for reverse sear after this little exercise. Also be sure to watch our friend Jabin Postal cook two perfect ribeyes with our bottled Meathead’s Amazing Smoked Red Meat Seasoning & Dry Brine and the reverse sear/cold grate method on a Slow ‘N Sear. Perfection!
What about other foods?
Let’s look at chicken breasts. Fatty skin on one side, lean meat on the other. If you start over high heat, there’s a good chance you’ll blacken the skin before the inside is cooked. You could cook it skin side up, but then the meat on the bottom gets overcooked and dry, and the skin stays rubbery.
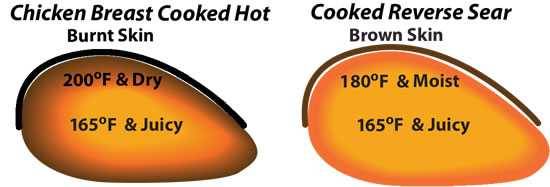
The better strategy is to cook the meat in the indirect zone, flipping it occasionally, with warm convection air and smoke, bring it close to the desired temp, and them move it over direct radiant heat, skin side down, to crisp it. Then you can serve tender, juicy meat, and crispy skin! Check out my update of the classic Cornell Chicken recipe to see the concept in action.
It even works for prime rib and other roasts. Start low and slow, and never have that 1″ band of overcooked meat again. I have a whole article on that subject too. Even baked potatoes are best when reverse seared.
In fact, many things reach perfection outdoors with 2-zone cooking, and reverse sear. Master these techniques.
How altitude changes things
Boiling temp drops as altitude increases because the air pressure is lower (the column of air pushing down on the food surface is shorter) and the amount of energy to convert liquid water to gaseous water (steam) is less. In Denver, which is about one mile high, boiling temp is about 203°F. The boiling point goes down about 2°F for every 1,000 feet above sea level.
Altitude also reduces the amount of oxygen available to your fire so coastal dwellers will need to open their vents wider when cooking in the mountains.
As you go up in altitude food and cooking surfaces cool faster and conduct heat slower because evaporation occurs at lower temps and evaporation cools things.
As to cooker temp, 225°F is a good number at sea level because moisture in the meat will not evaporate much at that temp because the meat is colder than the air around it. Since boiling temp is lower at higher altitudes, you should take the cooker temp down to 216°F to help preserve moisture.
Air pressure, however, does not impact melting temps of fats and sugars. They are not dependent on air pressure.
Some rules of thumb
- You need to master the 2-zone setup, with a hot radiant heat “direct zone” and a warm convection “indirect zone”.
- You need to master these three temperatures: 225°F and 325°F in the indirect zone, and Warp 10 (“Give ‘er all she’s got, Scottie”) in the direct zone.
- To get this right, you absolutely positively need a good digital thermometer. You couldn’t cook without the thermometer in your indoor oven, and you can’t cook outdoors without a thermometer either, and the piece of crap dial thermometer on your grill is probably off by 50°F or more.
- Put my Food Temperature Guide on your fridge.
- You should master these temps by practicing without food.
- Thickness determines cooking time, not weight.
- The thinner the meat, the higher the heat.
- The higher the heat, the less room for error. Food can go from succulent to sucky in a hurry at high heat.
- Cook tough cuts low and slow at 225°F.
- Foods under 1″ thick should cook hot and fast over direct radiant heat.
- Foods more than 1″ thick need to cook in two stages, low and slow at 225°F for the inside and hot and fast for the outside. This is the reverse sear and you should master it.
History of the reverse sear
I am given a lot of credit for popularizing this cooking method, which may be true, but I should not be given credit for inventing it. Likewise, J. Kenji Lopez-Alt and Christopher Finney are often credited with inventing the reverse sear. They did much to popularize it, but did not invent it.
1970s. The first to try the technique were the sous vide pioneers, Dr. Bruno Goussault, Chef Georges Pralus (of Restaurant Troisgros in Roanne, France), or Chef Jean Banchet (of Le Francais in Chicago). After cooking meats in plastic bags in low temp water baths, they then seared them on hot pans or on grills.
1980s. Winston Industries, a commercial foodservice device manufacturer, introduced the CVap, a humidity-controlled oven for the restaurant trade. Set the temp for 120°F, crank the humidity to high, and load it with steaks. The meat can stay there for hours and never lose moisture and the meat is microbially safe after about two hours. When an order comes in, the steaks get tossed under a broiler or on a grill at super-high heat to sear, and they are served sizzling. CVap is still popular.
2000. Swiss butcher, food safety inspector, and instructor Werner Wirth wrote about reverse sear in his book “Intelligente Küche” (Intelligent Cooking) which was published in 2003. That likely means he wrote it in 2001 and 2002 which means he had probably been experimenting with it earlier, lets say 2000 or so.
2002. Alton Brown, in his James Beard Award-winning book I’m Just Here For The Food, recommended cooking a roast at 200°F first and when it is 10°F below target temp, remove it from the oven, crank the heat to 500°F, put the meat back in, and create the crust.
Somewhere around 2003 to 2005. Christopher Finney of the Iron Pig BBQ cooking team began playing with reverse sear. I asked him when and he replied “somewhere around 2003 to 2005” (about the same time I did). His website now says 2001. He spread the word on barbecue forums and I did not start writing about it until 2010 so he should get credit for being the first to teach the barbecue world about reverse sear.
2007. J. Kenji Lopez-Alt wrote about the technique in the May/June issue of Cook’s Illustrated magazine in an article called “The Problem with Thick-Cut Steaks”. He told me “I first started playing with it a couple years before then when I wanted to get sous vide style results without a sous vide machine. I tried putting meat in a low oven and finishing it off on the grill or as pan and bam, it worked. I’ve since published all kinds of variations on it, for small cuts, roasts, poultry, burgers, grilled foods, vegetables, etc. It just works all around.” Yes, it does.
2017. I coin the term Sous Vide Que to describe the marriage of two great cooking methods, the marriage of fire and water.


High quality websites are expensive to run. If you help us, we’ll pay you back bigtime with an ad-free experience and a lot of freebies!
Millions come to AmazingRibs.com every month for high quality tested recipes, tips on technique, science, mythbusting, product reviews, and inspiration. But it is expensive to run a website with more than 2,000 pages and we don’t have a big corporate partner to subsidize us.
Our most important source of sustenance is people who join our Pitmaster Club. But please don’t think of it as a donation. Members get MANY great benefits. We block all third-party ads, we give members free ebooks, magazines, interviews, webinars, more recipes, a monthly sweepstakes with prizes worth up to $2,000, discounts on products, and best of all a community of like-minded cooks free of flame wars. Click below to see all the benefits, take a free 30 day trial, and help keep this site alive.
Post comments and questions below
1) Please try the search box at the top of every page before you ask for help.
2) Try to post your question to the appropriate page.
3) Tell us everything we need to know to help such as the type of cooker and thermometer. Dial thermometers are often off by as much as 50°F so if you are not using a good digital thermometer we probably can’t help you with time and temp questions. Please read this article about thermometers.
4) If you are a member of the Pitmaster Club, your comments login is probably different.
5) Posts with links in them may not appear immediately.
Moderators