


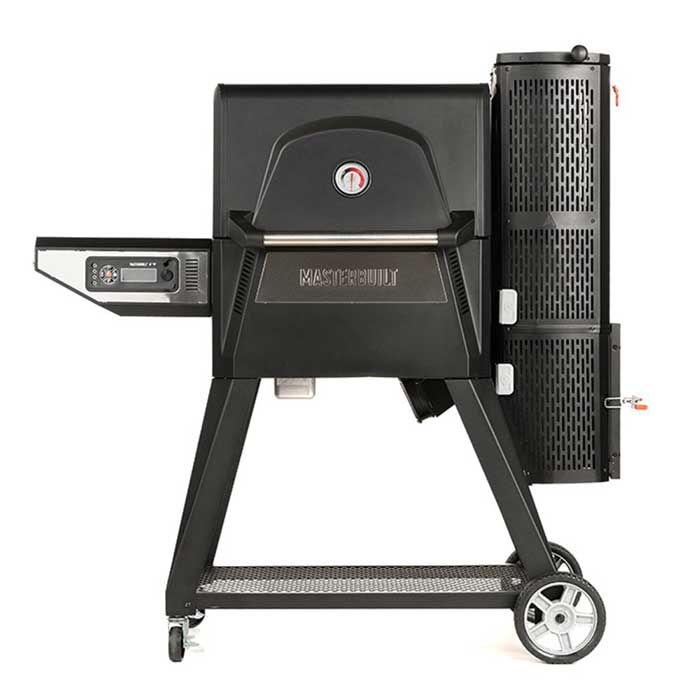

Masterbuilt has blazed a new trail with their Gravity Series 560 Digital Charcoal Grill + Smoker. A one-of-a-kind machine, the Gravity Series marries the ease of thermostatic control (as in your home oven or pellet smoker) with the smoky flavor you expect from cooking with charcoal and wood chunks. You can connect this cooker to your smart device via Bluetooth or Wi-Fi for remote monitoring and control, or ignore that technology altogether since it’s not required for operation. We haven’t seen anything quite like the Gravity Series, and we want to love it despite its flaws!
In the short time since first publishing this review, we have encountered significant and disturbing quality issues with this product, causing us to drop our initial 5-Star rating of platinum down to a 3-Star rating of Silver. The interior of the firebox at the bottom of the charcoal hopper has warped and buckled and appears to have rusted through the inner layer exposing some of what Masterbuilt refers to as FDA-approved food-safe soft ceramic “firebrick”, the insulation layer between the 2 layers of metal. As of now the outer layer of metal remains intact. While the hopper firebox deterioration is alarming, it appears to be of very little consequence and many likely wouldn’t notice it. Masterbuilt assures us that this deterioration is harmless and may even be expected due to the heat of the fire and that the unit will remain functional and safe to use.
Additionally, with continued use, the fan that regulates air to the fire stopped working. We determined the cause was a faulty safety switch on the top of the charcoal hopper. This was the second (of 3) switches to fail within a few months of use. We were not alone in experiencing faulty safety switches. Many of our readers and one of our active Pitmaster Club members have reported the same issue. It has become apparent to us that the safety switches Masterbuilt uses are a weak link in an otherwise groundbreaking cooker. While these failures seem to be fairly widespread among users, reviews of the cooker are still overwhelmingly positive, leading us to believe that the failures are not something everyone will experience. But how many failures are acceptable for a cooker only a few months old?
Here is our updated review of The Masterbuilt Gravity Series 560 Digital Charcoal Grill + Smoker.


The Gravity Series features a sealed, gravity fed charcoal hopper on the right side of the unit. Add your favorite lump or briquet charcoal through the top access door, light the charcoal from the lower access door, and then set the cook temp on the digital control screen and close the doors after the charcoal is lit. It does the rest for you. A variable speed fan immediately feeds the coals oxygen until the set temp is reached in the cooking chamber, then the fan slows to a whisper quiet crawl – or stops completely – until it needs to stoke the coals again. As with a pellet cooker, this process repeats as needed to maintain the set temp throughout your cook, circulating smoky hot air around your food while you enjoy other activities. Yes, it’s that simple. No more babying the coals to maintain temperature. And the food coming off this unique machine rivals that of any charcoal or wood grill or smoker I’ve used before. The Gravity Series is just easier to use, and if I’m being honest, more fun. Except when the switch fails.More on that later.
Startup
Keep in mind: Electricity is required to use this device. Start by connecting the supplied power adapter to the cooker, and then plugging the larger end into your power outlet. With two ends to plug in, it’s more like plugging in a charger cord than it is like plugging in an electric smoker. The cord is plenty long at 15 feet but the thin cord (around 3/16-inch) leaves me wondering how robust it will prove to be in the coming years. To season the unit, you follow the same general startup procedure that you’ll use when cooking, which is good practice for future use. Seasoning takes about 90 minutes, and Masterbuilt recommends doing the seasoning procedure twice, with a complete cool down in between, before cooking. The first seasoning run is to remove manufacturing grease. For the second seasoning run, you wipe the inside of the cookbox and the grill grates with oil then run the unit another 90 minutes at a high temp. After seasoning is complete, regular startup is easy and I was ready to cook in minutes as advertised.
Want a new set of tools? Check out Meathead’s new book, The Meathead Method. It’s a toolbox that will elevate all your cooking. Alton Brown calls it “The only book on outdoor cookery you’ll ever need.”
Note: The most important thing to remember with this machine is to pull out the two metal slides before starting! When pulled out, the top “heat intake” slide and the bottom “air intake” slide open up the airflow into the cooking chamber and into the lit coals, respectively. If either slide is left inserted during startup, the coals will not light and the cooker can be damaged. After cooking is complete, re-inserting the slides then stifles the coals to help with cool-down.
In the image here, you can see the two metal slides pulled out (in the red circle) and ready for startup.

The removable charcoal grate is accessible through the lower door of the charcoal hopper. At the bottom of this grate are two parallel wire “support bars” that hold the firestarter of your choice, such as a twisted wad of paper, paper towels, or a food safe starter block.

I prefer to use white charcoal starter cubes, but after a little trial and error, I found that Fatwood natural starter sticks (shown below) fit better on the support bars and can be inserted with the grate in place, making the startup procedure a little easier. This has become my favorite method of lighting the coals with this cooker. The manual recommends waiting 1-2 minutes after lighting the firestarter before closing the doors and allowing the fan to turn on, but I prefer to give it 5-10 minutes to ensure the coals are well lit and avoid a false start.

Thankfully, if the coals don’t take and the cooker fails to rise in temp, it will tell you via a series of beeps and an error message on the display. No such problems with my trusty Fatwood. Flame On!

Firebox burnout
After a couple weeks of cooking we began to notice some minor warping of the metal layer (“metal plates”) inside the hopper down near the charcoal grate where the fire sits. This seemed normal and inconsequential, and the outside metal appeared normal, so we were not alarmed. However, we were receiving reports from our readers that this warping metal would deteriorate and actually flake away, exposing the white-colored insulation layer underneath. After about 3 months of use, we began to have this same issue as noted from this picture, which shows the area down inside the hopper just above the charcoal grate where the fire sits. You can see the metal layer has flaked away exposing the insulation layer which they call “firebrick” underneath.

Masterbuilt assures us this is no cause for alarm and that in fact it’s normal and the unit remains fully functional and safe to use. We asked them for an official statement on this issue. At first they declined to offer us a statement on the matter but later shared this with us and with others on some public forums:
“Metal Plates
The metal plates in the lower portion of the hopper hold the firebrick in place and protect it during shipping. These burn out and drop into the ash pan. They are not necessary for the grill to function and we’re not offering a replacement part, since they are meant to be temporary.
Firebrick
In the Gravity Series Hopper, your fire is contained to a 6″ – 12″ area that is reinforced with a food-safe soft ceramic firebrick to handle the higher temps in the lower portion of the hopper. The ingredients in the food-safe ceramic are FDA allowed for use in food or as an indirect additive used in food contact.
The firebrick takes the heat from the charcoal fire and is to be replaced only once a hole burns in it that is more than 0.5″ deep and 5″ in diameter. These firebricks will be a warrantied part and will also be available for purchase post-warranty at a retail of $29.99 for the full set (4 firebricks with temporary metal plates). In our testing, we’ve seen firebricks last multiple years. You do get some initial firebrick degradation during burn-in and initial usage, but then degradation tends to stabilize.”
We are happy they’ve publicly addressed this issue and provided consumers with information to ease their minds about what appears to be premature firebox degradation. But we remain puzzled as to why this is an intended design and why it is not preemptively addressed in the owner’s manual or by other means.
Most other gravity-feed charcoal smokers are not intended for higher “hot & fast” grilling temperatures, so they do not suffer from this firebox issue. We feel this is a double-edged sword with the Masterbuilt Gravity Series; we love the flexibility with regard to low & slow or hot & fast, but we feel Masterbuilt should have anticipated the negative perception their design would create with regard to the interior firebox deterioration, and we speculate this could have been avoided in more ways than one. Consumer perception, as was ours, is that this is a problem and that it is not normal. We will trust Masterbuilt’s claims in this regard and continue to use the device.
Digital control panel
The control panel includes a power button surrounded by four buttons that toggle the digital display between the cooker set temperature, meat probe temperature, countdown/count-up timer function, and Bluetooth/WiFi pairing. You adjust the temperature anywhere from 150° to 700°F by pushing in the left thermometer symbol button then twisting a separate knob. Press the same button again to set the cook temp, or it will set itself after 3 seconds. The display defaults to reading the current cook chamber temperature. It will also read “OPEN” if the cooking chamber lid is opened, which disconnects remote access as a safety feature. The app will remain connected for monitoring the temperatures, but you’ll lose control from the app. That means if you’re using the app, and lookin’ while cookin’, be sure to pair your device with the cooker again to regain remote access.
Those dang switches! Grrrrrrrr!
After a few cooks I got my first clue that Masterbuilt’s safety switches were faulty. I found the cook chamber lid’s safety switch to be somewhat problematic. The cooker’s display would randomly read “OPEN” even though it wasn’t open. This error occurred because the switch was not functioning properly. Masterbuilt stated that the contact points inside the switch can get wet or clogged with grease or other buildup causing the malfunction. If you experience this issue, the switch is easy to remove with 2 screws, and if you’re handy, it can be taken apart and cleaned or simply replaced by contacting Masterbuilt and ordering a new one. Thankfully this particular switch does not affect the cooking performance. The purpose of this switch, which Masterbuilt admitted was “overbuilt”, is to prevent further remote control of the cooker, in case the lid was opened and something got in the cooker or the lid was left open; in other words, you’re forced to go to the cooker to start it up or make changes if the lid has been opened. The fan stays running enabling you to cook when at or below 500°F even when the lid is opened (or if the switch malfunctions and it thinks the lid is open. The two hopper door switches however are in place to stop the fan from running when the doors are opened at any cooking temperature. We were willing to let this first episode slide but the switch hits kept coming.
Shortly after the initial publication of this review, I did indeed experience the hopper door safety switch error as well. And this did cause the fan to fail to start with the unintended consequence of leaving the cooker dead in the water…and my ribs waiting for guests coming in a few hours. A bypass of the faulty switch was in order to be able to get my cook on. Removing the two Phillips head screws to access the plunger switch was very easy, as was removing the two wires connected to the switch. These two wires can then be connected together to complete the circuit, or in my case I found it easy enough to slide the protective boot from one wire back and insert the other wire under it so both remain connected together, effectively bypassing the switch, as shown in this picture.

NOTE: we do not recommend bypassing these hopper door switches. They are there for safety purposes. We found it necessary, however, in order to complete a cook when the hopper door switch suddenly failed. We strongly believe Masterbuilt should replace these switches with better built ones on all sold and unsold models to prevent these errors and cooking interruptions.
In case of any other errors, the display panel will also read “Err” followed by a number 1 – 5 for various errors, such as failure to ignite charcoal. The manual lists a handy chart to troubleshoot any error messages.

While the control panel works well, I found the display’s glossy screen somewhat hard to read outdoors in bright sunlight. It seems no matter how I had the cooker positioned there was a glare. It’s much easier to read in early morning, evening, and cloudy conditions.
Like what you’re reading? Click here to get Smoke Signals, our free monthly email that tells you about new articles, recipes, product reviews, science, myth-busting, and more. Be Amazing!
Temp control
Here’s where the Gravity Series can really shine. On most charcoal cookers, you control temperature by adding charcoal and by adjusting the airflow with a series of vents. Aftermarket thermostatically-controlled fans can make this process easier, but the Gravity Series simplifies it even more. The built-in fan, thermostatic controller, and gravity-fed charcoal make Gravity Series a plug and play charcoal grill and smoker. Just set your cooking temp and it maintains that temp like an indoor oven–but with a steady supply of charcoal smoke.

To test for hot spots, I ran our bread test for 7 minutes with the cooker set at 350°F. As you can see in the photo, the center of the grill runs slightly hotter, but not by much. I checked the actual temperature variances at the 4 corners of the cooking surface with 4 digital thermometer probes. Temperatures closely matched the unit’s own readout although some corners varied by 15-20 degrees. As the fan kicked in to raise the cooking temp, I documented a greater variance between the unit’s readout and the temperature readings from our probes, but the variance quickly settled as the target temps were reached. Considering that the cooker’s single temperature probe is located on the far left wall, I find this to be an acceptable and minor variance.

The control panel allows you to adjust the cooking temperature anywhere from 150° to 700°F with the twist of the knob. Masterbuilt claims it will reach 225°F in 7 minutes and 700°F in 13 minutes once the doors are closed and the fan turns on. Impressively, my tests squared with this claim. I didn’t have a digital thermometer probe that would read air temps up to 700°F, so after 30 minutes I used my Thermoworks infrared gun to measure the grill grate temperature instead. To my delight, the flat spots on the grate read 752°F! The Gravity Series 560 Grill + Smoker sears quite well at these temps. My cooking tests below show that this unit earns its name as a “Grill + Smoker.”
Charcoal capacity
The manufacturer’s website claims the hopper can hold 12-15 hours worth of charcoal. Masterbuilt told me this was at a cook temp of 200-225°F and an ambient temp of at least 70°F. My tests so far haven’t achieved this. With springtime ambient temps averaging in the mid-40s, a full hopper of Kingsford Original briquets gave me about 8.5 to 9 hours running at 225°F until temps dropped and I needed to add more coals. Repeated tests in similar weather averaged about the same. I also tested with lump charcoal (Fogo premium) and achieved about 7 hours burn time from a full hopper. It stands to reason that in hotter summer weather you’ll get more burn time, and I await the chance to test Masterbuilt’s claims in summer weather. Either way, if you’re cooking overnight, keep in mind that cooler weather will decrease the burn time of a full hopper of charcoal.

Cooking capacity
The main cooking surface, composed of two reversible cast iron grates, is 22 x 15 inches, plenty of space for a couple racks of ribs or a large packer brisket. Total clearance from the main cooking grate to the lid is just over 12”, high enough to handle even the largest turkey. Conveniently, the height of the main cooking grates is similar to standard counter height at 36.5 inches from the ground. Unless you’re an NBA player, this height should enable you to comfortably cook without crouching over.

Both grates are reversible for smoking or searing, and are labeled “SMOKE” and “SEAR” on each respective side. The smoke side has a narrower, peaked surface while the sear side has a wider, flatter surface for more contact when searing. The sear side will give you fairly wide grill marks, but here’s why an all-over sear is more flavorful than grill marks. And while these cast iron grates should last forever, they are not non-stick because of how we use and clean them, and they require more maintenance and cleaning to prevent rust than stainless steel rod grates. Read more here about why cast iron grates are not our favorite for outdoor cooking.

Included are two porcelain-coated half-sized warming racks which can be used separately for two additional levels or placed together for another full level, effectively doubling the cooking surface to 560 square inches. There are two levels to place these grates in. I was successfully able to cook two small briskets using both the main grates and the warming racks in the middle position as shown, with plenty of room to spare. The warming rack grates can also be placed one position higher than shown here.

Reloading
Adding more charcoal is simple. Undo the latch and open the top hopper door (on a good day, the frail safety switch stops the fan so an oxygen-fueled inferno doesn’t sear your hand or remove your eyebrows). Then add more charcoal, close the lid and latch it, and the fan immediately picks up where it left off. It is by far the easiest charcoal cooker I’ve ever reloaded mid-cook. Masterbuilt recommends that you wait until the chamber temp is at 250°F or lower before reloading, and that you wear heat resistant gloves since the top hopper door can get hot and there is the off chance that a rush of hot air and/or flame can come up through from the hopper. Wearing heat-resistant gloves, I had no trouble reloading the hopper in all of my cooks. Be sure to reload before the lit charcoal runs completely out or you will have to restart the fire!
Using smoking wood
For additional smoke flavor, the manufacturer recommends two ways to use wood chunks (chips are not recommended). 1) disperse a few chunks among the unlit coals (not just on top) when you add the charcoal, or 2) add chunks to the ash bucket, where the dropping hot ash will light the wood and cause it to smoke. For method 1, Masterbuilt recommends adding one fist-sized chunk among every 4 pounds of charcoal, and the manual states “never use more than 1.5 lbs of wood chunks throughout the hopper”. When I asked Masterbuilt about this recommendation, they told me that adding too much wood to the hopper can lead to a faster burn and a less precise burn temperature, and since there is more moisture in raw wood than charcoal, more wood can release much more creosote, all of which can prematurely degrade the hopper. In my tests, I used a few smaller chunks in the hopper totaling only about 12 ounces, and there was plenty of smoke flavor in the food.
For method 2, it’s recommended not to use more than 8 ounces of wood chunks in the ash bucket at a time. Masterbuilt tells me this amount minimizes the potential fuel, and therefore the heat, in the ash bucket, since the lower portion of the hopper is not designed to withstand the higher temperatures seen on the charcoal grate. More wood can be added as the cook progresses, but they caution against adding more until the previously added chunks have ceased generating smoke. I’ve used both methods, even simultaneously, with great results. I found method 1, adding wood chunks to the hopper itself, to offer a more pronounced smoke flavor since you can use more wood; and more chunks can easily be added when reloading the hopper. Method 2 does indeed smolder the chunks in the ash bucket as advertised, and this method can be useful if you want lighter smoke. Whether you prefer a heavy or a light smoke presence, you have plenty of options in that regard.

Cook tests
The Gravity Series performed well in both low & slow smoking and hot & fast grilling tests. Reverse searing a 1 inch ribeye went very well. I first cooked the steak slowly with Kingsford Original briquets and 1 small wood chunk in the hopper at a cook temp of 225°F until the internal meat temp registered 115°F. Then I removed the steak from the grill to prevent overcooking while I cranked the Gravity Series up to 700°F on the control panel. Once the display read 700, I put the steak on the “sear” side of the grate. It smoked and sizzled instantly, and my mouth started watering. After 1 minute, I flipped the steak and saw grill marks galore!
Since an all-over sear means more flavor than the stripes of grill marks, I rotated the steak about every 15 seconds, and flipped it over every minute to a new hot section of the grate until there was a nice even brown flavorful crust and the internal temperature was 132°F, about medium-rare. The flavor was outstanding with just a hint of wood smoke from the single wood chunk.

Like pellet smokers, the Gravity Series cannot be set for 2-zones simlutaneously with a moderate indirect zone on one side and hot direct zone on the other. However, its high temperature range and ability to quickly shift gears from low and slow smoking to hot and sizzling searing provides welcome versatility.
Want a new set of tools? Check out Meathead’s new book, The Meathead Method. It’s a toolbox that will elevate all your cooking. Alton Brown calls it “The only book on outdoor cookery you’ll ever need.”
Next up was a hot & fast chicken thigh cook. I set the Gravity Series’ temp to 350°F since temperatures over 325°F are best for crisping poultry skin. According to the USDA, poultry meat is safe when cooked to 165°F internal temperature, whether or not the juices run clear, but I prefer my dark meat to be even higher than that. I flipped the thighs once and took them up to 185°F as measured on my Thermapen instant read thermometer. Juicy and delicious, and no sauce needed!

As the Gravity Series’ “Grill + Smoker” name implies, this cooker is far more than just a hot & fast charcoal grill. It is also a great low & slow smoker!
Here’s the result of a 12-hour beef brisket flat, smoked at 225°F according to the general instructions in our Beef Brisket article. I used 4 fruit wood chunks totaling 12 ounces in the hopper and used 2 in the ash bucket. The genuine wood smoke flavor was there, and best of all I didn’t have to babysit the cooker once, other than a quick reload of charcoal. I consider this a grand success!


And of course, what’s a smoker test from AmazingRibs.com without ribs? Here are the results of a 6-hour low & slow BBQ rib cook following our Last Meal Ribs recipe. Once again, a successful cook and a very happy mouth.

All of the test cooks turned out exactly as expected. I had no trouble maintaining temperatures, and after about the first 30 minutes of the internal components coming up to temp, the cook temp stayed within 15-20 degrees of the setpoint as verified on a Maverick XR-50 remote BBQ thermometer. There was no vent tweaking, there were no fires snuffing out as you sometimes hear about from pellet cookers, and following Masterbuilt’s recommendation for wood chunk use, the food tasted on par with what I’ve enjoyed from any of the ten cookers on my deck. Whether you’re new to the world of outdoor grilling & smoking or an experienced backyard pro, my cook tests showed that the Gravity Series should meet your expectations for genuine BBQ flavor!
Shut down
At the end of a cook, the Gravity Series allows you to save unused charcoal by simply powering down from the control panel to stop the fan and inserting and pushing in both the “air intake” and “heat intake” slides. This seals air off from getting into the charcoal hopper and exiting into the cooking chamber, thereby stifling the coals much like sealing the vents on other charcoal cookers. In my tests, this shutdown method worked very well and charcoal was available in the hopper for the next cook.
Ash removal
Getting rid of the ashes is dead simple. The gravity-fed hopper automatically drops ash down into the ash bucket at the bottom. No human intervention required. Using briquets, a 12-hour cook filled the bucket without overfilling it. Note that if you use briquets and have a cook that lasts much longer than 12 hours, you may overfill the ash bucket. With lump charcoal, the ash filled the bucket just over halfway after a 12-hour cook as shown below. Lump charcoal, in addition to being lighter in a given volume, produces much less ash than briquets (learn more about charcoal and the differences between types here). When everything is cooled down, simply remove the bucket and safely discard the ash.

Cleanup
The Gravity Series uses a 2-part grease removal system with a sloped assembly underneath the cooking chamber to direct grease and drippings to a grease tray. Both parts are completely removable for cleaning.
Here is the sloped grease tray assembly which is removable from the back side of the grill.

And here’s the grease tray itself which is removable from the front.

One other cleaning note: you should scrape creosote buildup from the inside of the upper charcoal hopper door after each cook. I’ve read others state that paint peeled from the hopper lid after firing it up. What we see here is not paint peeling but a creosote buildup. A plastic putty knife or ball of foil will work well to scrape this off after each cook.

Grease fires
I had two minor grease fires inside the cook chamber when setting the thermostat to 700°F. This was after I had used it a few times and there was some buildup inside. Like any grill – gas, charcoal, or pellet – regular cleaning and scraping of the grates and other internal components beneath the grates is necessary. With the Gravity Series, you’ll need to do this plus give attention to regular cleaning of the grease tray assembly and emptying of the grease tray itself. This is absolutely essential after each cook, especially if you intend to use the higher end of the Gravity Series’ temperature capabilities. That said, at cooking temps of 225 to 400°F, I had no grease fires.
Accessories
Masterbuilt offers a very high-quality water-resistant cover for $49.99, and it’s highly recommended since the grill is not very water-resistant. I’ve found the removable grease tray beneath the cooker can fill with water if left uncovered in wet weather, so surely the inside of the cooking chamber isn’t protected from rain either, and with cast iron grates this can be a recipe for quick rusting. Masterbuilt recommends always covering and storing in a dry area. You can also purchase additional meat probes to a total of 4; only 1 is included. If you do not have a high quality digital thermometer, additional probes make it easy to take your meat to the perfect doneness levels without guessing. On its website, Masterbuilt also offers many replacement parts, including the cast iron grates. Unfortunately, you may need to call them or submit an online claim for replacement switches.
Connectivity
The manual as well as Masterbuilt’s website details how to connect your smart device to take advantage of the Gravity Series’ Bluetooth/Wi-Fi features. Connection requires first downloading the free app for Android or iOS to your smart device, enabling your GPS/Location services and Bluetooth on your device, then pressing the bottom “connect” button on the control panel for 3 seconds until the word “PAIR” is seen on the screen. The devices should sync within seconds, confirmed by audible beeping and PAIR disappearing from the screen. I found I had to enter my phone’s settings and manually make it connect to the discovered Masterbuilt device on my phone’s Bluetooth menu. All smartphones are different and this may not be your experience.
To maintain the Bluetooth connection, you must remain within Bluetooth range. A connection allows you to not only monitor the cooker’s temp and any of the 4 meat probes’ temps but also to make adjustments to the cooking temp, the alarm values, as well as shut off the cooker. You cannot turn the cooker on from the app. As noted earlier, whenever you open a hopper door or the lid, you must reconnect the app for remote access, a safety feature per Masterbuilt’s FAQs.
As with many other “smart” cookers, we found the wireless connectivity to be hit and miss. Sometimes it would connect but the connection would later fail. Sometimes it would not connect. Other times it connected fine and remained connected throughout the cook. We’re not alone. Masterbuilt mentioned to me that this is a known issue, and subsequent firmware and app updates should correct these issues. Currently as of this writing, the app does not allow the user to switch between Bluetooth connection and Wi-Fi, which offers much greater range. We were assured that the ability to toggle to WiFi will come with a later update. Thankfully, the Gravity Series doesn’t require these wireless connections to function, so if you don’t have any fancy wireless devices you can still use it successfully.
Conveniences
On the left side of the cooker above the digital control panel is a convenient 14 x 15 inch side shelf with 3 pegs to hook your tongs, scraper, or the air & heat intake slides during grill use. There is also a large bottom shelf underneath with plenty of space for charcoal bags, wood chunks, starters, etc. The lid has a dial heat indicator, which we hesitate to call a thermometer because it has no numbers, only ranges, and numbers are not needed since the digital display shows the cooking temp.
Masterbuilt wisely included a self-sealing probe port to run your thermometer probe(s) directly into the cook chamber instead of pinching them under the lid.

Build quality
Build quality on this unit is neither ultra heavy-duty nor flimsy, but aside from the switches and firebox issues, it’s as solid as could be expected in this price range. This may not be the cooker you’ll pass on to your grandchildren, but you’ll make BBQ that will make your neighbors and workmates jealous with minimal effort and less expense than many other more complicated options out there. The charcoal hopper latches and seals well.

Assembly
Everything arrived from the delivery company undamaged and all pieces were packaged very well. All hardware is included. Tools, however, are not included. You will need a Phillips screwdriver, adjustable (crescent) wrench, and a 19mm socket and ratchet. The manual recommends having 2 people lift the cooker body onto the cart. My teenage son and I easily lifted all necessary parts in place.
Assembly went smoothly, although there is a lot to do. The manual suggests allowing 1 hour 45 minutes for assembly. I took my time and carefully put it together and found that it took me about 2 hours. I could have easily sped up the process to fall within their time estimation. All pre-drilled holes lined up well, all needed washers and bolts were in the handy blister pack, and there were very few head-scratching moments interpreting the manual’s instructions.
Bottom line
Masterbuilt has long catered to the average backyard griller and pitmaster by making affordable products that work well without breaking the bank. The Gravity Series is unlike anything we’ve seen before. It is a set-it-and-forget-it smoker and grill capable of producing excellent smoked brisket and juicy seared steaks. At a price of $499.99 for the 560 model we tested, it offers a lot of convenience and genuine smoke flavor for your dollar. We wish the switch failures and what appears to be premature internal firebox degradation weren’t part of the experience. We also wish we didn’t experience the connectivity issues, but due to different smartphones, operating systems, and Wi-Fi modems, this is very common with “smart” outdoor cookers, not just Masterbuilt. Still, Masterbuilt’s assurance that the firebox issues are harmless and will not affect its safety or performance, and that the firmware and app will get updated to help alleviate connection issues, and the fact that these connections are not needed to operate the cooker make this a minor, if valid, complaint. Even though many love cast iron grill grates, we’d prefer to see the much more user-friendly stainless steel rod grates. A relatively minor nit to pick.
We deliberated, and, all factors considered, we feel the innovation they’ve achieved here and the hands-off ease with which a barbecue novice can get stellar results at a very affordable price point, balanced against our disappointments with the switch failures, earns the Masterbuilt Gravity Series 560 Grill + Smoker our Silver Medal. We’re rooting for Masterbuilt to address the quality and longevity issues we experienced, and if so, we can give it a higher accolade. Note that Masterbuilt recently released a larger version of this cooker called the Gravity Series 1050 Digital Charcoal Grill + Smoker, as shown here, with 1050 square inches of cooking space in total. While this model is larger and has some design improvements, it still uses the same switches and hopper materials as the 560. The Gravity Series 1050 has an MSRP of $800.

Warranty
All Gravity Series model grills come with a 1 year warranty from date of purchase with proof of purchase, excluding paint finish and rust.
Subscribe To Our Free Email Newsletter, Smoke Signals to keep up with our new articles, new recipes, new product reviews.
Updated: 7/20/2020


Before you can post a comment or question you must sign into our commenting partner, Disqus. This helps make sure everyone hanging around the grill is civil. We do not tolerate nastiness, racism, porn, inappropriate language, or attacks on others. All comments are the property of AmazingRibs.com and we reserve the right to quote them, edit them, delete them, and block people from making future comments.
Please leave comments and questions on the same page that is devoted to that subject so others can see questions and our answers when they are reading about the subject. You must enable JavaScript to use the comments section, and you must accept cookies to post comments. Note: the software that runs Disqus is different from the Pitmaster Club, so members need to sign into the Pitmaster Club separately.