


LANDMANN IS OUT OF BUSINESS IN THE USA.
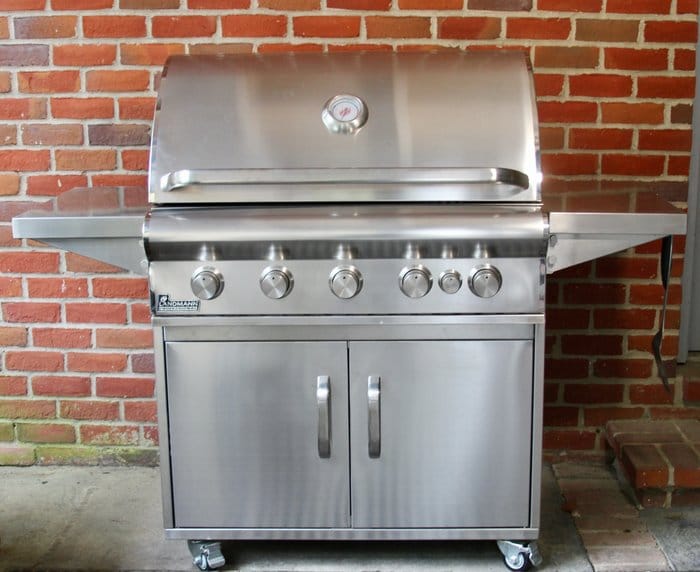
Landmann has over 50 years of experience producing premium smokers, grills, and accessories, so expectations were high when I first set eyes on their Professional Series Ardor 5-burner stainless steel LP gas grill (model 43112). And it delivered across the board – from assembly to heat control to clean-up and virtually everything in between.
By way of background, the grill is the centerpiece of the company’s premium modular outdoor kitchen system, allowing the owner to add such other elements as a separate side burner, a drawer unit, a double door set, and a rotisserie. They also offer an Ardor kitchen island with integrated worktop, allowing you to customize your own dream outdoor kitchen.
The central grill station is almost entirely constructed of top quality 304 grade stainless steel, meaning it not only looks good, but it is also built to last. The grill features five stainless steel burners, an integrated piezoelectric ignition system, a stainless steel warming rack, and a rear infrared burner that is only to be used for rotisserie cooking with a compatible kit that is sold separately. There is even a conversion kit included in case you opt to connect the grill to a natural gas line versus using liquid propane tanks.


While the grill unit is the centerpiece of the modular kitchen system, it is also available with a mobile grill cart, as in the model I tested. The cart features two 13-inch wide collapsible side tables with tool holder screws and a base cabinet with two double walled doors for holding the liquid propane tank and for additional tool storage.

Like what you’re reading? Click here to get Smoke Signals, our free monthly email that tells you about new articles, recipes, product reviews, science, myth-busting, and more. Be Amazing!

Just above the cart’s two front doors is a full width pull out drip tray, making clean-up a breeze.

Above the tray are the 5 primary die cast metal temperature control knobs and a sixth smaller knob that lights and controls the temperature of the rear infrared burner.

With the side tables locked in place, the total footprint of the grill is 51.25 inches tall x 64.5 inches wide x 28-inches deep.
Open the grill lid and you will find three cooking grates made of 0.31 inch diameter stainless steel rods. The grates have been designed to keep grease from building up with a specially designed vertical center support bar that makes grease slide away from them. Unlike most grills that hold the primary cooking grates in place with a solid front and rear lip, Landmann’s are supported by heavy duty round pins in order to further minimize areas in which grease can collect. These design features help keep the Landmann looking nice and clean as you cook.

There is also a removable stainless steel warming rack located just beneath the rear infrared burner for additional cooking capacity.

Just beneath the primary cooking grates are 5 “flame tamers” which are inverted v-shaped bars that help evenly distribute the heat from the burners while also forcing drippings away from the flames and into the grease tray, thereby reducing flare-ups and further simplifying the clean-up process.

Up your game: Join our Pitmaster Club. Try it out for free for 30 days. No credit card is needed. No spam. Join now and Be Amazing!

Remove the flame tamers and you’ll find 5 16-gauge stainless steel propane burners. In another attention to even the smallest detail, the ends of the burner tubes are tapered vertically instead of horizontally like most other grills. While it seems like an insignificant difference, the rotation of the taper means that there is no longer a flat ledge on the ends of the burner tubes in which grease can collect.

Finally, between the burners and the removable drip tray are 4 removable perforated heat shields. Like the flame tamers, these are angled like a tent to force grease down into the drip tray. You will also notice that the firebox has specifically been designed to have straight walls (aside from a slight angle on the bottom third of the sidewalls to direct grease into the drip pan) with minimal horizontal surfaces in order to further limit the buildup of grease.

The burners feature Landmann’s Precision Temperature System (PTS+) Cooking System which was German engineered to distribute heat evenly and efficiently across the cooking surface. According to the manufacturer, this is done in part by increasing the BTU output of the outside burners and angling the heat shields slightly up in the front to promote heat distribution to the outside edges and front of the grill which is where most grills experience a temperature drop.
When it comes time to cook on this grill, you will have no problem searing, given its 70,000 BTU input, or you can utilize a mix of the five burners to create direct and indirect cooking zones for 2-zone set-ups and low-and-slow cooking. Click here to learn about the importance of 2-zone cooking. With its generous 662 square inches of total cooking capacity across the primary cooking grates (not including the additional cooking surface created by the removable stainless steel warming rack) you can easily feed a sizable crowd. There is also the previously mentioned optional electric rotisserie unit that installs in seconds and works in tandem with the 18,000 BTU rear infrared burner.
Assembly
Putting the Landmann Professional Series Ardor 5-Burner Gas Grill together was virtually effortless as the central gas grill unit comes completely assembled aside from inserting the heat shields, flame tamers, and cooking grates. If you are not using the unit as a built-in, you will need to assemble the cart, beginning with attaching four heavy duty casters to the cart bottom. The 2 sides and back are then screwed into place, followed by one angled brace, a front brace, the two front doors, and 2 fold-down side shelves.
Once it is completely assembled, the main grill unit slides onto the cart and is set in place with 4 screws (note that you will need at least two people to lift and slide the main unit into place given the fact that it weighs in excess of 200 pounds). Add the grill’s interior parts (the 4 heat shields beneath the 5 burners, the 5 flame tamers above the burners, the three grill grates, and the removable warming grate), connect the LP hose and regulator, and you are ready to hook up the tank then start cooking! I was laid up from foot surgery when it arrived so our teenage son and a friend put it together for me in about 20 minutes. Talk about simple assembly!

Want a new set of tools? Check out Meathead’s new book, The Meathead Method. It’s a toolbox that will elevate all your cooking. Alton Brown calls it “The only book on outdoor cookery you’ll ever need.”

Firing it up
Once the grill has been assembled, you should take the same precautions as you would any time you start up a gas grill. Make sure all of the gas control knobs on the front of the grill are in the OFF position; open the valve on the propane tank; make sure the lid is open on the grill; and push the desired control knob in and turn to the left towards the “HI” setting. You should hear a “click” from the electric ignition system and the burner associated with that knob should instantly light. If not, turn the knob off then repeat the lighting process. The lighting of the rear infrared burner follows the same instructions.
If the burner does not light after 3 attempts, you can manually light it by attaching a match to the “match lighting tool,” a wire grasping tool connected to a chain on one of the cart’s front doors. Light the match, insert it under the grate above the burner you want to light, then turn the burner’s knob to HI. Once lit, that burner will light any other burners you intend to use.

Note that the manufacturer recommends that you clean the grill with heat prior to the first use. To do so, simply operate the grill with all burners on the highest heat setting with the lid closed for 15-20 minutes. This will burn off any residue and odor remaining on internal parts from the manufacturing process.
Cooking
Before cooking for the first time, I tested the grill’s temperature at different settings to ascertain just how flexible it is when it comes to cooking at different temperatures and with different heat configurations like for 2-zone cooking.
To estimate the surface temperature of the main cooking grates, I placed a cast iron griddle pan in the center of the primary cooking area then tested the surface temperature with the Thermoworks IR-IND infrared thermometer reviewed here. Note that the temperature knobs are marked with OFF, HI, and LOW settings only. When pre-heated on the LOW setting with the lid closed for 10 minutes, the griddle pan registered an average temperature of 285°F. Increased to medium (eyeballed since there is no actual medium marking on the temperature knobs) and heated for another 10 minutes with the lid closed, the griddle pan temperature is approximately 495°F. Finally, turning the knobs to HI and heating for another 10 minutes with the lid closed resulted in an average temperature of 700°F.
Next, I tested just how even the grill distributes heat as touted by the PTS+ Cooking System and to locate any hot spots. To do so, I toasted slices of bread across the primary cooking grates, with all five burners set to medium. As you can see from the photo below, the browning was remarkably consistent aside from what seems to be a cool spot in the front right corner of the grill (you will notice when turned over, the toast in that spot is paler in the lower left corner which would have been over the far bottom right corner). The slice in the far left center position also appears to have cooked hotter than the other, but only slightly. It is worth noting again that there is no actual “medium” setting on the temperature knobs so I eyeballed it which could account for the slight variations in browning.

As a further test of the grill’s ability to cook evenly across the entire 650+ square inch cooking surface, I grilled chicken wings over medium-high heat with the lid closed until cooked through. As evidenced by the photo below, the wings were evenly golden brown and nicely crisped across the entire cooking surface.

To test the grill’s ability to cook low-and-slow, I turned the two outer burners on and adjusted them to bring the grill’s ambient temperature to approximately 250°F.

I then set a single rack of beef back ribs in the center of the grill, closed the lid, and allowed them to cook for approximately 4 1/2 hours. While the ribs were missing any smoke flavor (a problem that can easily be solved with the addition of a wood chip box, a wood chip pouch, or a pellet smoke tube), they were perfectly cooked and were both moist and tender.

After the low-and-slow rib session, it was time to crank up the heat and see just how well this grill can sear. For this test, I cooked a 2-inch thick bone-in ribeye using the reverse sear method. To do so, I kept the left two burners off, turned the center burner to (approximately) medium, and set the two right burners to high. The steak was set on the left side of the grill as far from the heat sources as possible and cooked with the lid closed until it reached an internal temperature of 115°F. I then moved it to the hot side of the grill to create a dark brown crust, turning it frequently until the interior reached 130°F and the exterior was evenly charred. The result was a perfectly cooked medium-rare steak with a beautifully browned crust.

Lastly, I tested the rear infrared burner with the optional rotisserie kit. To set up the rotisserie, you simply need to attach a bracket to the left or right side of the grill with two screws (the side you select depends on where your nearest outlet is located). The rotisserie motor then slides on to the bracket and is connected to your outlet. I secured a whole chicken that was seasoned with dry rub to the spit rod using two adjustable four-pronged meat forks and inserted the left end of the spit rod into the motor and the right side rests on a notch on the other side of the grill. There is even an adjustable counter weight on the non-motor side of the spit to help balance the rotation when cooking uneven food. Due to the size of the chicken I had to remove the primary cooking grates so it could fully rotate. I also set a disposable aluminum half pan on the center flame tamers directly below the chicken to catch dripping fat and juice. With the rear infrared burner set to medium and all main burners off, I closed the lid so the chicken could roast evenly. After that you simply flip the switch to turn the motor on and let the rotisserie and infrared burner do their things.

One nice finishing touch to the rotisserie is the addition of a light to the motor so you can fully view the meat as it roasts at night. After approximately 45 minutes, the chicken was fully cooked and the skin was golden brown.

Clean-Up
As I discussed earlier in this review, Landmann put a tremendous amount of thought into making clean-up as easy as possible with this grill. While most grills feature tapered fire boxes with several 90-degree angles used to support burners, grates and other elements, Ardor was designed with straight walls, aside from a slight angle at the bottom of the left and right sides so that grease slides down the sides and into the full length removable drip tray.
Additionally, the burners and grates have been set in place using heavy duty pins, eliminating those flat ledges on most grills that tend to collect a lot of grease and debris. As mentioned earlier, even the tapered ends of the burners have been turned so that they narrow on the top and bottom so grease doesn’t settle on the tops.
As for the grates, the cross piece that holds them together is about 1/16th-inch wide so less grease and debris can get trapped in the recesses. The heat distribution tents are a higher pitch angle than most to allow the drippings to continue to roll along without collecting on them. Finally, at the bottom of all of the components is the removable drip tray that covers the entire length of the fire box, catching most of the grease, drippings and debris during the cooking and cleaning process.
To clean the cooking grates, scrub them with one of our recommended grill brushes or scrapers found here after cooking is done and the flame is turned off but the grates are still warm. Warm gunk is easier to brush off. After scraping, crank the grill up all the way to burn off any remaining debris.
Next, to clean the removable drip tray, wait for the grease to cool then scrape clean. I used a polycarbonate pan scraper, like one of these, which removed the grease with ease. It isn’t necessary but you can also hose the tray off.
Finally, to clean the exterior, always wait until it has completely cooled then remove any specks of grease using a mild abrasive pad like Scotch Brite and stainless steel cleaner (never use steel wool which is too abrasive). Use the mildest cleaner and always scrub in the direction of the grain and never use abrasives on the grill’s polished highlights.
Conclusion
With heavy duty, long lasting 304 grade stainless steel throughout, added attention to cleaning ease, and the powerful and even heat distribution and efficiency of the PTS+ system, the Landmann Professional Series Ardor 5-Burner Gas Grill with Cart fires on all cylinders.
This grill delivered across the board – from low-and-slow BBQ ribs cooked using a 2-zone set-up to roasting wings over medium/medium-high heat to a whole chicken using the rotisserie to high heat seared steak. Lookin’ great and cookin’ great, there were truly no shortcuts taken in the overall design and execution of this gasser. We award the Landmann Professional Series Ardor 5-Burner Gas Grill with Cart our AmazingRibs.com Platinum Medal.
Warranty
Landmann provides a lifetime guarantee on all stainless steel panels. 10 years on stainless steel burners, cooking grates, and flame tamers. 1 year on all other parts. Rust, scratches, discoloration or any damages due to improper use and care is excluded from the warranty.
We thank Landmann for providing the Landmann Professional Series Ardor 5-Burner Gas Grill with Cart for review.


 Sign up for a free trial of the AmazingRibs.com Pitmaster Club and experience everything that the world's largest membership-based BBQ and grilling community has to offer!
Before you can post a comment or question you must sign into our commenting partner, Disqus. This helps make sure everyone hanging around the grill is civil. We do not tolerate nastiness, racism, porn, inappropriate language, or attacks on others. All comments are the property of AmazingRibs.com and we reserve the right to quote them, edit them, delete them, and block people from making future comments.
Please leave comments and questions on the same page that is devoted to that subject so others can see questions and our answers when they are reading about the subject. You must enable JavaScript to use the comments section, and you must accept cookies to post comments. Note: the software that runs Disqus is different from the Pitmaster Club, so members need to sign into the Pitmaster Club separately.