


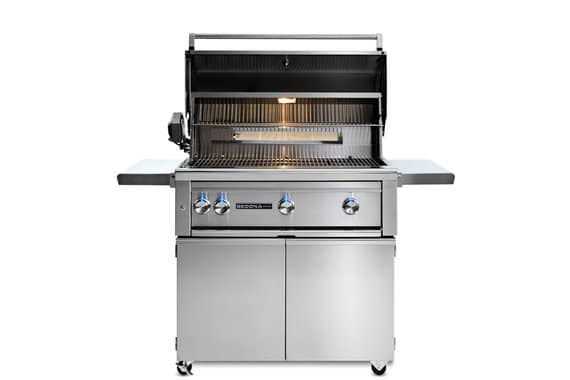
With an unparalleled attention to detail, The Lynx 36” Sedona Freestanding Grill with Rotisserie and Prosear™ Infrared Burner (L600PSFR) is the ultimate marriage of form and function.
Known for their high-end outdoor kitchen equipment, Lynx knows how to create freestanding and built-in grills that not only perform but also have major eye appeal. The 36” Sedona is no exception with its seamless welded construction, brushed stainless steel body with hand polished edges, and blue-lit control knobs, among other fine finishing touches.
The true beauty of this grill, however, is the versatility it offers to the cook – from low-and-slow indirect grilling to high heat searing and everything in between. With two stainless steel burners, a Prosear™ Infrared Burner, and infrared rotisserie back burner combining to provide up to 69,000 BTUs, there is very little that this grill can’t do.
There is also no shortage of space when cooking for a large crowd thanks to its 891 square inches of cooking capacity, including 618 square inches on the grill’s primary grates and another 273 on the removable top rack. If you want a larger cut of meat such as a whole chicken or a roast, the grill also comes complete with a rotisserie unit. You can easily install it near the infrared back burner.

Construction
You’ll find quality craftsmanship and attention to detail throughout the grill. On the front, two easy-to-open cabinet doors provide access the LP tank and to additional storage space for grilling tools. Just above the doors, a slide out shelf makes cleaning up grease and other drippings effortless. The shelf also features a thin cable with an attached clip that you can use for holding a match to manually light the burners if necessary.
Features
The front also has four heavy-duty burner control knobs as well as a small button for turning on the internal grill light and the blue accent lights for the control knobs. Opening and closing the heavy stainless steel lid is remarkably smooth and silent thanks to the Lynx Hood Assist system: high tension springs located on each side of the lid make it open and close very easily. Both sides of the grill feature work shelves that you can be flip down when you’re not using them. On the back, you’ll find a retractable power cord, to be plugged into an electrical outlet for powering the internal and external lights as well as the ignition system. Note that you plug the rotisserie motor in separately when it is in use.
Under the hood, two stainless steel rod grilling grates are positioned above the grill’s two stainless steel burners and the Prosear™ infrared burner. Ceramic briquets top the two 23,000 BTU stainless steel burners, providing even radiant heat distribution across the grill surface. The infrared sear burner sits on the far right third of the grill and has adjustable temperature control for cooking more delicate dishes, a distinct advantage over many sear burners that only have a single high heat setting. A nice final touch: just above the removable warming shelf sits a built-in halogen light that makes nighttime grilling a breeze. Just be sure to keep it clean to avoid blocking the light.
Assembly
The Lynx Sedona arrives fully assembled in an easy-to-dismantle wood and cardboard protective crate. Simply remove the straps, lift the cardboard carton off the grill, remove the top pallet from the grill, and then remove the grill from the bottom pallet. Note that you will need at least two people to lift the 250+ pound grill off of the wooden pallet.

Once unboxed, select a location for the grill that is level and that has prevailing winds blowing from the front to the back of the unit for proper front-to-rear airflow. You will need a space that is at least 56 inches wide to accommodate the grill when you extend both side tables. Also make sure that you have a minimum of 3 inches clearance in the back in order for the lid to open freely.
Next, assembly consists of simply removing zip-ties that hold the burners, ceramic briquets, warming rack, and rotisserie unit in place during transit. Connect the power cord to an electrical outlet and install a 9-volt battery (as a backup for the ignition system), and the grill is nearly ready to fire up. Lastly, you attach two springs for the Lynx Hood Assist, remove some protective film from the stainless steel base and side tables, and attach a propane tank to the LP hose/regulator assembly located inside the right front cabinet door (natural gas connection is also available).

The grill also comes with a rectangular box containing the owner’s manual, the rotisserie motor, and the two rotisserie forks, all of which you can store elsewhere for future use.
Firing it up
Once the grill has been assembled and you have gone through the checklist in the owner’s manual, firing it up is similar to most gas grills: make sure the burner knobs are “OFF,” open the valve on the LP tank, then, push in the burner knobs and rotate them to the “LITE” position. After all three burners are lit (the two main burners and the sear burner) , turn the knobs to “HI” for pre-heating.
Normally, I would immediately set the control knobs to the desired heat setting, but Lynx stresses the importance of pre-heating the entire grill with all three burners set to “HI” for at least 10 minutes. This allows the ceramic briquets to properly heat up, thereby ensuring even cooking results throughout the grill. Once pre-heated, adjust the zones you will be using to the desired temperature setting. To test the grill’s temps, I placed a griddle pan over the main burners during pre-heating. When pre-heated on “HI” for 10 minutes, the griddle pan registered approximately 700°F.

Lowered to “MED”, the griddle temperature then dropped to approximately 380°F, and the “LO” setting produced temperatures of roughly 290°F. That’s a pretty wide range of temperatures that can handle all sorts of grilling tasks from searing to slow cooking.
Cook Tests
For my initial cooking test, I toasted slices of bread over the two main burners to assess the grill’s heat distribution and find any hot spots. Tested with both burners set to “MED”, all slices of bread browned relatively evenly, though the slices on the front left and front center were slightly darker.

Continuing the heat distribution test, I placed chicken wings evenly across the two main burners then grilled them over medium-high heat.
Testing Issues and Troubleshooting
When I first conducted this test, the wings located on the far left and in the center of the main cooking area darkened much faster than the wings located along the right side of the main cooking area (directly adjacent to the Prosear™ burner). After speaking with a very attentive and well informed customer support representative, I discovered that I had not pre-heated all three burners as recommended by the manufacturer, thereby inhibiting the ceramic briquets’ ability to evenly disperse heat since they were not fully heated. As a result of their direction, my second attempt at grilling wings was more uniform than my first test but the front left and front center sections did still cook slightly faster than the rest of the grill surface.

Don’t make the mistake of thinking that the sear burner is exclusively for high-temperature searing, as it is on many other gas grills. The Lynx Prosear™ burner gets plenty hot for searing but you can adjust it for lower temperature grilling as well.
Low-and-slow Cook Test
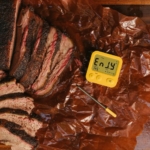
Next, I tested the grill’s ability to cook low-and-slow. For this test, I set the left burner dial to “HI” and kept the center burner and infrared burner off, bringing the grill’s ambient temperature to approximately 300°F. I then set a single rack of St. Louis cut spare ribs in the center of the grill, closed the lid, and allowed them to cook for approximately 5 hours. That simple technique resulted in ribs as moist and tender as those I make on a traditional smoker, aside from the lack of smoke flavor.

Prosear™ Reverse Sear Test
After the low-and-slow test, I turned my attention to the Prosear™ infrared burner. For this test, I cooked a 2-inch thick bone-in pork chop using the reverse sear method, cooking the chop using indirect heat with the main burners until it reached an internal temperature of 125°F then cranking the infrared burner up to high to finish the chop with a deep golden brown sear. It came out moist and delicious with a beautiful crust.

Rotisserie Test
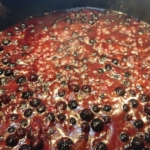
Finally, I put the rotisserie to the test with a whole chicken. Setting up the rotisserie couldn’t be easier: remove the grill’s warming rack, slip the motor into the built-in bracket along the left side of the grill, and secure your food (whole chicken in this case) to the spit rod with two adjustable four-pronged meat forks. Then you simply insert the left end of the spit rod into the motor and the right side rests on a support on the other side of the grill. I placed a disposable aluminum pan on the main grill grate directly below the chicken to catch the drippings so I could create a flavorful sauce and minimize cleanup.

To light the rotisserie burner, you push the control knob in for 2 seconds then turn it to the “LITE” position and hold it for 30 to 60 seconds until the burner’s thermocouple has fully heated. Note that the gas flow to the burner will automatically shut off if the thermocouple isn’t fully heated before releasing the knob. Once the burner is fully heated, simply turn the rotisserie motor on, close the grill lid, and let the rotisserie and burner do all of the work! After approximately 30 minutes, we had a perfectly cooked whole chicken with crisp and golden brown skin.

Clean-up
Part of the allure of the Lynx Sedona is its gorgeous looks, so it is essential to keep it clean between cooks. Fortunately, the cleanup process is relatively simple thanks to the quality of the materials and finishes used by the manufacturer. Wipe any grease and splatters from the exterior after each use so that they do not bake in to the surface over time. For deeper cleaning and polishing of the exterior, the manufacturer recommends using a commercially available stainless steel cleaner along with a fine to medium grit non-metallic abrasive pad such as those from Scotch Brite.
For the interior, as with most grills, the stainless steel grill grates are easiest to clean right after you turn off the heat. The manufacturer recommends using a brass bristle brush dipped in hot water. Although, you need to be careful when selecting any metal bristle brush as bristles can fall out and end up in food thereby causing serious injury. I prefer those with long bristles woven into the head of the brush such as this one from Grillaholics. Better yet, a non-bristle grate cleaner like this one from Chargon works amazingly well on the Sedona grates. Wipe off the halogen light to keep it from darkening over time.
You should also remove the drip tray and clean it with hot soapy water. The owner’s manual also provides specifics for cleaning the ceramic briquets, the two primary burners, and the Prosear™ burner every three to six months, depending on how often you grill.
Conclusion
From its beautiful seamless stainless steel exterior and blue accent lights to the high heat sear burners and rotisserie add-on, the Lynx Sedona is the ultimate union of premium design and functionality. While this is certainly considered a “luxury” item given its price point, this grill isn’t just a showpiece. It’s a well designed, high capacity grill. It is capable of cooking everything from mouth watering low-and-slow BBQ to perfectly seared steaks and everything in between. Given the overall design and ease of use, the Sedona qualifies it as a Gold Medal grill.
Warranty
Lynx offers a limited Lifetime Warranty on the body, sear burner, stainless steel burners, rotisserie burner, and grates. They also offer a limited five year warranty on the warming rack, spit rod, briquet trays, manifold and gas valves. Everything else has a two year limited warranty. This pertains only to defective parts and does not include labor or shipping and handling. For one year, Lynx will repair or replace all parts that you find defective at no cost to the original purchaser.
We thank Lynx for providing a Lynx 36″ Sedona for our review.


 Sign up for a free trial of the AmazingRibs.com Pitmaster Club and experience everything that the world's largest membership-based BBQ and grilling community has to offer!

Before you can post a comment or question you must sign into our commenting partner, Disqus. This helps make sure everyone hanging around the grill is civil. We do not tolerate nastiness, racism, porn, inappropriate language, or attacks on others. All comments are the property of AmazingRibs.com and we reserve the right to quote them, edit them, delete them, and block people from making future comments.
Please leave comments and questions on the same page that is devoted to that subject so others can see questions and our answers when they are reading about the subject. You must enable JavaScript to use the comments section, and you must accept cookies to post comments. Note: the software that runs Disqus is different from the Pitmaster Club, so members need to sign into the Pitmaster Club separately.