


Primitive cookery: Wood, fire, food. That’s all you need. No knobs, no dials. Yes, I know that most of this website is devoted to the best tools for taming fire, but some of the best food I’ve ever eaten was cooked over a campfire. Ask my wife about the grocery store porterhouse steak in Allegany State Park in NY 30 years ago.
There is one overriding reason to go back to your stone age roots and connect with your inner caveman: The aroma. It is unlike any other. Memo to all the scientists seeking a human pheromone: It has been right under your nose since the beginning of time.
Bring a plate of wood grilled salmon to the table and you’ll have to help your guests back into their chairs. Grilling on wood makes marinades, brines, spice blends, rubs, and sauces a waste of time and money.
You can grill with wood over a campfire, over a firepit, or even on a charcoal grill. But it is tricky and takes practice. And, because it requires total involvement and all the senses, it is also the most fun you can have cooking and entertaining. Ever seen people pull up lawn chairs, encircle the gas grill, roast marshmallows, and sing Kumbaya? Didn’t think so.
Campfire and firepit cooking
If you are building a campfire in your back yard, you should check with your fire department, there may be an ordinance against it, and check with your neighbors. Some people, especially asthmatics, have trouble breathing when there is a lot of smoke next door.

Simple campfire. Try to place your fire behind a windbreak such as a building a hill or a stand of trees, but don’t start a campfire under a roof. Find a spot away from buildings, tents, shrubs, and overhanging branches. Clear a circle down to dirt at least a foot wider than the fire will be. Better still, dig a hole 6 to 12″ deep to contain the coals and to give you dirt to smother them when you are done. It’s a good idea to encircle the fire with big stones, bricks, cinder blocks, or something on which you can place the cooking grate. Digging holes and surrounding your fire with rocks reflects heat into the fire, and they keep you and your guests warm. But wet rocks from the banks of creeks or under water can be waterlogged, and when they heat up, they can explode. If you can, make one side higher than the other so part of the grate is further from the coals to moderate temperature but be careful your meatballs and hotdogs don’t roll into the fire. Leave one side open so you can reach under the grate with a rake or shovel to rearrange the logs and embers when needed.

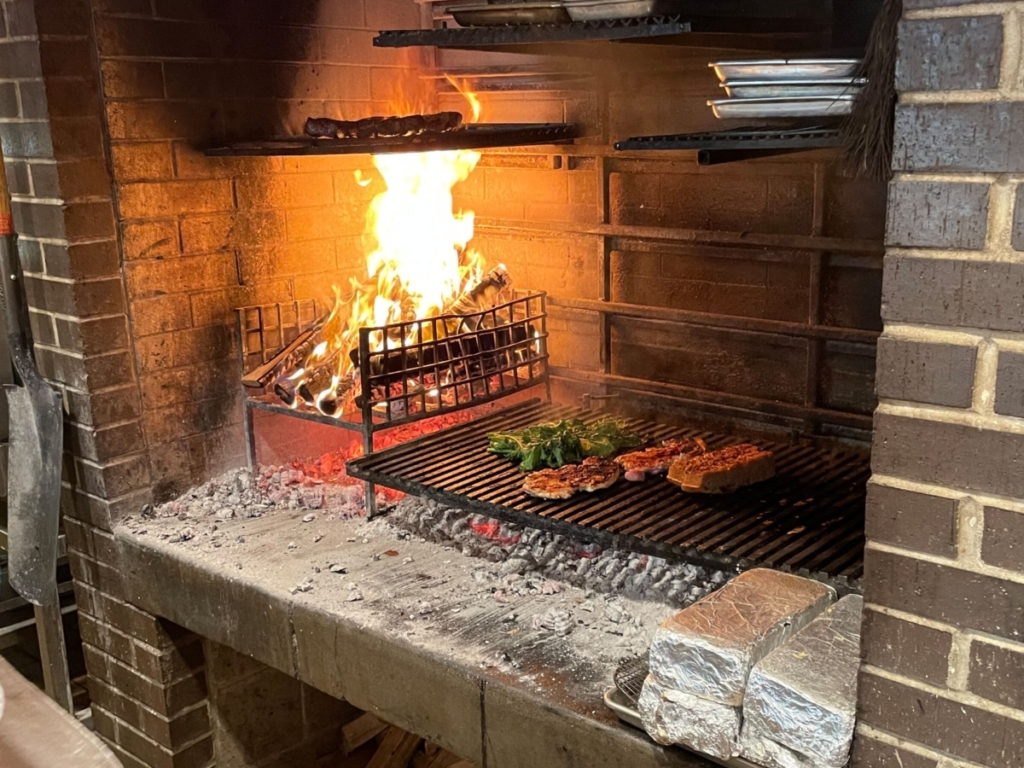
Permanent campfire. You can build a permanent campfire in your back yard quickly and cheaply with bricks, cinderblocks, flat slate, or, like the one shown here, concrete garden wall blocks. You can then buy a cooking grate to go over the top.
Dakota firepit. A simple wilderness method that you can use even on windy days is the “Dakota” firepit. You simply dig two holes about 1′ wide, 1′ deep, and about 1′ apart. Then you connect the two bottoms with an underground tunnel. Start your firewood burning in one hole and as it burns down, push the coals into the other hole. Use a flat rock or green sticks to cover the second hole, and you can cook on it with pots and pans, with a rotisserie, or on the sticks.
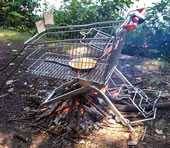
Improvised grate
A very effective method that I, ummm, cannot recommend.

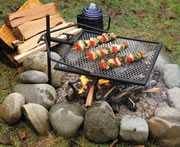
Collapsible grate
You can use a grate from any grill although there are some manufacturers that sell campfire grill grate with folding legs designed just for campfire cooking.
Hovering grate
Another nice design for a campfire grill is a pipe that you drive into the ground, the grates slip over the pipe, and they can be raised and lowered.
Campfire rings
There are a number of designs for portable fire rings to contain the fire and reduce wind, many with cooking grates. Some are quite elaborate. Click here to see some of the options.
Spits
There are even campfire spits and rotisseries , some with battery operated motors, for campfires.
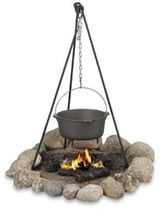
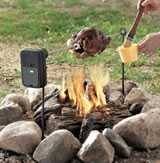
Tripod
My favorite tool is the campfire tripod, with three legs and a cooking grate that hovers above the fire on three chains. With a tripod, you can even skip the grate and just hang a haunch or bird on the chain.
Building your fire
Lay things out in the 2-zone setup with a hot zone over the coals and a cool zone with no coals underneath. This is especially important for a wood fire because you often need to get the food into a safe zone or else you will be eating biochar. The hot zone can be off to one side as it is on a grill, or in the center, but make sure you have plenty of real estate to move food out of the way of hungry flames.
To get into first gear, you need tinder, then you need kindling to get into second gear, and finally, firewood to cruise in third and fourth gear.
Tinder is ideally small pencil thick dry sticks, pine needles, pinecones, or bark. Dried leaves and newspaper are risky as kindling. They can produce fly ash, big floating hot flakes of ash that can easily set the forest or you house on fire. Kindling is finger size sticks and twigs. If you prefer, you can use charcoal instead of kindling. Firewood is logs ideally about the size of your forearm or a little larger. Use only dried wood. Wet wood is hard to light, it sputters, and puts out acrid smoke. Wet wood can ruin your meal. Click here to learn more about wood.
The two best methods to build the fire are the teepee method and the log cabin method. For the teepee, start by piling tinder, then build a teepee of kindling around the tinder, and then build a teepee of firewood around the kindling.

For the log cabin, shown here, lay two logs parallel to each other, and lay two more on top at right angles. Repeat three logs high. In the center, make a pile of tinder, then a pile of kindling on top of the tinder.
If you wish, you can drizzle an ounce or two of cooking oil on the tinder and kindling, but never use a smelly accelerant such as charcoal lighter fluid, gasoline, mineral spirits, turpentine, or kerosene. Light the fire with long wooden matches or a long neck butane fireplace lighter. If necessary, you can set the end of a stick on fire by wetting it with cooking oil and using it like a match.

The most important things to remember are: (1) Too much heat is bad and (2) too much smoke is bad. It is way too easy to ruin dinner if you have a roaring fire and belching smoke. A few gentle flames licking the food are OK, but they can easily burn the food, especially chicken skins. So the first trick is to start the fire and let it burn down a bit before the food goes on. You want a bed of glowing embers, ideally about 1″ thick.
Wood will burn out quickly. If you are just doing a couple of burgers or steaks, you won’t need to add more wood. But if you are cooking anything thicker, like a spatchcocked turkey or butterflied leg of lamb, you’ll need reinforcements. You can toss a log or two on as needed, usually off to the side, but the best technique is to start the logs burning in another location and, as they burn down, carry the embers to the cooking fire with a shovel. The AmazingRibs.com science advisor Prof. Greg Blonder says he likes to start two fires side by side and shuttle coals from one to the other.

Keep a close eye on the food. Wood fires can be hot. That’s serious infrared emanating from those coals. And fats dripping on embers can create an inferno in a hurry. You can really scorch something just in the time it takes to run inside and pour a drink. Empty your bladder before you lite the fire. Be prepared to move the food around.
Cook thinner pieces of meat your first time, something that won’t collect too much smoke. Keep it under 1″. You don’t want a USDA Prime ribeye tasting like an ash tray. After you begin to master the flame, then you can try thicker cuts.
Don’t let the food get too close to the heat. If the fire is too hot, rake away some embers or raise the cooking surface. If it is too cold, add embers or lower the grate. Getting the hang of this takes practice.
You also need long handled tongs to turn the food and well-insulated welder’s gloves for handling the tongs as well as moving embers around. As primal and basic as cooking with wood may seem, you still want to make sure you don’t waste money by overcooking the food, and you don’t want to make anybody sick, so bring a good digital thermometer to the party. I know it seems incongruous, but it is essential.
I keep a spray bottle of water to beat back flareups from dripping fat. If you use a spray bottle, beware that they can get ash on your food, so it is a good idea to move the food away before you pull the trigger. Keep a bucket of water or dirt handy to douse your fire when you are done or just in case things get out of control. Do not leave your campfire unattended. Do not be the cause of a forest fire. When you’re done, douse the coals with water, cover them with dirt, discard any dirt or ash that has drippings still on it to discourage wildlife and vermin from coming to breakfast. If you pour water on the fire, stand back, steam can burn you just as badly as flame.
How a pro does it
For some advice on cooking with wood I visited a master, Chef Paul Virant of Vie in Western Springs, IL, a Chicago suburb, always ranked among the top restaurants in the Chicago area, and one of my favorites.
Virant is on the flaming edge of the wood cooking movement. Dan Barber of Blue Hill in Pocantico Hills, NY is another devotee, quoted in the New York Times as saying “The more I learn about grilling, the more old-school something like sous-vide becomes.” The idea may be cutting edge in the US, but it has been thus in Europe and South America since the first auroch was dragged into a Spanish restaurante.
Vie’s menu offers these grilled treats among others:
- A 28 day dry-aged strip steak
- Sturgeon and Indiana shrimp (yes, they grow salt water shrimp in tanks in Indiana)
- An excellent burger and soft bun
- Sweet potatoes
- House bread
- Brined pork loin
Many restaurant grills are large three-sided affairs surrounded by steel or tile, and some have wood-fired bread baking and pizza ovens attached. Few have lids because the smoke can get overpowering.

Virant’s grill is a rectangular box lined with fire bricks, about a foot deep, three feet from side to side, and two feet from front to rear, with a high power exhaust fan and hood overhead.
He buys air dried hardwood and fruit wood logs that have been split to forearm size and cut into about 18″ long sections. He sits two on the bottom of the pit, two more across them at right angles, and two more across them, log cabin style, three courses high. This configuration leaves plenty of airspace on all sides.
To fire up he takes a chimney and fills it about half way with charcoal, sits it on the stove over a gas burner, and within a few minutes, they are fully engaged. He dumps them into the center of his log home, the grate goes on, he waits about 20 minutes for it to heat up, scrubs it with a wire brush, just a formality because it was cleaned spotless at the end of service the previous night, and he is ready to cook. When the grate is hot he starts cooking by putting meats and vegetables around the edges of the fire. It is just way too hot and smoky in the center.

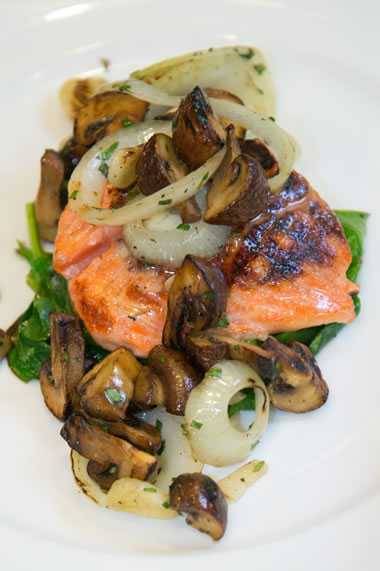
For his lesson with me he improvised a lunch with grilled everything: Local onions, garlic, mushrooms, and spinach, topped with line caught salmon and dressed with olive oil, grilled lemon, and fresh herbs.
He began by putting on the thickest and slowest cooking elements, the lemon and salmon. Then the rest. Through the entire cooking process Virant stands vigilant, focused on the food, rolling the mushrooms and garlic cloves around so they don’t burn, and moving them further from the heat as they approach readiness. When the onion slices are marked on one side, he flips them, marks them again, and pulls them way back from the flame when they are limp.
Finally he sits a mound of spinach directly over the flame and after no more than 10 seconds begins turning the pile over with tongs. Within less than a minute they have wilted and before they melt he lifts the pile onto a plate. He drizzles it with a squeeze of the grilled lemon, a little olive oil, some large grain salt, freshly ground black pepper, mounts the salmon on top, crowns it with grilled onion rings, slivered garlic, mushrooms, and herbs. A wonderful dish with harmonious flavors all stitched together by threads of wood smoke. I can still taste it.
Cooking with wood on a grill
You can cook with wood on most charcoal grills but there are some designed specially for wood cookery. In Southern California the Santa Maria style grill is especially popular. It has an open top and a wheel and pulley system that lets the cook raise and lower their famous tri-tip steaks to decrease or increase heat, or to keep the heat the same as the embers ebb. They come in all sizes, from small backyard rigs to the one shown here, used for catering.

A few wood burners are imported from South America where grilling red meat on a moveable grate is common. Most have V shaped grates sloped forward to drain away drippings to keep down flareups. The Grillworks has several beauties.
There is even a small portable called Cook-Air that weighs only 17 pounds. It has a blower system that gets the fuel up to cooking temp, 700°F in five minutes, and I’ve cooked some of the best steaks of my life on it with untreated scrap oak left over from a flooring project we did in our house.
Others that are designed for cooking with wood include American Outdoor Systems, Brinkmann Trailmaster 57″ Vertical Smoker, Bubba Grills, Englebrecht, The Good One, J&R Oyler Pits, Kalamazoo Hybrid Fuel Grills, Ole Hickory (Commercial), Pitt’s & Spitt’s, Southern Pride (Commercial), Texas Pit Crafters, and West of Memphis. We have reviews and more info on all of these in our equipment reviews section.
I’ve also cooked with wood on a Weber Kettle and other charcoal grills. The first rule is to get the grill off your flammable deck. Logs sputter, create sparks, and can burn down your house. Wear shoes, not sandals. Build a fire as if you were making a campfire. The second rule is to stand by your grill. The bigger the grill, the better so you can use the usual 2-zone system. Leave the lid off. The smoke can get thick, and with the lid on it can precipitate as soot.

Then there is a method I can the vigneron method. When visiting wineries in Bordeaux, the French region that makes wine perfectly designed for steaks, I saw a cooking method that blew me away.
In the winter vineyard owners prune most of the branches, called canes, off the vines. They then have huge piles of grapevine wood, rarely thicker than a pencil. During the fall harvest season vignerons will take a big stack of dried canes, and set them on fire. They quickly burn down to a glowing mound, and the workers grill meats over the scorching hot embers. The flavor is exquisite. My hosts called this method sarment (pronounced sar-MOHN).
I many states in the US, grapevines abound wild in the woods and grow on fences along the roadside. To insure a steady flow of grape wood, I planted five Himrod vines (the best green table grapes I have ever tasted) and I save the prunings. Each year I get enough fruit for a few snacks and enough wood for about three cooks. I’ve also done this with twigs from my neighbor’s cherry tree. Of course he expects to be fed in exchange.
To start, I take out the bottom grate from my Weber Kettle and open the lower vents. I crumple two sheets of newspaper and put them in the bowl. Then I stuff as many dried vine prunings as I can fit on top of the paper, all the way to the top of the kettle. On goes the top grate. I light the paper from below, through the vent holes, and the whole thing goes poof in about two minutes with very impressive 5′ flames. I once came close to melting the television cable running overhead.
Within a few minutes I have glowing white hot embers. But the embers are gone in a hurry because the canes are about the size of kindling. You’ve got a window of about 15 minutes between the time the flames disappear and the embers go cold. I wait until I can no longer see yellow flame. Then I scrub the grate, on goes the meat.
In France I had small butterflied quail, but at home I completely blackened Cornish game hens when I tried it. The skin is too fatty. Even though they’re smaller than standard broiler chickens, they’re still too thick, so steer away from poultry. I now use this method primarily for flank steaks because they are about the right thickness, under 1″, and beef loves heat and smoke. I pat the surfaces dry so it doesn’t steam, and use only salt. Pepper just scorches. Never any marinades.
I leave the lid off, turn the meat every minute, and it’s usually done in less than 10 minutes. The burning fruitwood creates temps in the 800 to 1,000°F range and gives it a fine flavor. That’s Warp 10, Mr. Spock.
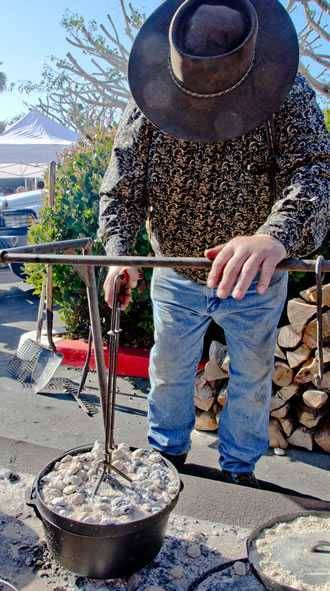
Cowboy and chuckwagon cooking
There is a whole subculture of cowboys and cowboy wannabes devoted to re-creating chuck wagon cooking. Many have even built replica wagons, or somehow found an original and restored it. They hold at least 50 gatherings a year, big feeds, and cookoffs every year in many locations in the West. This is a whole culinary style in itself. There’s even an American Chuckwagon Association. Chuck wagons were the original RVs and meals on wheels all rolled into one, and they accompanied cattle drives up the Chisholm Trail from Texas to Kansas and on to the slaughterhouses in Chicago. These modern culinary historians are experts at campfire cooking and take it to another level with an array of cast iron pots, pans, griddles, and Dutch ovens. To get started, you need Bayou Classic 8.5 Quart Cast Iron Dutch Oven like te one above. It even comes in handy around the house. It’s perfect for whole chickens or slow braising in the oven or in the grill. You can even sit it on top of coals and shovel more coals on top of the flat lid with a raised rim, and you can cook classic chili, baked beans, cornbread, casseroles, and even cobblers. It is 13″ wide x 7″ high, weighs 21 pounds and includes a perforated aluminum basket for steaming, frying, or boiling.
 Sign up for a free trial of the AmazingRibs.com Pitmaster Club and experience everything that the world's largest membership-based BBQ and grilling community has to offer!
Before you can post a comment or question you must sign into our commenting partner, Disqus. This helps make sure everyone hanging around the grill is civil. We do not tolerate nastiness, racism, porn, inappropriate language, or attacks on others. All comments are the property of AmazingRibs.com and we reserve the right to quote them, edit them, delete them, and block people from making future comments.
Please leave comments and questions on the same page that is devoted to that subject so others can see questions and our answers when they are reading about the subject. You must enable JavaScript to use the comments section, and you must accept cookies to post comments. Note: the software that runs Disqus is different from the Pitmaster Club, so members need to sign into the Pitmaster Club separately.