
All the instagram hero shots, all the grocery store advertisements, the restaurant ads, the grill ads and most meat ads show beautiful steaks and burgers with cross hatched grill marks. Restaurants can even buy chicken premarked with grill marks that they can microwave and serve. Cooking magazines and cookbooks teach readers how to get great grill marks.
Overrated.
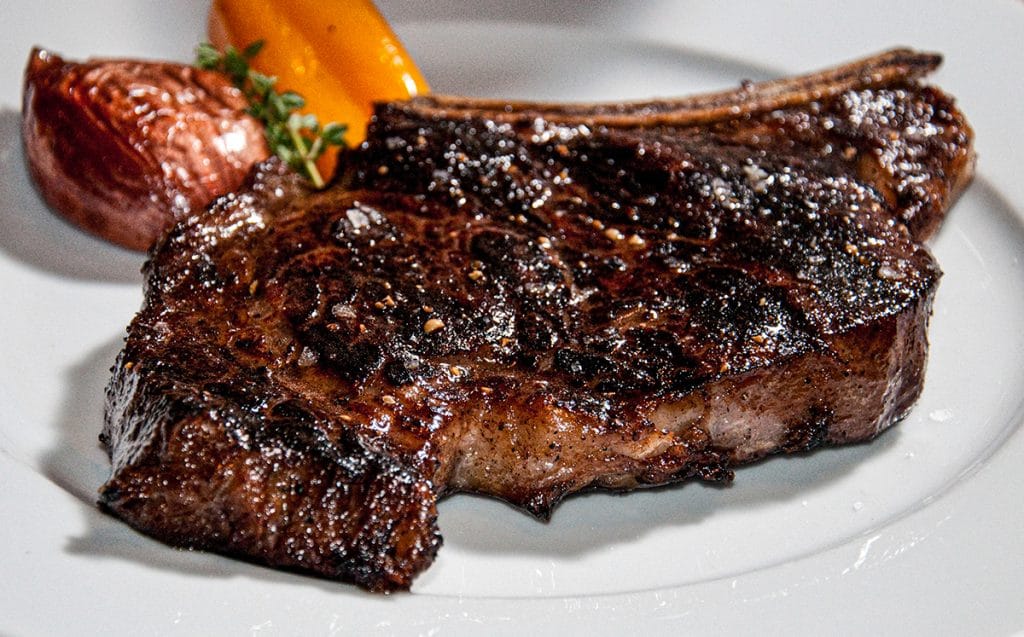
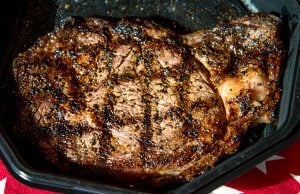
Look at the ribeye above, cooked at Michael Mina’s Stripsteak in Vegas, and below, a winner at a steak cookoff where grillmarks always seem to win. Doesn’t the ribeye below elicit a Pavlovian response? Yes, we’re trained to salivate at the sight of grill marks. But I’m here to tell you, the ribeye from Stripsteak above will taste better.
Why grill marks are overrated (most of the time)
When it comes to meats, and many other foods, the goal is golden to brown color on as much surface as possible. Dark brown crusts on grilled meat are the most flavorful part because dark brown is the result of changes in the chemistry of the meat. Called the Maillard reaction, browning occurs when heat changes the structure of amino acids, proteins, and sugars, creating hundreds of new really tasty compounds. We call that searing, and the result is a crust that too many of us is the highlight of the meal. When it comes to most foods, brown is beautiful. Black is not. Tan is not.
Chefs know this.
Those beautiful grill marks are merely superficial branding, just coloring on the surface — like the freckles on Lindsay Lohan, cute, but lacking substance — unlike the deep rich sear that delivers max taste and texture in the ribeye at the top of the page.
The steak with the mouthwatering cross hatches has perhaps 1/3 of the surface fully browned, but the diamond shapes between the grill marks remain tan, boring, well done meat, whose potential is unrealized, like Superman without a phone booth, like Gehrig without a bat, like Chopin without black keys.
Worse, if you’re not careful, grill grates can scar your meat with black stripes of chalky carbon that tastes like burnt toast.
That’s one of the reasons that many great steakhouses use broilers where the flames are above the meat. That way they can get brown all over. That’s why grill marks don’t make me salivate. I want brown all over.
Here’s what’s going on.
Not all heat is the same. As I describe in my article on the thermodynamics of barbecue, cooking on a grill involves radiation, convection, and conduction. Conduction is when the metal grates are in direct contact with the food. It is the fastest way to transmit heat to meat. Radiation is the heat carried by infrared light emanating from coals or gas burners directly below the food. It is second fastest method. Convection is the warm swirling air if the meat is not directly exposed to flame. It is the slowest method. Conduction cooks faster than radiation or convection.
Metal grill grates transmit heat much better than air because they have so much more mass. Air is really a better insulator than conductor. That’s why styrofoam is filled with air. That’s why you can put your hand into a 300°F oven for several seconds, but touch 300°F grill grates and you’re blistered in an instant.
What gives?
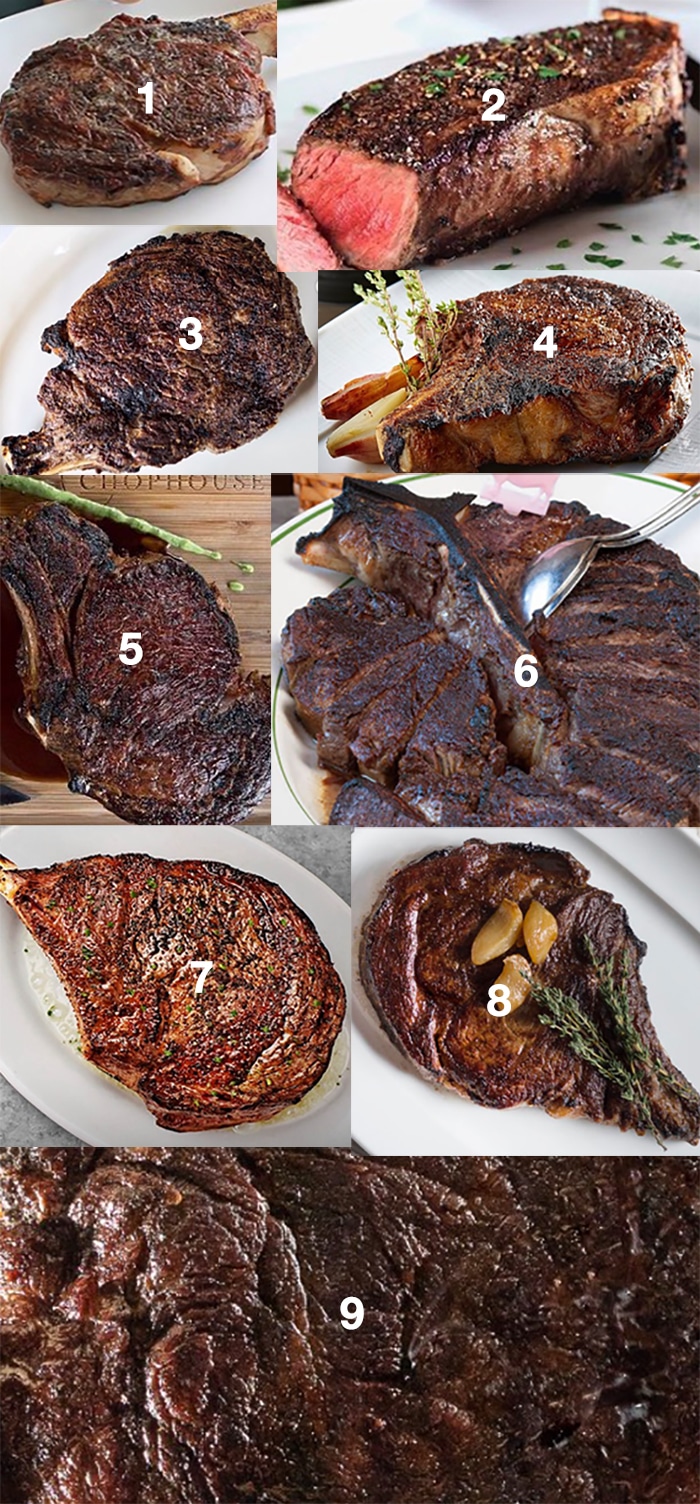
Proof
Here is a picture of the steaks from some of the finest, most expensive steakhouses in the country. They are (1) Stock Hill in Kansas City (2) Chandler’s in Boise (3) Gibson’s in Chicago (4) Knife in Dallas (5) Hall’s Chophouse in Charleston (6) Peter Luger in NYC (7) Ruths Chris nationwide (8) Porterhouse in NYC (9) Smith & Wollensky in many cities.
Why do steak competition cooks all use GrillGrates® and work their butts off to get perfect cross hatches?
I dunno. For some reason when the very popular Steak Cookoff Association started they bought into the grill marks myth and so have so many of their judges and cooks. So almost all cooks use GrillGrates® because they make such beautiful grill marks. But if you buy my argument that you want an all-over brown Maillard sear, just flip your GrillGrates over and use the back side! The back side is a flat griddle with holes to let smoke through. Perfect!
OK, there are some occasions when you do want grill marks
When you have thin foods like shrimp, skinny chops, skirt steaks, asparagus, and bell peppers, it is hard to get the exterior browned before the interior is overcooked. This is when you want grill marks and GrillGrates® are perfect because the food can’t fall through into the fire. That conduction cooking will develop part of the surface in a hurry, leaving the inside tender and juicy. So on foods that are less than 1″ thick, grill marks actually are good. But on thicker foods, I want all over browning.
How to get the perfect Maillard sear
So how do you get the perfect all over Maillard brown sear? Cook the meat in a cast iron pan with a thin coat of oil. Or use a griddle. Or use the back side of GrillGrates.
OK, so you want that grilled smoky flavor. Then don’t use a pan. Go the exact opposite direction. Start with a piece of meat that is more than 1″ thick and use cheap thin wire grill grates in order to allow the browning to come from direct heat radiation and allow the drippings to vaporize and flavor the meat. But don’t let the meat sit on the grates so long they burn. Move the meat around a lot so the thin grates won’t make marks, and you get the all over mahogany color you want.
Say what? Why not use cast iron grates? Aren’t they the best?
More mythology. Click here to read my reviews of popular grill grates and how to clean them.
Debunking the “flip just once myth”
All the books say to flip your meat as little as possible! Don’t believe them!
Not any more. If you flip more often, you get better flavor, more even color and doneness, and less cooking time. Among the advocates of frequent flipping are Harold McGee, author of On Food and Cooking: The Science and Lore of the Kitchen, J. Kenji Lopez-Alt of SeriousEats.com, Nathan Myhrvold, editor of the landmark six-book set Modernist Cuisine: The Art and Science of Cooking, and the AmazingRibs.com science advisor Prof. Greg Blonder, all culinary scientists of serious consequence.
Here’s what McGee says “If perfect grill marks are necessary [flip] once or twice. If texture and moistness are more important, then flip every minute. Frequent turns mean that neither side has the time either to absorb or to release large amounts of heat. The meat cooks faster, and its outer layers end up less overcooked.”
Lopez-Alt decided to test the theory. He made a dozen 1/2 pound burgers and cooked them in a steel skillet heated to 450°F. He flipped some often, every 15 seconds in some cases, and others he flipped only once. He took them all to an internal temperature of 125°F (medium rare and well under the USDA recommended safe temp) and then rested them for five minutes at room temp. Sure enough, the patties that were flipped more often cooked in 2/3 the time, the edges were more brown, and the color was more even top to bottom. The single-flip burgers got a little darker on the outside, but had a thicker layer of well done and overcooked meat under the surface, up to 50% of the thickness! That number fell to 40% when flipped every minute, 35% when flipped every 30 seconds, and 30% when flipped every 15 seconds.
Here’s what is happening. When the meat is exposed to contact with the hot pan it absorbs heat a lot faster than when exposed to hot air, which is not a good conductor. The molecules on the meat’s hot surface get excited and start moving around a lot raising the temp of the slower molecules closer to the center. Then, when you flip the meat, the surface cools a bit immediately so it is less likely to burn when you flip it towards the heat, but the molecules below the surface, are still jumping around and inviting their buddies to dance along with them. The same thing happens when the meat is over a hot flame. The process is essentially the same as when you are cooking with a rotisserie. Blonder points out that “Many famous steak houses cook steaks in two-sided broilers that subject meat to direct flames from above and below- truly the gates of hellicious browning.”
I have played with the process a lot and indeed, flipping every minute or so give me the best crust, and least overcooked meat beneath the surface.
I asked the AmazingRibs.com science advisor, Prof. Greg Blonder, what he thought of the concept. “Flipping every 15 seconds is just barely OK. If you flip that fast, the crust does not form because each time you flip you have to steam off any exuded water before browning can start. This takes more than 15 seconds. I think the better approach is to keep the meat flat for at least a minute, then flip. Of course, on a grill the steam quickly exits between the grates, so you can flip faster than in a frying pan.”
David Parrish’s Cold Grate Technique
David Parrish is the inventor of the Slow ‘N Sear, a must have for owners of the Weber Kettle. He’s a fan of this site and the reverse sear, and one day he had an ah-ha moment. When searing steaks the hot grates make grill marks and even if you flip often, they can burn. He realized that during the sear step some of the grates were hot, some were cold, so he began rotating the grate so the steak when on cold metal. Here he demonstrates the process:
Reverse sear poultry and anything thicker than 1″
The only problem with all of this is that, on poultry or steaks and chops more than 1″ thick, you need to do one more thing. Reverse sear.
So far we have been concentrating on the surface of the meat. But if you have a chicken leg or thigh, it has to be cooked to 165°F to be safe. A steak is perfect medium rare at about 130°F to 135°F. By the time you get the chicken up to temp, that fatty skin is as black as the Interstate. Ditto for thick steaks and chops. So the technique is to reverse sear. Cook the inside of the meat first by putting it into a convection heat zone where it is not directly exposed to high heat. Do this by setting up your grill into 2 zones, one direct, one indirect. Start a thick steak on the indirect side at a low temp and warm it slowly until the interior is about 20°F below your desired temp, and then move it over the direct heat to sear. That’s right, you cook the inside and the outside differently, and you sear at the end of the cook, not the beginning. The process is called reverse sear and you can read more about by clicking here.
Caveats
Now keep in mind, a lot depends on the type of meat, its thickness, and the heat of your grill, but if you understand these concepts, you can amp up your grilling: Shoot for a uniform all over deep golden to mahogany color, just this side of black, and to get there use either thin wire grates with the meat right above the heat, or a flat surface like a griddle or the back of GrillGrates, and turn often. For thick cuts of meat and poultry, reverse sear.

High quality websites are expensive to run. If you help us, we’ll pay you back bigtime with an ad-free experience and a lot of freebies!
Millions come to AmazingRibs.com every month for high quality tested recipes, tips on technique, science, mythbusting, product reviews, and inspiration. But it is expensive to run a website with more than 2,000 pages and we don’t have a big corporate partner to subsidize us.
Our most important source of sustenance is people who join our Pitmaster Club. But please don’t think of it as a donation. Members get MANY great benefits. We block all third-party ads, we give members free ebooks, magazines, interviews, webinars, more recipes, a monthly sweepstakes with prizes worth up to $2,000, discounts on products, and best of all a community of like-minded cooks free of flame wars. Click below to see all the benefits, take a free 30 day trial, and help keep this site alive.
Post comments and questions below
1) Please try the search box at the top of every page before you ask for help.
2) Try to post your question to the appropriate page.
3) Tell us everything we need to know to help such as the type of cooker and thermometer. Dial thermometers are often off by as much as 50°F so if you are not using a good digital thermometer we probably can’t help you with time and temp questions. Please read this article about thermometers.
4) If you are a member of the Pitmaster Club, your comments login is probably different.
5) Posts with links in them may not appear immediately.
Moderators