


For about $100 you can easily convert a standard Weber Kettle into a much better grill as well as a smoker capable of making restaurant quality smoked ribs, pulled pork, beef brisket, turkey, salmon, or whatever you want to smoke. This revolutionary new device also makes an awesome searing tool for steaks. We have even baked brioche with it. We have used ours extensively and hereby crown the Slow ‘N Sear “The Single Best Accessory For The Weber Kettle Ever”.
If you have a limited budget or limited deck space, or even if neither is a concern, the Slow ‘N Sear can turn your trusty rusty kettle into a smoking, grilling, and baking powerhouse. Read on for more info.
A word of caution. There are cheap Chinese knockoffs on Amazon.
Buy ONLY from the manufacturer’s website by clicking this link
About the Slow ‘N Sear
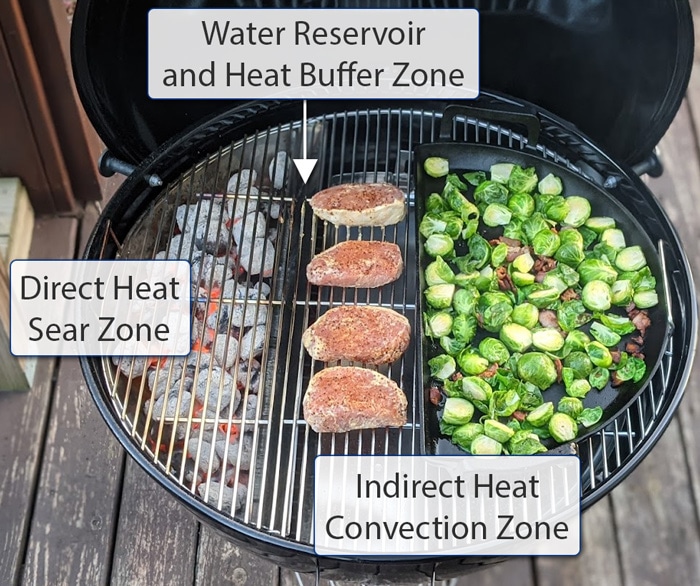
The Slow ‘N Sear is made of two laser cut pieces of 16 gauge 304 stainless steel that are machine formed and hand welded/polished. Formed into a charcoal basket with a built-in water reservoir, it weighs about 5 pounds and it turns your kettle into a perfect 2-zone cooker.
Without a doubt, 2-zone cooking is the single most important technique a backyarder needs to master. On the indirect convection heat side you can bake or smoke roast food that rivals the output of a big rig for thousands of dollars. On the direct radiant heat side the Slow ‘N Sear creates a searing zone that rivals steakhouse temps. It creates the hottest sear zone we’ve ever tested on any grill.

You can smoke for more than 8 hours on one Weber chimney of charcoal (80 or so briquets). A quart of tap water in the well will give you 5 or more hours of smoke enhancing steam. Some readers report the Slow ‘N Sear overdelivers with 10 hours of cook time at 225°F and 5 hours of steam from a quart of water.

The owner of the company, David Parrish knows his stuff. He has a degree in physics and was the founding “Pit Boss” of our Pitmaster Club. But we don’t love the Slow ‘N Sear because we love David, we love this tool because it is the best of breed. And it works better than the other kettle add-on on the market.

Smoking with the Slow ‘N Sear
To smoke with the Slow ‘N Sear you simply place it on the charcoal grate and fit the curved charcoal basket almost flush against the side of the grill. You can place meat on the lower and the upper rack so it is possible to cook multiple large hunks of meat at once. If you have something drippy like a pork butt, put a drip pan or aluminum foil shaped boat on the charcoal grate under the meat. There is no need to add water to the drip pan.

Now we’re ready to fire things up. Wad up two sheets of newspaper or place a paraffin starter in one corner of the charcoal basket. Pour 12 charcoal briquets on top, pile them into one corner, and light them in place like you would light a chimney.
Once the hot coals are white, fill the remainder of the basket with unlit charcoal, place two or three wood chunks in the charcoal, add a quart of water to the reservoir, and close the lid. Leave the top vent fully open and the bottom vent cracked about 1/2″. In a few minutes, as the temperature passes 200°F close the top vent until it’s about 1/3 open and the bottom vent to 1/4 open. Your grill will settle at a stable cooking temperature in 15 to 20 minutes.
Temperature Adjustment
At this point if the temperature is not where you want it to be you can further adjust the vents as needed (we like 225°F for most low and slow cooks). Once you’re at your desired temp add the food to the indirect side. You now have an ideal 2-zone setup, and the food will slow roast with indirect heat, just like the big boys.
Put the lid on and go drink a beer. The Slow ‘N Sear will pump out aromatic smoke and just the right low and slow temp for hours. We’ve had no trouble keeping the temp between 225°F and 250°F in all kinds of weather. The thick steel double walled water reservoir blocks your meat from direct exposure to the radiant heat and flames of the coals. The water puts moisture in the air that condenses on the meat and wet surfaces attract smoke.
Perfect for Steaks
The Slow ‘N Sear is the perfect way to cook thick steaks with the reverse sear. I start the meat on the indirect side, just a few wood pellets in the Slow ‘N Sear with the coals, and I slowly warm the meat to about 115°F, getting the interior perfectly even colored. Then I take the steak off for a few moments, let the grill heat up with the vents open, and place the steak right over the hot coals, lid off. You need to stand right there and flip every minute or the meat will burn. Perfect seared exterior. Perfect wall to wall medium rare interior. Click here to learn more about the reverse sear.
For thin steaks, I just fill the charcoal basket with hot coals and throw the steak right on the grate above the coals. Turn often to prevent burning and you will have a deep dark exterior and a medium rare interiors.
Baking
But you don’t have to smoke or sear on it. Check out these delicate brioche hamburger buns we baked on it on the very first cook after we got it.

Keep in mind that this is a “hot” smoker. So, it can’t do cold smoking for things like lox or cheese. But it can do just about anything else the fancy-schmancy smokers do.
Accessories
Slow ‘N Sear has two nice add-ons. There is a half moon shaped stainless drip pan that you can place on the bottom grate on the indirect side to catch drips for making sauces or just for keeping the bowl of your grill clean. I put a little water in it to make sure the drips don’t burn. It can also be used as a griddle.

They also offer GrillGrates, a special cast aluminum grate that makes perfect sear marks and keeps small foods from falling through.

Slow ‘N Sear Setup and Tips
Here are some tips for success. Special thanks to David “Pit Boss” Parrish for several of these tips. He created the thing. He should know how to use it!
- A charcoal grill uses two fuels, charcoal and oxygen. You need to figure out how to control them to get the right temp, usually 225°F or 325°F depending on the food. Before you start cooking, calibrate your tool. Do some dry runs without meat so you know what it is actually doing and how it reacts to changing vent openings and when coals burn down. Start by reading my article on calibrating and seasoning your new grill or smoker.
- If you have been cooking low and slow for a while on a kettle you are going to discover the vent settings you’re accustomed to using won’t work. The Slow ‘N Sear burns charcoal very efficiently so expect to keep both the top and bottom vents more closed than you’re used to.
- When making vent adjustments to get to or maintain 225°F or 325°F it’s important to make very small adjustments. If you’re trying to get down from 235°F to 225°F, for example, the adjustment necessary will be so slight you’ll barely be able to see a difference once you’ve moved the vent. Never open the lid to lower temps. This will feed oxygen to the charcoal and 15 minutes later you’ll be running even hotter than you were before you opened the lid.
- Keep the lid on tight. If you are having temp control problems, chances are you are leaking too much. Air flow control is vital. If you see a lot of leakage under the lid, go buy four or five 1.5″ binder clips in your office supply store. They’ll hold it tight. Binder clips are by far our favorite fix for leaky a leaky lid.
- Temps running high? Get a spray bottle and fill it with water. The sprayer should have stream and mist settings. If your kettle is 30°F or more above the temp you’d like, crack the lid to expose the charcoal. Spray streams of water (3 or 4 bursts) onto half of the lit charcoal. This will reduce how much charcoal is burning and will lower your temps quickly. Now close the lid and close your vents a bit or the temps will head right back up. If you’re really picky and your kettle is only 10°F or 15°F hot try spritzing mist on the lid.
- That’s right, spray a little mist of water onto the TOP of the closed lid. The water should evaporate quickly. Just a couple of spritzes. If the water sits on the lid for more than 10 seconds you sprayed too much. Now close the vents slightly. The water will drop your pit temp about 5°F and closing the vents slightly will keep the temp there. You can keep spritzing every minute or so until the temp gets down where you want it.
- Remove all ash from your kettle before using the Slow ‘N Sear. It takes over 8 hours but ash buildup will eventually start blocking the intake vents. You may as well start with as little ash as possible.
- The air temp outside the grill, rain, and wind can drastically impact the internal temp. For 225°F cooks most days you’ll start with 12 lit briquets. The colder the day, the more lit coals you need (15 to 20 briquets) to use when lighting the grill. On hot days start with no fewer than 10 lit briquets. You can put hot coals on top of unlit coals or visa versa, it doesn’t make much of a difference.
- Don’t use lump charcoal. It varies from bag to bag and you need consistent heat. There is too much dust in lump bags and dust impedes airflow in the Slow ‘N Sear. Also, with briquets you can count them and this helps you control temp. I recommend Kingsford Blue Bag charcoal because it does not burn as hot as the Kingsford Competition (brown bag). Whatever you do, pick one charcoal and stick with it until you’ve learned your pit.
- If you plan on cooking for 10 or more hours, it’s a good idea to replenish your fuel supply at the 8 hour mark before the remaining briquets get so small they can’t be moved without falling through the charcoal grate. To replenish charcoal open the kettle and move the food grate so you can pour charcoal into the Slow ‘N Sear charcoal basket (or just lift the hinged part of the food grate if your grate has that feature). With a pair of tongs, or similar device, shove the remaining charcoal into a corner of the charcoal basket. Fill the basket up with unlit charcoal. Place the food grate back in place. Now is also a good time to clean the ash out of your kettle using the one touch cleaning system. Close the lid. That’s all there is to it.
- We recommend wood chunks, not chips, for smoke flavor. Put two or three wood chunks, at least golf ball size, not chips, on top of the lit coals. Mojobricks, which are made from compressed sawdust are great for this purpose. Read my article on the Science of Wood.
- We like to keep a drip pan on the lower charcoal grate and under the food to keep the kettle cleaner, and it’s also a great location for a pan of beans to collect drippings. You can even cook hunks of meat. Just remember that the temp down there is usually about 70°F cooler.
- You can use rib racks, but don’t crowd them. There must be airflow between the slabs of meat. Click here to read my article on Cooking More Than One.
- The more cold food in the grill, the colder the air temp in the grill will be so you will need to consider how much cold food you’re cooking when you’re adjusting your vents.
- When cooking at 225°F or 325°F fill the water reservoir with one quart of hot water, not beer, wine, juice, etc. They don’t penetrate the meat. They just waste money. Click here to read more. Use hot water, the hotter the better, so the energy from the charcoal isn’t wasted heating the water. Don’t skip the water, it helps keep the temp from spiking and dipping. The water will last several hours. By the time the water runs out the meat will be sweating plenty of water vapor into the cooker so you probably won’t need to add water again.
- Don’t use water if you plan to cook above 325°F (e.g. reverse sear) and never put flammable liquid in the reservoir!
- When you lift the lid, lift it straight up and don’t tilt it. That will trap much of the heat under the hood and recovery will be faster when you put it back on. Click here to read the debunking of “lookin you ain’t cookin“.
- Do not use a thermometer in the dome unless you plan to eat the dome. The side of the grill with the Slow ‘N Sear will be hot, the side without will be much cooler. The temp in the dome will be a blend of the two. You must always measure the air temp where the meat will be. It is the meat that you are cooking, after all.
- Use a probe with a cable and drop the probe through the vent holes in the top, not under the lid. Snaking it under the lid will allow in air. Better still, drill a small hole in the side of your kettle just above the grate on the side opposite the Slow ‘N Sear so you can slide the probe in there. While you’re at it drill another hole just above the lower grate for when you cook down there.
- Join the Pitmaster Club. Our moderators and hundreds of owners have created a Slow ‘N Sear forum with idea exchanges between Slow ‘N Sear owners. The list of tips and tricks grows daily. If you’re in the club you can find the Slow ‘N Sear forum here.


 Sign up for a free trial of the AmazingRibs.com Pitmaster Club and experience everything that the world's largest membership-based BBQ and grilling community has to offer!

Before you can post a comment or question you must sign into our commenting partner, Disqus. This helps make sure everyone hanging around the grill is civil. We do not tolerate nastiness, racism, porn, inappropriate language, or attacks on others. All comments are the property of AmazingRibs.com and we reserve the right to quote them, edit them, delete them, and block people from making future comments.
Please leave comments and questions on the same page that is devoted to that subject so others can see questions and our answers when they are reading about the subject. You must enable JavaScript to use the comments section, and you must accept cookies to post comments. Note: the software that runs Disqus is different from the Pitmaster Club, so members need to sign into the Pitmaster Club separately.