


We demystify wonderful tawny biscuits, ditch the silliness, and show you how to get them soft, fluffy, and crispy on the outsides
I am obsessed with biscuits. I have tried every recipe under the sun. Biscuits are so wonderfully versatile, and surprisingly, they are easy and forgiving. And they can be baked on a grill with indirect heat! Either way, biscuits are best when served hot right out of the oven.

Foolproof Southern Biscuit Recipe
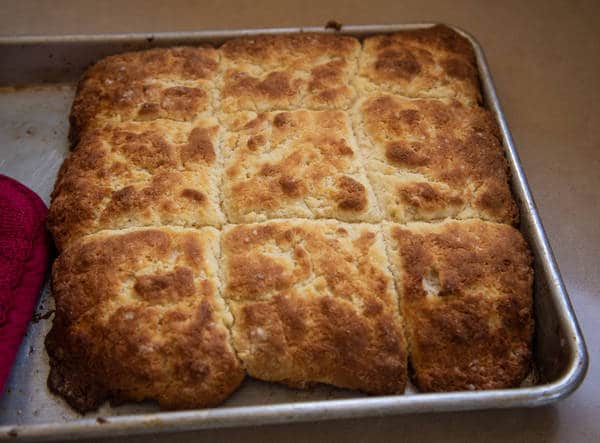
Rate this RecipeThere are many recipes out there for Southern biscuits with countless variations on the ingredients and techniques, and not surprisingly, controversy and nonsense abound over how to make them. My take on classic buttermilk biscuits are special in that they are really easy to make and get nice and crisp on the top and bottom, yet the center remains soft and fluffy.
Ingredients
Method
- Prep. Toss the butter in the freezer an hour or so before cooking.
- With a fork, mix the flour, baking powder, baking soda, sugar, and salt in a medium bowl.
- Divide the butter into a 5 tablespoons chunk and a 3 tablespoons chunk. Keep the paper on the 5 tablespoon chunk so you can hold it without melting it all over your hands. Roll the paper back and grate the 5 tablespoon chunk with the large holes on a box grater right onto the baking sheet, then mix it into the flour with a fork, a handful at a time, until all the grated butter is coated. This is a brilliant trick that I discovered reading every recipe I could find. So fast and easy.
- Pour in the buttermilk and stir it with a fork until the liquid and all the dry ingredients are absorbed. You should have a wet sticky dough. Stick it in the fridge for about 15 minutes.
- Melt the 3 tablespoon chunk of butter and lightly paint a small baking pan or cookie sheet with it. Thoroughly cover a section about 8 inches (20 cm) square with the butter. Butter the inner sides of the pan as well. When you are done, pick up the pan and look at it to make sure it is thoroughly buttered to prevent sticking. Do not be tempted to use a sheet of parchment paper or a silpat. Butter is crucial to getting a crispy bottom (and for flavor). Set the remaining melted butter aside for painting the tops before baking.
- Toss 3 to 4 tablespoons of flour on your work surface and coat your hands well with flour. Slide the dough onto the work surface and gently press it into a 6 inch (15 cm) square. It'll be about 1 inch (25 mm) thick. Fold the square of dough in half, flatten it out, and fold it again and again, at least 5 times. This folding creates layers that will bake into a flaky biscuit. You will probably have to re-flour the surface and your hands several times. Then form the dough into a 6 inch (15 cm) square.
- Cut the dough into 9 squares like a tic-tac-toe board. If you prefer, you can cut them into round biscuits with a biscuit cutter or the rim of a water glass. Or, you can make “drop biscuits,” rustic unformed biscuits, by simply ripping off a hunk of dough a bit larger than a golf ball. At this point, you can now freeze the biscuits between layers of wax paper in a zipper bag. Then you can bake them right out of the freezer, adding an extra 5 minutes or so to the baking time.
- If you are ready to bake now, put the biscuits one at a time on the buttered baking sheet and push them up against each other. They like to touch, as it makes each biscuit puff up with pride and keeps them from falling over. Don’t worry about putting them in the pan in the same place they were on the work surface. But if you have time, pop the pan of biscuits into the fridge for about 15 minutes. Just before cooking, paint their tops with the remaining melted butter. You probably won’t use it up, so save the rest for serving. Again, this step of buttering the tops is crucial for the crispy crunch.
- Fire up. Preheat the oven to 425°F (218 °C). On a grill, use indirect heat. On a smoker, keep the smoke down.
- Cook. Bake until golden brown on top, a bit darker on the bottom, and about 205°F (96°C) in the center, about 15 to 20 minutes if your oven is calibrated. After about 7 minutes, rotate the pan for even browning.
- Serve. While still warm, serve the biscuits on their own, buttered, or with butter and molasses, as is traditional in some parts of the South. Jam and/or marmalade make excellent spreads. Or serve them with turkey and all the fixings, with ham and a glaze or redeye gravy, smothered in sausage sawmill gravy, made into sandwiches, or topped with a sunnyside up egg. Biscuits also make pillowy toppings for fruit cobblers, pot pies, or chili baked in a Dutch oven. Oh, and if you are going to serve your biscuits with butter, set a stick on the counter when you start the process so it can come to room temp and it will spread more easily.
Notes
About the salt. Remember, kosher salt is half the concentration of table salt so if you use table salt, use half as much. Click here to read more about salt and how it works.
About the flour. All the experts warn not to use bread flour. I have not tested this warning but am willing to accept such universal condemnation as the additional protein in the flour would create chewy biscuits.
About the buttermilk and how to substitute. Most biscuits are made with buttermilk because it is acidic and the acid reacts with the baking soda to create carbon dioxide and that gives the dough “lift”, helping it rise and add airiness and lightness since there is no yeast involved for fermentation. But most of us don’t keep buttermilk on hand. To make a cup of buttermilk substitute, pour one tablespoon of white vinegar or lemon juice into a measuring cup and top it off with milk until it measures one cup. Stir them together and let them sit for five minutes. Here’s another hack: whisk together half a cup of sour cream and half a cup of water. Yet another hack: take 2/3 cup heavy cream and 1/3 cup sour cream and beat them til fluffy.

Before you can post a comment or question you must sign into our commenting partner, Disqus. This helps make sure everyone hanging around the grill is civil. We do not tolerate nastiness, racism, porn, inappropriate language, or attacks on others. All comments are the property of AmazingRibs.com and we reserve the right to quote them, edit them, delete them, and block people from making future comments.
Please leave comments and questions on the same page that is devoted to that subject so others can see questions and our answers when they are reading about the subject. You must enable JavaScript to use the comments section, and you must accept cookies to post comments. Note: the software that runs Disqus is different from the Pitmaster Club, so members need to sign into the Pitmaster Club separately.