Learn how prime steakhouses cook their steaks and how to do it even better at home.
Cooking a high quality steak at home can seem like a daunting task but thanks to this guide you’ll soon be able to create one that is perfectly cooked on the inside, features a dark and flavorful crust, and is juicy with a big bold beefy flavor. The keys to success are: Selecting the proper cuts, grades, thickness, and technique. Here’s how to can raise your game to steakhouse level and have your guests reeling in deliria.
At a glance: Selecting the right steak, prepping it, and cooking it
1) Buy the best grade of steak. You want something that has filigrees of fat woven through the meat called marbling. The top grade in most groceries is USDA Choice or Certified Angus which is USDA Choice or above. If you can special order it, and if you can afford it, get USDA Prime or Wagyu beef.
2) Select the proper thickness. 1.5″ thick bone-in grade ribeye is my favorite.
3) Dry brine. About two hours in advance, liberally salt both sides and put back in the fridge. Let the salt melt and be pulled into the meat. Salt tenderizes and amps up the flavor. No pepper yet.
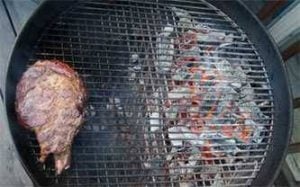
4) Preheat. Setup a grill for 2-zone cooking with one side scorching hot and the other about 225°F, no water pans. If you are not familiar with the concept of 2-zone cooking, now is the time to learn this crucial technique.
5) Cook the interior. Place the meat on the indirect side, lid down. Add wood to the charcoal. This allows the meat’s interior to slowly warm up evenly and prevents the banding of colors with dark outer layers. This makes it more tender as it slowly cooks and adds smoke flavor. When you cook hot and fast there is no time for smoke to do its magic.
6) Flip. Stand by your grill and check the meat temp every 5 minutes or so with a very thin probe very fast thermocouple thermometer. Flip it when it get to about 95°F. You don’t have to be precise on this. DO NOT rely on touch until you are very experienced.
7) Prepare to sear. When it hits 115°F interior, get the hot side as hot as you can. Take the meat off and add more lit coals if you need to. Or raise the coals closer to the cooking grate. Or fire up the sear burners. Now pat the exterior dry with paper towels. Don’t worry that you are wasting juice. A few drops lost will not hurt anything. We need the surface dry for the next step otherwise we will be steaming the surface, not searing it. Now paint the meat with rendered beef fat, clarified butter (whole butter has too much water), or vegetable oil. This prevents it from sticking to the grate, fries the surface, and enhances flavor.
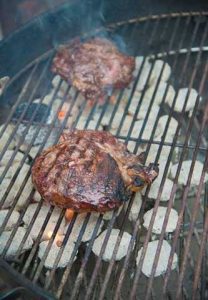
8) Sear. Now move it to the hottest part of the grill and leave the lid open. We want the lid off so heat is concentrated on the exterior of one side at a time. We are working on the outside now, not the inside. Sear the exterior on one side for 3 to 5 minutes checking frequently and moving it a bit to prevent grill marks from burning the meat. This should get you a dark flavorful exterior. When you have the right color, paint the top with oil and flip the meat. Hit the dark side with oil and a few grinds of black pepper. We pepper it late in the game so the pepper doesn’t burn, but hot oils will extract its flavor.
9) Serve simple. No need to rest the meat. No fancy sauces. Make a Board Sauce at the most. My favorite sides are Warm French Potato Salad and Crunchy French Green Beans with a big red wine.
A deeper dive, beginning with the cuts
The prime steakhouses serve the best cuts, usually from the rib and loin area, along the spine of the steer. They are also the most expensive: ribeyes, porterhouses, T-bones, strip steaks, and cuts from the tenderloin such as chateaubriand and filet mignon. You can make darn tasty meals from the sirloin, round, flank, chuck, and other cuts, but these muscles are not as tender.
My preferences are the ribeye and strop. They are the best cuts for flavor and tenderness combined. They both come mainly from the same muscle, the longissimus dorsi, so arguing which is better is like debating which side of Sergeant Pepper’s is better. A lot of folks prefer meat from the tenderloin because it is the more tender, but they are also leaner than ribeyes so they don’t have the flavor fat brings to the party.
Click this to learn more about the Science of Beef Cuts.
Beef grades
I refer to the best steakhouses as prime steakhouses because USDA Prime is the grade of meat served in the best of them. You won’t find Prime in discount steakhouses in mall parking lots or in most groceries. USDA Prime beef is selected because it has a lot of marbling, thin hairline grains of fat that weave weblike through the fibers of protein. You can see it. Most Prime goes to restaurants.
Wagyu is a special breed of beef that produces highly marbled and flavorful meat. It is even rarer than Prime, but gaining in distribution. Rarest of all is genuine Japanese beef such as Kobe which is almost too fatty and costs as much as a small car. If you can’t find Prime in the store, and if you can afford it, ask your butchers. If you can give them a week advanced warning they can often order it. Wagyu is easily available online.
The next grade down from Prime is USDA Choice, and Choice is common in grocery stores. But not all choice is the same. Don’t just grab any old steak from the meat counter. Ask your butchers for help. Explain that you have a special dinner and you want the best looking cuts they can find. They will often be pleased to look in the back room for a particularly nice piece of meat or custom cut exactly what you want. I’ve made some killer steaks from Choice beef.
Click here to read my article on Beef Grades & Labels. I have links to some suppliers of great repute on our mail order food page.
Steak thickness
For this technique, cuts 1 1/2″ to 2″ thick are best, but most grocery stores don’t sell steaks that thick. You have to get them custom cut. The method for cooking thick steaks is very different than the method for thin steaks. This is a crucial concept, and if you think about it, it makes sense. So I typically tell my butcher I want “boneless ribeyes, from the center of the roast, with the most marbling you can find, 1 1/2″ thick, and please try to make all steaks about the same thickness.”
Plan on 3/4 pound per adult for bone-in steak and 1/2 pound per adult for boneless steak. If there are leftovers they can go home with guests or make an appearance on a sandwich or salad the next night.
Seasoning
Some prime steakhouses use a secret mix of herbs and spices, the most famous being Lawry’s Seasoned Salt. But many prime steakhouses use only salt and pepper, and some use only salt. I’ve never seen one marinate the meat. Why? Seasonings sit on the surface and the scorching heat incinerates them. Marinades mask the steak’s natural flavors, they don’t penetrate very far, they don’t tenderize much, and if the meat’s surface is wet the heat makes steam and prevents crust formation. Click here to read more about how marinades do, and don’t work.
At home, dry brine by salting the steaks liberally on both sides at least an hour or two before cooking and put them back in the fridge. The salt helps the protein hold in moisture as well as enhance flavor. In the pictures here you can see the salt on the surface. Within 20 minutes you can see the moisture melt the salt, and before long, the salt has moved into the meat. See the pictures of steaks dry brining elsewhere on this page.
How to dry brine


Unless your doctor forbids you from using salt, use it. It really brings out the flavors. Salt is an amplifier. It is also an annihilator. Adding the right amount will amplify meat’s flavor. Add too much and it will make it inedible. It also holds in the moisture and denatures the proteins making the meat more tender and juicy.
Brining is a method of adding moisture and salt by soaking meat in salty water. But too much water can bloat a steak and dilute its beefiness. So here’s a technique popularized by Chef Judy Rodgers of San Francisco’s famous Zuni Cafe. It is illustrated in the photos of a boneless ribeye, above. Click here to read more about dry brining.
1) An hour or two before cooking pat the meat thoroughly dry with a paper towel. Sprinkle salt on on both sides of the meat. Put it back in the fridge. If you have a small wire grate that can hold the meat above a plate so air circulates, all the better. If not flip the meat after 30 to 60 minutes.
2) The salt draws out moisture which dissolves the salt. See how the meat has become shiny with moisture in the middle picture?
3) The meat reabsorbs the moisture (and much of the juices that have leaked out) bringing the salt in with it. Notice how the color of the fat at right has changed where the salt has soaked in.
Video: How Dry Brining Works
Here is is again in time lapse video:
Charcoal or gas? It’s the heat that matters most, not the fuel
Most prime steakhouses broil their meat with open flames from above, not below, fueled by gas, not charcoal or wood, and they can hit temps from 800 to 1000°F. To the right, you’ll see the broiler at David Burke’s Primehouse in Chicago. They have a talented team of chefs, a purebred Angus bull in Kentucky who sires all their meat, and a impressive aging locker lined with what they say are 800 year old salt blocks from the Himalayas.
At prime steakhouses like Primehouse, meat sits on grates that allow cooks to raise and lower them if they want the meat closer or further from the flame. There are a few that use grills with flames from below, and still even fewer that use charcoal. Most don’t like fire from below because flareups from dripping fat that can burn the meat. Yes, the vaporization of the drippings can contribute to the flavor, but their impact is minor especially when you consider the short time it takes to cook most steaks.
I want all of you charcoal die hards who swear that you cannot grill with gas to note that almost all prime steakhouses broil from above at very high temps with gas, so clearly the secret of searing great steaks is the temp not the tool. The lesson is, if you can get a gas grill hot enough, you can sear steaks just as well with charcoal. Problem is, most gas grills cannot reach charcoal temperatures.
Getting the same results at home
The solution is to use two cooking temps, one for the interior and one for the exterior. We will begin by low temp smoke roasting the meat with the lid down and bring it up to about 115°F gently so the meat remains uniform in heat and color throughout. Then we will move it over high heat with the lid up and darken the exterior quickly, flipping often, so it doesn’t build up energy and overcook the interior. This method is called the “reverse sear” or “sear in the rear”.
Reverse searing produces more tender meat since low heat doesn’t bunch up the proteins. It also allows smoke to do its magic, and it allows enzymes to tenderize the meat. High temp cooking moves too quickly for smoke to flavor the meat. It can also deliver a crispier surface because the meat is served after coming off the high heat. But this method is a little tricky because you absolutely must have a precise thermometer and you really need to practice to get the timing right. Click here to read more about the concept and watch a fun video of Chef Jamie Purviance and Meathead. Also be sure to watch our friend Jabin Postal cook two perfect ribeyes with our bottled Meathead’s Amazing Smoked Red Meat Seasoning & Dry Brine and the reverse sear/cold grate method on a Slow ‘N Sear. Perfection!
Now a word about grill marks. Grill marks are caused by the metal grill grates darkening the meat where they contact the surface. The metal heats rapidly and conducts heat to the surface more rapidly than the rest of the surface which cooks by radiant heat (see my article on the thermodynamics of cooking). Grill marks are flavorful and crunchy, and they look great (grate?). But the goal is to get the entire surface as dark as the grill marks. If the grill marks taste wonderful, why not give the same treatment to the whole surface?
So the goal is to give everything an even deep mahogany brown hue, as dark as possible without charring. For more, read my article on grill marks.
For this level of control, you need to calibrate your grill.
Make your own “Beef Love”
Chef Rick Gresh keeps a cup next to his grill with what he calls “beef love”, melted beef fat trimmed from his aged steaks. Gresh paints the steaks with it before they go into the dining room. I have taken his method one step farther. I paint the meat with beef love before it goes on the direct heat as well as before I serve. It enhances browning and brings great flavor to the party.
To make your own beef love, just ask your butcher for a pound of suet, the term they use for beef fat. Butchers trim pounds of it every day and throw it away. It won’t cost you anything. Take it home, chop it into cubes about 1/2″ and put them in a pot over medium heat to medium low. Put on the lid. After a few minutes you should see tallow (liquid suet) in the pot. If not, raise the heat slightly. After about 30 minutes most of the fat will have melted. There will be some fibrous matter that doesn’t melt, just throw it away. Pour the tallow into a heavy bottle, let it cool and solidify, and store it in the freezer. It will keep for months.
When it is time to cook your steaks, scoop off an ounce or two and melt it in a small pan. You can even melt it on the grill.
As an alternative, I have had great luck using rendered bacon fat, duck fat, and goose fat as beef love.
Cooking a steak on a small grill
You can accomplish the same thing on a small single burner gas grill, on a portable charcoal grill, or on an indirect pellet grill. Start cooking the interior by cooking at a low temp with the lid down. Then heat the grill as hot as possible and cook the exterior with the lid up.
Can I smoke steaks?
Feel free, but personally, I don’t care for the taste. You can do the first part of the reverse sear in a smoker, and then sear the crust, but for some reason that much smoke flavor doesn’t work for me. It just masks the beefiness.
Keep track of your steaks
I love these bamboo steak markers. They come in a pack of 500 and include five temperatures: rare, medium rare, medium, medium well, and well. They are 3.5″ long and you insert their sharp points in the side of the steak so the meat can be flipped easily. If they don’t char, you can wash them and reuse them.


The great chef and educator Bruce Aidells, author of a number of superb cookbooks including the The Great Meat Cookbook, has produced a polished detailed video series on steak covering everything from selecting the meat to cooking it. It is a beautifully produced set of seven videos starting with selecting and buying beef and chock full of tips. It is produed by the website craftsy.com and they have an excellent learning platform for watching educational videos where you can pause and come back the next day to the exact spot you left off at, a place to take notes, study materials, discussion, recipes, etc. Click here for a preview.
If you like them medium to medium well
Not everyone likes their steaks on the red side. For those who like their meat cooked medium or more, use thinner steaks.
For skinny steaks, use the turntable method
The reverse sear works only on thicker cuts. For steaks 1″ or less, and my “turntable” method works beautifully. It even works on on skirt steaks for fajitas. The goals are the same, a dark crisp, crust, and tender juicy, medium-rare center. But because the meat is thinner, the path is different.
1) Season. Salt and pepper the meat on both sides an hour or two in advance so the salt can penetrate.
2) Dry. Make sure you pat the meat dry with paper towels before you put it on. Moisture creates steam and prevents browning.
3) Oil. Coat the meat with a thin layer of fat. It can be rendered beef fat, clarified butter, or vegetable oil. Oiling the meat is better than oiling the grates. When you oil grates it vaporizes almost instantly and can create an acrid smell. When oiled meat hits the grill, the cool meat keeps it from burning and the oil will heat up quickly and transmit heat. It will slightly fry the surface and help create crust. Don’t use unclarified butter. It contains too much water.
4) The A side. You should still setup for 2-zone cooking so you have a safe zone for steaks that finish quickly. Get the direct side screaming hot. Raise the charcoal right beneath the cooking surface. Leave the lid off. Put the meat over the hottest part of the grill. Keep this one side down, but, like a vinyl record turning on a turntable, rotate it slightly every 30 seconds to prevent the grates from branding and burning the surface and to allow all parts of the surface to brown evenly. You want the entire surface a uniform dark brown without grill marks. Click here to read why grill marks are not desirable on steaks.
5) The B side. Now here’s where things get weird. By the time you have the perfect crust on one side, heat is penetrating and the center is pretty close to perfect. If you flip the meat and sear the other side dark, you will overcook and destroy the steak. So flip the meat and cook the second side for only 1 minute! That’s more than long enough to kill any contaminants on the surface. Like an old fashioned vinyl record, the B side may not be as good as the Side A, it will be tan not brown, but Side A and the center will be perfect.
6) Serve. Remove the meat and serve immediately. Do not let the meat rest. Resting meat is probably a myth that you can see challenged here.
What to do once the steak gets off the grill
There is no need to rest the meat. It has been proven that this does nothing to improve juiciness. Don’t let it cool off and lose its crust. Serve it hot. Prime steakhouses like to let the meat speak for itself. You don’t see prime steakhouses putting A1 on the table, and if you ask for it, listen for cursing in the kitchen.
Some steakhouses like to place a daub of butter on the surface to add unctuousness, sometimes it is even an herbed butter or butter with shallots or mushrooms. Some chefs like to sprinkle large grain salt on the meat just before serving so you occasionally get big pops of salt. It’s a nice sensation, unless you encounter a bolder sized grain that breaks a tooth, but because this meat has been dry brined, and the salt is evenly distributed throughout, you could easily oversalt if you use a finishing salt just before serving.
If you absolutely have to dress up your steaks, try to keep it simple. My favorite is a Board Dressing. Rich red wine sauce is a classic, as is horseradish cream sauce, or chimichurri, but I prefer to save them for leaner cuts like flank steak or sirloin. I have a Japanese friend who once presented me with a great steak with tangy green wasabi paste, the horseradish-like root. I liked it a lot, but it seriously masked the natural goodness of the meat. In Argentina, herbaceous chimichurri sauce is everywhere. Caramelized onions, grilled onions, grilled mushrooms, grilled red peppers, are also popular garnishes.
Some prime steakhouses, like Peter Luger in Brooklyn, cuts the meat off the porterhouse, slices the strip thin across the grain, and then reassembles the whole thing on the platter. This is also a nice approach if you have huge steaks and one person cannot eat a whole steak.
As you eat the first steak you cook with this method, you might discover that it is a little over or under cooked for your taste. Don’t be discouraged. Adjust the procedure to accommodate your tastes. You know how to get to Carnegie Hall.
What to serve with your steak
Let the steak be the center of the show. Meat and potatoes are an unbeatable combo, although rice is nice and couscous is cool. Try my really simple Warm French Potato Salad. Keep the veggies simple, like my Crunchy French Green Beans, or, since the grill is primed and ready, go for Grilled Asparagus.
Two things I insist on with my steaks: A big red wine and good friends.

Carving big steaks
Ribeyes, strips, and T-bones/porterhouses (porterhomes?) are bigger than ever because of improved breeding and feeding. Once upon a time such a steak was a big meal for one, but nowadays, if it is cut thick, even after shrinkage, a whole steak is more than a normal person can or should be eating at a sitting, unless he has just returned from the space station.
For example, Allen Brothers is selling 26 ounce (2″ bone-in) and 22 ounce (1.5″ bone-in) ribeyes (they’re fabulous). Their 1.5″ boneless is 16 ounces. Their porterhouses (tail on) are 2″ and weigh 36-38 ounces!!!
Sooooo, if that is the case, one ribeye is a good portion for two people and a porterhouse, after boning could be enough for three people. So the question then is, how to divide it?
First of all, I must confess, I usually cook a whole steak for each adult, and if there are leftovers, I insist they take them home. Then when I need help moving, I can call on them to help.
I slice my cold leftovers and make a steak sandwich or more often put the slices on a salad.
If I am serving wagyu, which is sooooo rich, I carve the steaks.
Ribeyes and strips have two problems to be solved. The bone, and the rib cap.
I normally prefer boneless ribeyes because the bone adds zero flavor and if I cook it properly the meat next to the bone can often be undercooked a bit. If I am dividing it for two, the bone just gets in the way and then I have to arm wrestle my wife to see who gets to gnaw on it and I’m tired of losing.
Besides, I hate paying the same price for bone as for meat. Also, although I never cook steaks indoors, even in winter, if you cook in a pan the bone can prevent the meat from contacting the pan and browning properly.
This leaves the problem of the rib cap, or the spinalis, the crescent shaped muscle that wraps around about 1/3 of the longissimus, the eye of the ribeye. The rib cap is more marbled than the eye, and because it is on the outside it usually is overcooked. That’s a shame because I think it is the best muscle on the animal.
I solve both problems by buying bone-in rib roasts. I then remove the rib rack, and that’s a meal right there. I smoke the back ribs Texas style. Then I remove the spinalis, and that’s a separate meal. It looks a bit like a salmon filet, and It can be grilled as such, or rolled.
That leaves the long tube of longissimus, the eye of the ribeye, and I cut that in 1.5 to 2″ steaks. The muscle tapers a bit, so the thin end is a good portion for one. The fat end is a big portion, and after cooking, slicing it is no problem because the spinalis is gone. I just cut it into strips about 3/4″ thick. Guests can easily cut that thickness into bite-size chunks. I collect the juices in a gravyboat.
Here’s a 1″ ribeye with a Board Sauce which is simply chopped herbs and olive oil. To get the meat juices to mix with the board sauce, I carve it.

Porterhouses and T-bones. I do it the Peter Luger method (below). Run the knife along the bone, remove the strip and filet, slice them in 3/4″ slices, reassemble them and slide them back along the bone, and serve. I bring the board around the table and they can stab whatever they want. It is an impressive presentation.


The Perfect Grilled Steak Recipe
Rate this RecipeIngredients
Method
- Prep. About 2 to 4 hours before cooking, trim off most of the external fat. Fat can melt and cause flareups that can deposit soot on the meat and burn the surface. Then sprinkle salt all over the meat. About 1/2 teaspoon kosher salt per pound (half that amount if you use table salt).
- Fire up. On a charcoal grill set up your grill for 2-zone cooking. You want one side scorching hot and the other side at about 225°F (107°C). This is tricky and you will have to experiment to get it set up right, so do a dry run or two until you get it down.
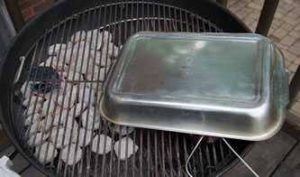
- Get a chimney full of charcoal fully hot and covered in white ash, and push them all to one side. Get them close to the cooking surface, as close as 1" (25 mm) below the meat. I have been known to put bricks in the bottom of a Weber kettle and raise the lower grate to about 2 to 3" (51 to 76 mm) below the top grate. I then put dry wood on the coals. On a kamado, insert the deflector plate.
- On a gas grill set up with 2-zones shooting for 225°F (107°C) in the indirect zone. Start the meat on the indirect zone, put wood on the direct zone, and close the lid. On a pellet grill, set the temp for 225°F (107°C). Most of them are all indirect.
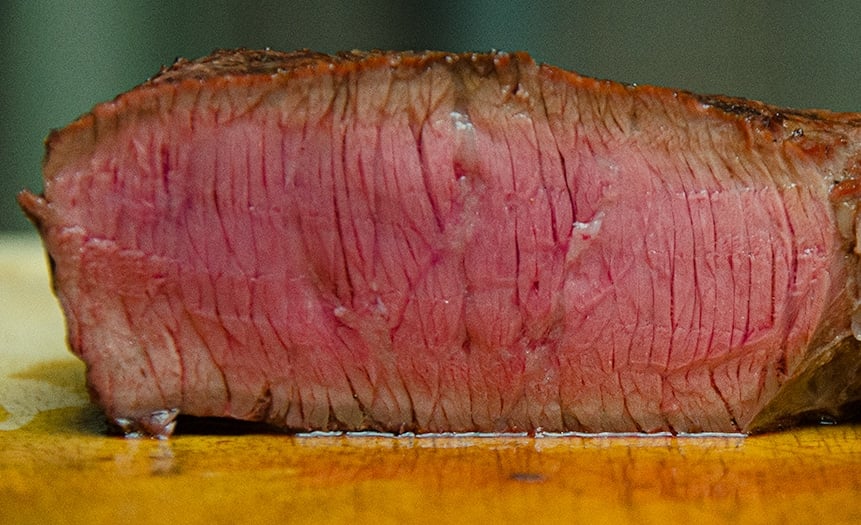
- Cook. Most home grilled steaks, if you slice into them, progress from dark on the surface, to brown just below the surface, to tan, to pink, and on to red. If you want your steak medium rare, the sad fact is that it is usually only medium rare in a small band of the interior by the time you get the exterior to the right color brown. That means that as much as 1/2 of the interior is overcooked. The challenge is to get the interior the same color bumper to bumper.
- To get this done right, we employ the reverse sear cooking method. For the first phase, cooking indirect, you want the meat to warm slowly. I sometimes place the lid on an angle. With the lid on tight, the steaks get too hot too quickly and they get tough.

- Sometimes I leave the lid off and put a pan over just the meat. Every grill is different and the weather is also a factor. Experiment.
- After about 15 minutes start checking the interior temp with a very thin probe on a very fast thermocouple thermometer like the industry gold standard, the Thermapen. Push it most of the way through and slowly back it out and note the lowest temp. Check every 5 minutes in more than one location. Don't worry about poking the meat. Steak is 75% liquid, so if you poke a hole in a 16-ounce (453 g) steak and it loses 1/4 ounce (7.4 mL) of juice, you'll still have 11.75 ounces (345 mL) of fluid left.
- Why should you keep the probe away from the bone? Muscle and bone are very different composition. Muscle is mostly water. Bone has a hard, dense, outer shell, and the center, can be gelatinous or a honeycomb of mostly air. When you begin to cook meat with bone, the muscle and bone heat at different rates. At first the bone does not heat up as rapidly as the meat, but then, when the bone gets hot, it can get hotter than the muscle. So if you take the temperature close to the bone or touching the bone at the beginning of a cook, the temperature will be lower than the center of the muscle mass because the bone is acting like an insulator. If you take the temperature near or touching the bone, the reading will be higher.
- Flip the meat once or twice so it heats evenly on both sides. At this low temp, the exterior color should not go much beyond tan, if you added wood it might get a ruddy glow. When the temp in the deepest part of the meat hits 110 to 115°F (43 to 46°C), open the lid and leave it open. This could take 30 minutes.
- The surface tastes best when high heat instigates several important chemical reactions. The Maillard reaction is a chemical reaction between amino acids and sugars created by heat. Caramelization is the browning of sugar by oxidation under heat and there are small amounts of sugars in meat. Combined they beget a rich, complex, caramel or butterscotch flavor.
- There are also fats on the surface, and they contribute a lot to the flavor of the meat. When heat melts the fat and chemically alters it, the flavor is drastically altered. Fat reaches its most rich and succulent zenith when golden brown, just before it blackens, and muscle is peak when it is nut brown. Blackening or charring is carbonization, and the taste is not much better than eating charcoal, so you want to stop the process just short of blackening. That’s why I never eat at places named “Char House”. They tell you on the marquee they plan to ruin my steak!
- Remember, searing is the treatment of the surface. It has nothing to do with sealing in the juices. And remember, grill marks are flavorful and crunchy, and they look great , but the goal is to get the entire surface as dark as the grill marks. If the grill marks taste wonderful, why not give the same treatment to the whole surface?
- On a charcoal grill bunch the coals all together if necessary or add new hot coals. On a gas grill, crank up the burners. You can take the meat off the grill and add more coals and wait for them to get hot if necessary, and you can take the meat off a gas grill while you wait for it to heat up.
- Paint the meat with “beef love” and sprinkle on the black pepper. Gently press it into the surface so it doesn’t all fall off, but a lot will. Now move it to the hot side of the grill, as hot as possible, as close to the heat source as possible. The oil helps conduct heat to the meat, assists with browning by frying the surface, and adds flavor. Beware of flareups. They can cause soot.
- You want the lid open for this step so all the heat is concentrated on one surface. You don't want heat trapped under the hood cooking the top or sides. They're just about done. When the meat is on the hot side, stand by your grill! Do not wander off and chat up your guests or check your email. Things will move quickly because the meat's surface is already close to 200°F (93°C), and you need to be ready to react. If you have charcoal about 1" (25 mm) below the meat, each side can be ready in as little as 3 minutes!
- You want the surface to get scorching hot so it will brown quickly without transferring heat to the center. By cooking hot and fast, the heat works mostly on the surface and doesn’t have time to migrate deep into the meat.
- Keeping the lid open when searing the exterior is essential. This prevents heat buildup from cooking the center of the meat. With the lid closed, the air all around the steak warms and it starts to cook from all sides. In this step we are working only on one surface at a time, nothing else. Check the color of that surface every minute or so and make sure you put the meat back down so the grates touch different parts of the surface. We do not want grill marks. We want everything evenly dark. If a little of the edge fat blackens, that’s OK, but don’t blacken the muscle fibers.
- Flip the meat frequently, every minute. Become a human rotisserie, This allows the energy buildup in the surface to bleed off into the air after you flip. When you flip, try to place the meat on a virgin section of the grate that has not been cooled by contact with steak. After you flip, hit the top side with beef love and freshly ground black pepper. There’s enough heat there to extract flavor.
- The procedure is identical for the second side. Wait til the color is perfect, paint on beef love, black pepper, flip, sear, and remove form the heat.
- On a kamado, remove the meat and put it on a platter. Lift out the deflector plate. Open the lower vent all the way and get the coals good and hot. Use a hair drier in the bottom vent if needed. Lower the cooking grate as close to the coals as possible. an put the steaks back on. Lid open.
- On a gas grill, if you have a sear burner, use it. If not, remove the meat and set it aside on a plate for a few minutes while you get the grill ready to sear. Remove the grates, and set them down Close the lid and turn all burners on high. After it's max heat, open the lid, leave it open, pat one surface of the meat dry, and put it on the hottest part of the grill, dry side down. You might even be able to remove your grates and lower them to sit right on top of the flavor bars or deflectors that protect your burners. Remember, the closer you get to the heat source, the better. You might consider buying GrillGrates. They replace your factory grates and amplify the heat just like the "infrared" or sear burners. You can even flip them upside down to use them like a perforated griddle for an amazing sear. You may want to consider buying a cheap charcoal grill like a hibachi just for searing steaks. Get your grill as hot as possible by preheating it longer than usual with all burners on high and the lid down. You might even be able to remove your grates and lower them to sit right on top of the flavor bars or deflectors that protect your burners. Remember, the closer you get to the heat source, the better.
- Leave the lid up during searing and flip the meat every minute or two.
- Another option is to preheat a cast iron pan or a griddle in the hot zone, and sear by conduction. It goes fast and covers the entire surface. Again, leave the lid up for the sear phase. Then again, you may want to consider buying a cheap charcoal grill like a hibachi just for searing steaks.
- On a pellet grill you should definitely buy a cheap hibachi or use a superheated cast iron griddle or pan for the searing. Most pellet grills are not suited for superheated searing.
- When you have both exteriors perfect, the interior should be in the medium rare range, 130 to 135°F (54 to 57°C)(click here for a chart of steak doneness). Err on the side of undercooking, you can always put a steak back on the grill, but if it is overcooked, you cannot bring it back to life.
- Serve. Remove the steaks from the grill and serve immediately while still hot. There is no need to rest the meat. It has been proven that this does nothing to improve juiciness. Here's another video, showcasing how to properly grill a steak.