


Create the best thick juicy crispy steakburger hamburger you ever tasted, all from the comfort of your backyard with our steakburger recipe.
The succulent Steakhouse Steakburger is the elusive beast that I stalked for years. Like a lion hunting wildebeest in the Serengeti, I came home skunked more often than sated. And when I came home, the confounded thing turned the tables and stalked me, circling me in my sleep, just out of reach, haunting my dreams. I could not catch it. Not on my own grill. Rarely in restaurants.
About the steakburger
My prey was a big fat fellow, about 3/4″ thick, weighing in at 8 ounces or so. It wasted no space on the bun. It had a thin rich salty cordovan crust that is redolent of slightly charred tallow. And when punctured by my fangs, gushed pink juice and molten fat profusely. With each bite it reminded me that a great grilled burger is not just cheap calories wrapped in tissue paper on every corner of every town in America, but a gustatory delight as elusive as any delicacy.
Its natural habitat is the white tablecloth steakhouse where it is treated like hand carved prime rib. It is broiled or grilled by a flame, but the price is outlandish. On the rare occasion that I bagged one, it left me delirious, in a beef coma.
So early in my barbecue career I stopped hunting and set about taming the beast. It took me a year to perfect this technique. What I learned was boggling, and negated almost everything I thought I knew about hamburgers.
But my effort was a raging success, and just to underscore the point, I serve my Steakhouse Steakburgers in a bowl because they are so juicy. People will ask why you are setting the table with bowls. You just crack a half grin, just a twist in one corner of your mouth, cock your head, and say quietly “You’ll see”.
My tortured path to enlightenment and how I discovered the reverse seared steakburger
I began my quest by reading every book I could find on hamburgers. I learned that most of the best burger cooks use chuck steaks which they grind fresh daily and which, untrimmed, is about 20 to 30% fat.
First, I started by getting a meat grinding attachment for my stand mixer. I knew I didn’t want to grind all my own burgers, but if I was going to capture this beast, I had to start with high quality meat, fresh, and find the right blends. Grinding my own meat was easy and it allowed me to get the coarse texture I wanted. I did not want meat ground so fine that it was a pulpy slurry. What I wanted was a little chew, or “toothpack” in the slang of the food scientists. Not as much chew as steak, but some resistance. I wanted the meat to have enough integrity that it could hold in moisture and give it up only when masticated.
I knew that the flavor of all the great burgers in my life were beefy like a great ribeye, but like prime graded beef, an important component of the flavor was fat getting right to the edge of burnt, but not actually burnt. My work with steaks had taught me that there is a critical point in the cooking process where beef tallow goes from just being flavorful to awesome and then in a minute or so it goes to burned. So I knew that high heat and high fat were keys to success.
Other methods of grilling
I remembered that the very best big buxom burgers of my life were all in restaurants and they were broiled under a gas flame at blazing hot temperatures. Flattops are great for skinny diner burgers, but it is hard to cook them all the way through properly on a flattop without a thick layer of overcooked meat. So I started in my kitchen by placing two large patties under my gas broiler. I got nice color on the exterior, but the center was almost raw, and the popping and sizzling of the fats and juices created enough smoke to move my wife to remind me that I’m supposed to be an outdoor cook.
When I took their temp, they were way underdone. So, I left them under the broiler until they were black and the smoke alarms were complaining loudly. I had to toss the patties in the microwave to make them edible. My wife still reminds me of that night whenever I start to talk like I know how to cook.
So after I cleaned the oven, I got out my el cheapo hibachi, loaded a chimney with charcoal, and set the grates about 1″ above the glowing coals. I measured the temp at grate level at about 750°F. That’s steakhouse hot. I reasoned that cooking on an open grill would allow me to superheat one side while the other side remained cool so that the heat would not travel deep inside so rapidly. I flipped them frequently as recommended by food scientist Harold McGee, simulating a rotisserie, allowing one side to get hot while the other cooled and the juices migrating back and forth.
Results
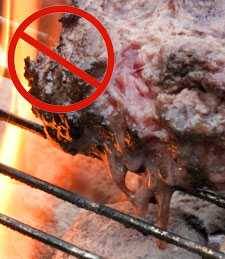
Well, the exterior was done fast enough, but, as you can see, muddy brown goop drooled out. When it hit the coals it created a lot of flavorful smoke and flareups, but by the time the center of the burger hit my favorite temp I was left with a shrunken hockey puck with a blackened exterior, that ranged from brown below the skin to my favorite color only in a thin band in the center. Worse, they had lost about 25% of their weight. This method might work for skinny diner burgers, but not for fatties.
So I decided I would slow the cooking of the center by putting the freshly ground patties in the freezer for about 15 minutes before cooking. That just chilled the exterior leaving the center warmer than the outer layer. I thought about leaving them in longer, but that would just freeze the meat on the outside, and freezing water expands while the sharp edges of the ice break open cell walls encouraging more juice loss. Hmmmmmm.
Then I tried mixing chunks of frozen butter into the patties. Butter is a mix of lipids and water, with lots of flavor. It helped a little, but not a lot. The butter flavor was nice, but wrong. So I tried mixing in frozen beef suet, fat trimmings my butcher was glad to give me for free. The flavor was better, but they were still not juicy enough. The skin was practically black, and the interior was a rainbow progressing through shades of tan to the color I wanted in the center.
Then one day, while I was slowly smoke roasting a Texas style beef brisket, the light went on. Barbecue pitmasters cook brisket and ribs and other tough fatty and sinewy meats low and slow so the fats and collagens would melt, but the proteins would not get their panties in a bunch and squeeze out the myoglobin, the protein laden juice that is so important to flavor and moisture. But burgers are a very different animal than brisket even if they are cut from the same animal. On brisket the fat is mostly outside, on burgers it is inside. Brisket is tough, burgers have been tenderized by grinding the muscle fibers. But brisket reminded me that you can keep moisture in by cooking low and slow. If it worked for brisket, why not burgers?
So my next patties went on my four burner gas grill where I knew I could get precise control of the temp. I turned on the burner on the right, left the other three burners off, and stabilized the temp on the left side at 225°F, the temp I like for most of my low and slow cooking of brisket, ribs, and pulled pork.
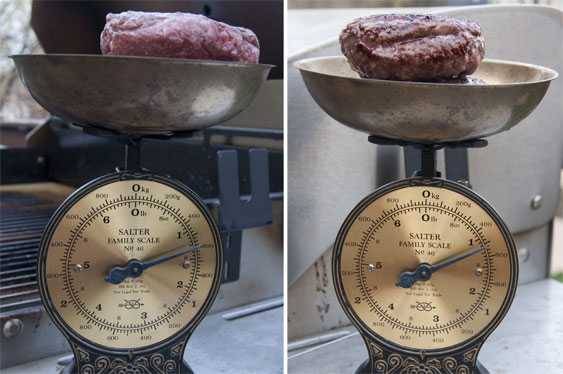
I decided to torture test the concept by forming two monster 10 ounce burgers. Besides, doing the math would be easier on 10 ounce burgers. That’s them, raw at 45°F, on the left. They went on the indirect side and I closed the lid. After 20 minutes I flipped them and took their temp. They were 75°F in the center. After another 20 minutes, the interior was 125°F, so I took them off and weighed them again. They were 9 ounces each. Weight loss was only 10%.
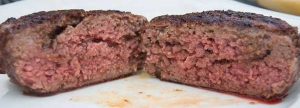
But the exterior was an unappetizing ruddy tan color, and there was no crust. What fun is that? So I cranked the heat on two burners, superheated a cast iron skillet, and laid in the burgers. Within 2 minutes they had a beautiful dark auburn color. The process reduced the weight by only another half an ounce. When I cut one in half it gushed juice, and the band of brown beneath the skin was only about 1/8″.
How to add the outdoor flavor to your reverse seared steakburger
The taste was beautiful, but one thing was missing. The outdoor flavor. So I repeated the experiment on my Weber Kettle charcoal grill. This time I went back to a saner 8 ounce patty, cooked them on the indirect side with the lid on, and finished them over the hot coals rather than in a pan. They took a bit longer to get the right color to the skin, about 5 minutes per side, the weight loss was greater, and the brown layer was about a bit thicker. But they were mighty good.
So on my next attempt I raised the charcoal grate closer to the meat grate by placing bricks under it. I added dry wood chips to the charcoal. (Wet wood chips just cool the fire and make steam delaying the smoke). I started the burgers on the indirect side and flipped them after 10 minutes. In about 5 minutes more they were at 120°F. Before I moved the meat to the hot side I painted one side with a thin coat of cooking oil knowing that oil helps transmit heat faster, and that it would almost fry the surface. Some of it dripped off and created more smoke.
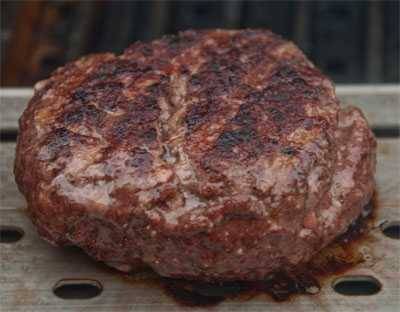
BINGO! I had caged the beast! I had produced perfectly cooked burgers that were dark brown, and salty on the outside. They had rich steak flavors, a wonderful smoky undertone, and they were juicy enough to soak the bun. And in the process, I had discovered a technique called reverse sear, or red neck sous vide. And it works on steaks, chops, even baked potatoes. It is one of the most important techniques you can learn as you master the grill.
Now I had to replicate the flavor on a gas grill for readers without charcoal. I repeated the setup had I used before, one burner turned on and three turned off. This time I filled a small aluminum loaf pan with wood chips. I poked a few holes in the bottom of the pan and seated it on top of the hot burner. When the burgers hit my target temp, instead of moving them to a cast iron skillet, I moved them to a section of GrillGrates turned upside down on top of the hot burner, right above the smoking chips.
Regular readers know of my admiration for this product. GrillGrates are replacements for the grates that came with your grill. They do amazing things which you can read about by clicking the link above. Their bottom is a flat plate of aircraft aluminum that can get super hot. The plate has larger holes to let smoke through. The GGs acted like a super hot griddle or plancha. They seared the exterior perfectly. By cooking the meat low and slow and then searing it at the rear of the cook, I had made the perfect Steakhouse Steakburger.
Why does the “reverse sear” work?
I know the whole process sounds backwards, I know that Dad told you to sear the burgers at the beginning, but searing does not hold in moisture. In fact it squeezes out moisture, a fact that has been demonstrated in labs. Moreover, if you try to sear a cold burger the exterior has to go from 40°F fridge temp to about 300°F at which temp the Maillard reaction really kicks in and browning occurs rapidly. That’s a distance of 260°F. By the time the exterior is right, the interior is overcooked.
But if you cook the burger low and slow it will lose very little moisture, warm evenly from top to bottom, and then when you move it to high heat, you only need to bring the mass of meat from 120°F to 300°F, a distance of only 180°F. Searing happens faster, there is less moisture loss, less heat transmission to the center, and a much better burger. Click here to learn more about reverse sear and why it works for almost everything cooked on a grill.
Before you start, please take a few minutes and read these articles and watch the video:
- The Science of Hamburgers
- Grinding Your Own Burgers
- The Science of Hamburger Buns
- The Science of Burger Condiments
A note about safety and proper cooking of burgers
Undercooked ground meat and sausage can kill. It can happen to you or a loved one. It is primarily a problem in ground meats, not steaks. I urge you to click this link to read more about dangerous pathogens in burgers and other ground meats and how to prevent food-borne illness. If you see pink ground meat on this website, it is meat I have pasteurized as described in the above link and the video.
Our steakburger recipe


Steakhouse Steakburger Recipe
Rate this RecipeIngredients
Method
- Prep. Get a pad and a pencil and keep it nearby so you can take notes until you have the process mastered. Prepare the condiments and have them ready but keep them cold in the fridge. When you are cooking, you want to be focused on the meat, not fussing around setting the table.
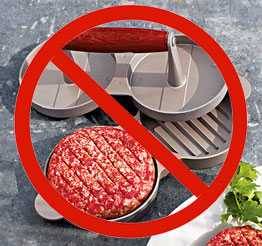
- Mix the black pepper, onion, and garlic powder in a small bowl. No salt yet. It can compress the meat and we want it loose to hold the juices. Spread the meat out on a plate and sprinkle the spices onto the meat distributing it evenly. Gently form balls of meat about 2" (51 mm) across and weigh them. Adjust to 8 ounces (227 g) each. Try to smooth over deep crevices. Deep cracks allow heat to penetrate to the core too quickly. Gently press them into disks about 3/4" (19 mm) thick and and about 4" (10 cm) wide. It should have air pockets for juices to gather and to keep it tender. Don't use a hamburger press like this one.
- Fire up. Set up your grill for 2-zone cooking. The indirect side should ideally be about 225°F (107°C). Try to keep it under 250°F (121°C). On a charcoal grill, push all the coals against one side of the grill and raise them up. I like to get the coals about 1" (25 mm) below the food grate. The Hovergrill is a great way to get the coals up high on a Weber Kettle. You can also use bricks to raise the lower charcoal grate. On a gas grill, turn one or two burners on high and leave the others off. Locate the spot on the surface where the temp is close to 225°F (107°C). That's where the meat will go. When the food grate is hot, clean it well with a wire brush or another tool.
- Cook. Place wood chips or pellets on the coals or, if you are using gas, in a packet or aluminum pan as close to the hot burner as possible (read my article on The Science of Wood). Place the burgers on the indirect side. If you are cooking bacon to place on top, put 2 strips per burger on the grill in the indirect zone near the burgers. Close the lid and leave everything alone. Cook about 10 minutes.
- Put on a heat resistant glove and push the tip of your thermometer in the side, go past the center, and slowly back it out. The lowest temp is the one that counts. Poke the center with your finger to start forming muscle memory about the stiffness of the meat at different temps. Check all burgers. You may discover that one is moving faster then the other. At about 105°F (41°C), turn the burgers over, cook another 10 minutes and poke it gently again. Notice how it has stiffened. Because they are not over direct heat, you do not need to flip them often.
- I like to butter and toast my buns, so now's the time to put them on the indirect side. Do not walk away. They can go black in a hurry. When they are done, you can set them aside.
- When the burgers are about 20°F (-6.7°C)below the temp you want (see my award winning Food Temperature Guide), sprinkle them generously with salt, paint them with vegetable oil, and move them to the direct zone. The oil will help seal in moisture, conduct heat, and keep them from sticking. If you are on a gas grill, crank it to Warp 10. If necessary take the meat off while the hot side heats up, lid down. If the fire flares up move the burger to a spot that doesn't have a flare because flares can burn the surface and deposit soot. On a charcoal grill you can also use a small squirt gun to tame flares. Just don't drown the coals and be careful not to kick a lot of ash onto the meat. Flip the meat every minute, acting like a human rotisserie, so all the energy is expended on one surface at a time, not on cooking the interior. The interior will warm, but not too much. Remove the burgers when the interior reaches 5°F (-15°C) below the desired temp. Don't overcook them while waiting for the second side to be perfect.
- Serve. To prepare the burgers, spread the glop on the bottom so it can help hold the burger in place. Remember, you have only two fingers on the bottom and eight on top, so you want to put the slippery stuff on top. The glop will also help keep the juices from destroying the bun. Add the burger patty and any toppings then crown with the top bun.Grasp the sandwich with both hands, and no matter what Momma told you, put both elbows on the table. Push your chair back a few inches so you are leaning forward over the bowl. Try to keep the juices off your shirt.


Why We Require You To Sign In Before You Can Post Comments
Before you can post a comment or question you must sign into our commenting partner, Disqus. This is helps make sure everyone hanging around the grill is civil. We do not tolerate nastiness, racism, porn, inappropriate language, or attacks on others. All comments are the property of AmazingRibs.com and we reserve the right to quote them, edit them, delete them, and block people from making future comments.
Please leave comments and questions on the page devoted to the same subject so others can see them and our answers when they are reading about that subject. You must enable JavaScript to use the comments section, and you must accept cookies to post comments. Note that the software that runs Disqus is different from the Pitmaster Club so members need to sign into that separately.
Moderators