


Your holiday meals will never be the same again thanks to this flavor-packed grilled or smoked turkey recipe! And the best part? It’s easily adapted for cooking a turkey in the oven.
The goal with this grilled or smoked turkey recipe is moist tender meat, full of turkey flavor and delicate smoke and herb flavors in the background, plus deliciously crispy skin. That simple. Follow my logic and the result will be a magnificent-looking, dark mahogany avian, with incredibly tender and juicy flesh, delicately and elegantly flavored with savory herbs and seductive smoke, anointed with a gravy that eclipses all others.
Turkey poses several problems that we can solve by thinking scientifically. My methods differ drastically from tradition. But if you follow my guidelines you can make this flightless bird soar above the flock. Do not take risks with the Thanksgiving dinner. I know you want to show off when grilling or smoking a turkey, but please resist the temptation. Play within yourself. Keep it simple. Don’t go crazy with powerful turkey injections and turkey dry rubs that hide the natural flavor of the bird. Don’t try to do too much with your Thanksgiving grilled turkey or smoked turkey recipe. And don’t embarrass yourself trying to show off when smoking a turkey or grilling a turkey.
Why wait?
Here’s a great idea: Rather than waiting for the next major holiday to roll around, when you have a houseful of critics, why not do a test run a few weeks in advance to get your technique down?
This will be the best turkey you’ve ever tasted. I know because hundreds of readers have written to tell me so. (See the comments and pictures at the bottom of the page). To get there we cook the bird outdoors, adding the elegance of smoke, and along the way, we bust some well-entrenched myths.
The good news is that you don’t need a smoker for grilling a turkey or smoking a turkey, although having one helps. You can become a Turkey Zen Master on any old backyard grill, or even in your indoor oven with these techniques. But remember, when you cook the bird outdoors, you not only get great flavor, you free up the indoor oven for sweet potatoes, stuffing, green beans, and pie. Always save room for pie! We begin with a summary of concepts in the box, and below we get into the details explaining why we want you to do it our way.
Handle raw turkey like kryptonite
Treat all raw fowl with great care. There is a good chance that it has Salmonella, Campylobacter, or some other pathogenic bacteria in it. Research shows that about 2/3 of modern poultry has been contaminated by the time you get it home. That’s just a fact of life nowadays. But don’t worry. Cooking kills bacteria. If you cook poultry properly, you are perfectly safe.
How do so many birds get so yucky? Pathogens are in the soil and in the air. Even “free range”, “pasture-raised”, “natural”, and “organic” birds are easily contaminated because they scratch and peck in dirt and grass that is teeming with bacteria, and because they eat insects, worms, larvae, seeds, etc. They often step in each other’s poop and they peck in it. You can’t prevent it unless you put them in diapers.
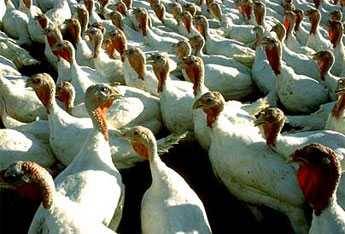
Turkey factory farms
Most turkeys are grown by “independent” farmers who work under contract to big brand marketers like Butterball and Perdue. They are highly competitive because they know that we shop for bargains so they use efficient, inexpensive, mass-production farming methods. These concentrated animal feeding operations (CAFOs), sometimes called factory farms, are designed to deliver low-priced big-breasted birds grown to market size in only 4 to 5 months, much faster than nature intended. Birds are then processed in slaughterhouses and high-speed disassembly lines. During the process, poop can get on their skin, on the gloves of the workers, on the conveyor belts, and in the water baths that are used to remove feathers and rinse the meat. It is practically impossible to prevent contamination, and it happens on small organic farms, too.
So you must handle raw poultry like kryptonite. Thoroughly wash your hands, tools, countertops, cutting boards, sink, platters, and anything that contacts uncooked poultry.
How to handle your poultry appropriately
The best solution, pun intended, is to buy an empty spray bottle at the drug store and fill it with a dilute solution of water and household bleach. Bleach is a powerful sanitizer. That’s why they put it in swimming pools. USDA recommends a solution of one tablespoon of good old-fashioned 5% unscented, liquid chlorine bleach per gallon of water. Vinegar, acids, and other compounds do not work. I don’t care what you read. Ask any microbiologist. I have.
After washing your cutting board, knives, meat grinder, counters, and sink, thoroughly wet their surfaces with the bleach solution and allow it to stand for several minutes. Rinse with clear water and air dry or pat dry with clean paper towels that can be discarded. Cloth towels are germ carriers. Store the bleach solution in the bottle, tightly sealed, and use it often. It will remain potent for months. Click here to read more about food safety.
Proper meat temp: Tasty vs. safety
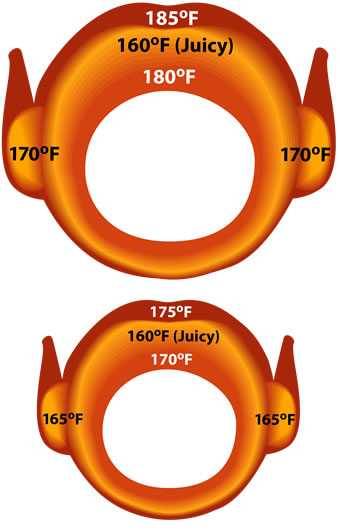
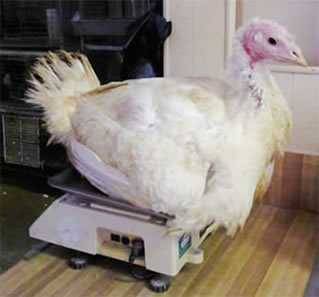
Confusion abounds over the proper temperature to which you must heat turkey for safety and for maximum tenderness and juiciness. One of the problems is that USDA changed the recommended minimum temperature for cooked poultry in 2006. Until then USDA said we should cook white meat to 160°F (71.1°C) and dark meat to 180°F (82.2°C), and if you were cooking a whole bird, take it all up to 180°F (82.2°C). The new recommendation is 165°F (73.9°C) for any and all parts of turkey and chicken. That means cookbooks published in 2006 or earlier are wrong. Worse, many celebrity cooks seem never to have gotten the word. It’s common to hear them tell us to desiccate our birds by overcooking them to 180°F (82.2°C).
Click here for a complete guide to the proper cooking temps for all meats, both USDA and restaurant chef recommendations. The excellent thermometer shown above, the Thermoworks Thermopop reads accurately in 5 seconds and sells for less than $30. Click here to order it.
Benchmark temperatures
| Recommended cooking temp | 325°F (163°C) |
| USDA recommended serving temp | 165°F (74°C) |
| Remove from heat when all parts hit | 160°F (71°C) |
| Ideal temp for dark meat | 170°F (77°C) |
| Popup thermometers pop at | 185°F (85°C) |
| Bacteria start dying at about | 130°F (54°C) |
Dark meat has about 9% fat, 33% more than white meat. So, it tastes and feels best at about 170°F (76.7°C). White meat is very lean, about 6%, and it dries out quickly if it is overcooked. It is at its best texture and juiciness at about 155°F (68.3°C). But that’s 10°F (5.7°C) below the USDA recommendation and the risk is too great at that temp. So I will advise you to cook it to 160°F (71.1°C) and let the temp rise to 165°F (74°C) while it moves from cooker to carving. More on this below.
USDA wants to keep things simple for us in order to keep us safe. Admirable! What USDA doesn’t tell you is that microbes start croaking at about 130°F (54.4°C). The hotter the food gets, the faster the pathogens die. You can pasteurize your turkey at 130°F (54.4°C) in 2 hours or at 165°F (74°C) in 2 seconds, hence the USDA recommended minimum of 165°F (74°C). What the USDA doesn’t tell you is that you can kill them all if you heat the bird to 160°F (71.1°C) for 7 seconds, 155°F (68.3°C) for 23 seconds, or 145°F (62.8°C) for about 4 minutes.
Sous-vide turkey
Chefs who cook sous-vide (the ultimate low and slow cooking) know this. They put turkey parts in plastic bags, vacuum seal them, and place them in water baths at 150 to 160°F (65.6 to 71.1°C) for 2 to 3 hours and the results are incredibly tender, tasty, and safe. But most of us don’t have calibrated sous-vide water bath cookers (click the link to check them out), and even then, if you aren’t careful, there is risk. For more on how time and temp work together in the process of pasteurizing meat, read my article on meat temperature. Click here for ratings and reviews of more than 150 food and oven thermometers by our staff electrical engineer.
Plan for carryover cooking
The USDA doesn’t factor in carryover either. Carryover is simple physics. In a 325°F (162.8°C) oven, the surface of the meat will slowly warm. This warming is the process of exciting the molecules so they move faster. It takes time because the meat is a combination of water, fat, and protein, and they are good insulators.
As the surface warms it conducts its heat slowly inward to the cooler cells beneath, passing it along like a bucket brigade. Excited molecules get their neighbors excited by bouncing off them like billiard balls. Slowly the heat marches towards the center.
As the exterior passes the heat along, it loses heat so the bucket brigade prevents the surface from zooming up to 325°F (162.8°C). Also, moisture on the surface evaporates cooling the surface in the same way sweat cools you off on a hot day. If the meat is thin, the heat builds up rapidly. If it is thick, it takes much longer to get to the desired temp in the center. The trick is to get the center to the target temp without overcooking the exterior. One technique is to baste the exterior, but that keeps the skin wet and soft, and we want it dry and crisp. Another technique is to cook low and slow. For this grilled or smoked turkey recipe, we’ll keep the temp at 325°F (162.8°C), which is medium, and I’ll explain why later.
Heat absorption
Interestingly, the meat keeps cooking after you take it out of the heat. The hot outer parts continue to pass their heat inward and in 15 to 30 minutes after coming out of the oven, the center of the muscle can rise another 5°F (2.8°C). The heat also escapes into the air, so we don’t want to leave the meat sitting around too long or it gets cold.
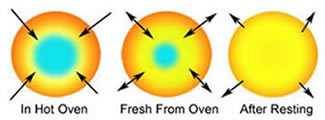
In this illustration, on the left, we have a piece of meat cooking at 325°F (162.8°C). It absorbs heat from all sides, the outer surfaces are hottest and the heat is passed to the center by conduction. In the center picture, the meat has been removed from the oven. Heat continues to be passed towards the center, even though it is sitting at room temp, and some of the heat is escaping into the surrounding air. On the right, the meat has come close to an even temp throughout and now it is cooling as more heat escapes.
To be absolutely safe and still have moist and tender whole birds, and to make sure nobody sues me, you should serve turkey at 165°F (74°C) in the deepest part of the meat and test it in multiple locations with a good digital thermometer. At my house, I usually take the meat up to 160°F (71.1°C) and let it rise 5°F (2.8°C) by carryover.
Cooking temperature for our grilled or smoked turkey recipe
I recommend you cook most poultry at 325°F (162.8°C). Readers know that I love low and slow and many of my recipes recommend a 225°F (107.2°C) setting. That’s a great temperature for gently melting tough collagen-based connective tissues without getting their protein panties in a bunch and squeezing out moisture (see my article on meat science).
But turkey doesn’t have the same composition as pork ribs or beef brisket, so we don’t need to worry about melting tough collagens. Turkey can handle higher temps, and higher temps are needed to render the fats in the skin in order to crisp it. The higher temp helps brown the skin in the short cooking time allotted.
Browning
We want brown skin because when cooking, brown means deep rich, complex taste. Browning is the result of a process called the Maillard reaction and, although it starts at low temps, it really kicks in at about 310°F (154.4°C) when amino acids and sugars form scores of scrumptious new compounds. This chemical reaction is responsible for the rich flavors in toasted bread, coffee beans, and dark beer.
At 325°F (162.8°C) you can render more fat from the skin and get the skin crispier. Nothing worse than soggy wet flabby rubbery skin, and that’s what you get at low temps. Also, at lower temps, it is possible the bird will stall at about 150°F (65.6°C) internal temp. The stall is a phenomenon that occurs when evaporation from the meat cools it so that the temp doesn’t rise until the surface dries out. If you stall while cooking a turkey you will need new dentures the next day.
High temp cooking
On the other hand, we don’t want to cook turkey too hot. Recently I have been seeing more and more recipes for cooking turkey at high temps, like 500°F (260°C). This just risks incinerating the skin and flies in the face of physics. High temps are fine for thin cuts like 3/4″ (2cm) steaks because we want the exterior dark with the interior at 130°F (54.4°C), much lower than turkey. But turkey breasts are much thicker than most steaks and we need to allow enough time for the heat to travel to the center. At high temps, by the time the heat penetrates, the exterior and outer layers are overcooked and dry.
Besides, at higher temps, the window of opportunity opens and closes too quickly. The amount of time at which the meat is properly cooked in the center is short, and in short order it is overdone. By cooking lower we have a better chance of removing it at the perfect temp. Slow pitches are easier to hit than fastballs.
So 325°F (162.8°C) is a nice compromise. High enough to benefit from the Maillard reaction on the skin and to melt some of the fat, hot enough to gelatinize connective tissues, but not flamethrower hot, not risking a badly overheated outside of the meat before the center is cooked.
If you can’t hit 325°F (162.8°C)
If you have a smoker or grill that doesn’t get to 325°F (162.8°C) (some smokers won’t, especially most gassers and electrics), you will need to cook longer. Don’t sweat it. The skin will still be brown because the Maillard reaction can still take place at lower temps, but at a much slower pace. Besides, the smoke is going to darken things, too. But you may not get really crispy skin. If the skin isn’t crisp by the time it hits 145°F (62.8°C), put it in an indoor oven or on a grill at 350 to 400°F (176.7 to 204.4°C).
Need More Turkey Tips?
Be amazing this holiday season and serve your guests the best turkey of their lives. Our downloadable eBook Turkey Outdoors Made Easy delivers 25 tested recipes from the AmazingRibs.com team, giving you everything you need to achieve flawless smoked or grilled turkey.
Get the eBook for *FREE* when you buy our rubs and sauces
My #1 tip when cooking a turkey on the grill: Use digital thermometers
Turkey is unforgiving and your guests don’t forget. Undercook and turkey is slimy and after dinner, everyone prays to the porcelain god. Overcook and you have attic insulation. The most important thing to do when cooking turkey is to hit the target temps on the money. Good news: It’s easy with the right tools.
Take a look at the calendar. This is the digital age. Bi-metal dial thermometers were invented in the 1800s, and all but the most expensive models can most charitably be called indicators, not precision measuring instruments.
Cooking without a good digital thermometer is like driving without a speedometer, flying without an altimeter, building furniture without a tape measure, filling your tires without a pressure gauge, or repairing the reactor without a Geiger counter. Digital thermometers are inexpensive, fast, and accurate. They will pay for themselves in one steak dinner or one trip to the doctor.
Thermometer issues
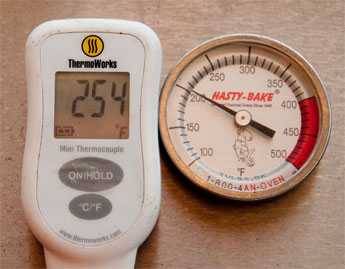
You simply cannot trust the cheap bimetal dial thermometer that the manufacturer installed in your cooker, shown on the right. Grill manufacturers compete to undercut each other’s prices so they are not about to install a high-end thermometer, especially when most of their grills are used for hot dogs and burgers. They buy a bargain basement. Even the top brands use cheap thermometers. Look at the picture above. That dial thermometer is off by 50°F (27.7°C). This is common. And Hasty-Bake is one of my favorite grill makers. They don’t make junk grills.
Grill thermometers are not only inaccurate, but they are mounted in the lid, waaaay above the cooking surface. Well, the temp in the dome can be a lot different than the temp at the grate. The grate is much closer to the heat source and the dome is closer to the ambient air. If you are cooking on Thanksgiving Day north of the Mason-Dixon Line, that air temp is cold.
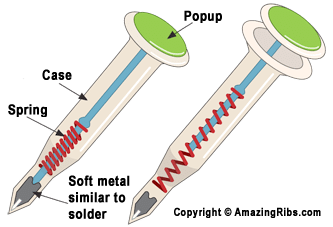
About pop-up thermometers
Neither can you trust the pop-up thermometer that comes inserted in the bird. The plunger that pops up is anchored in metal that is supposed to melt at a set temp, often at 185°F (85°C). At that temp, a turkey breast is more particle board than party. That 20°F (11.1°C) difference is the difference between succulent and sucky. In November 2013 Consumer Reports tested pop-up thermometers and wrote that they popped “at internal temperatures above 165°F (74°C) the minimum safe temperature for all poultry.
But three timers popped up when meat was still below that safe zone, one as low as 139.5°F (59.7°C). These low readings are a concern… Serving undercooked turkey means you risk sending your guests home with a nasty case of food poisoning. Our food safety experts recommend that cooks do not rely on these timers to tell whether their holiday bird is done.”
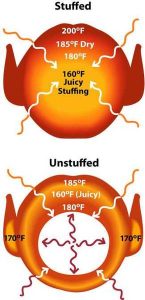
Worse still, if you stuff your bird, it is not measuring the temp of the stuffing which is several inches further away from the heat than the tip of the popup.
About the “instant read” dial thermometer
Neither can you trust the bi-metal “instant read” dial thermometer in your kitchen drawer when preparing a grilled turkey recipe, smoked turkey recipe, and so many others. In most cases “instant read” means 30 seconds to get at best a ballpark reading. You need to be able to poke a breast and read it right now. You need to be able to pull it back gently and see how the temps vary throughout the meat. Then you need to move on and test the thigh. And then close the lid before all the heat escapes. If you have a bi-metal dial thermometer in the kitchen drawer, right now, go and throw it out.

Thermometers we use
I use two thermometers when I cook indoors or outdoors: The Maverick ET-732 has two probes. One that can be inserted into the breast and left there throughout the cook. The other has a clip so it can hover just above the cooking grate. Both are attached to cables that run from the probes to the outside of the grill so I can monitor the temperature of both the meat and the oven at any time without opening the lid. It even has a wireless monitor that I can sit on the coffee table while I watch the game, and alarms in case I snooze.
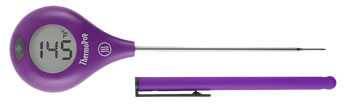
And just for good measure, I use a rapid read handheld digital when I’m doing turkey. The super fast Thermapen is my fave, at about $99 it reads precisely in two seconds, or the new Thermopop (above) for about $25 which reads precisely in five seconds. I use them to spot-check the meat in multiple locations. Good thermometers will save you a lot of money and grief in the long run, and nothing will improve your cooking more, outdoors or in. Please click here for a in-depth buying guide to thermometers.

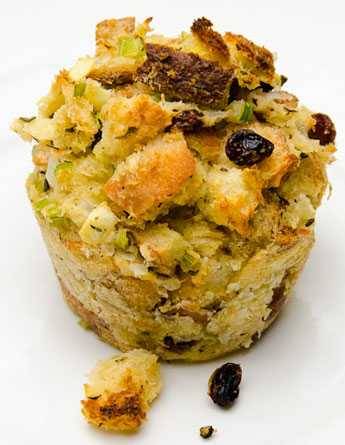
Don’t stuff the bird, make muffings
If you must have bread stuffing (and if you’re having me over, you must have bread stuffing) then cook it on the side (some people insist on calling it dressing if it is not stuffed in the bird).
1) If you stuff the bird, the temp in the center of the stuffing must be at least 165°F (74°C) to be safe because juices from the bird get into the stuffing. By the time the heat penetrates that far, the breast will be overcooked and void of moisture.
2) An empty cavity allows heat and smoke and flavor to enter the meat from the inside as well as the outside.
3) If you don’t stuff you can put herbs in the cavity to amp up the flavor. Stuffing does little for flavor.
4) Stuffing sticks to the ribs of the turkey. If you use the carcass to make stock the next day, which you absolutely should do, the bread in the stuffing will make the stock unappetizingly cloudy and the carbs and gluten will make it thick.
If you cook stuffing outside the bird, you can spread it in a baking pan and get more crispy brown bits, the bits everybody wants
Now here’s an outside-the-bird concept: Mix a little egg into the stuffing and cook it in well-buttered muffin pans so each individual “muffing” will brown all around making lots more crunchy bits! If you want your stuffing wet and juicy, there will be lots of gravy from this recipe to pour over it.
If you have to have stuffing
If you absolutely positively must have the stuffing in the cavity, then make it very moist, heat it in up to 165°F and stuff the bird with steaming hot stuffing. Then the meat won’t overcook while waiting for the stuffing to heat up. Then cook the bird at a lower temp, like 225°F (107.2°C) so the exterior will not dry out as much. But you still must get the center of the stuffing up to 160 to 165°F (71.1 to 74°C) before you take it off the heat because juices from the bird will get into the stuffing. For my favorite stuffing and muffing recipe, and tips on making muffings, try David Rosengarten’s Classic Bread & Butter Stuffing With Cranberries.
How big a bird do you need for our grilled turkey recipe and smoked turkey recipe?
There are several variables to consider when deciding how much meat to buy. What is your male-to-female ratio? How many young children will there be? How many big eaters will there be? Are adult beverages in play? How many appetizers and snacks? What are the side dishes and how many? When does the football game start? And most important, do you want leftovers?
As a rule of thumb, 1 pound of raw weight per person usually will be more than enough. When you subtract bones, giblets, and shrinkage, you will lose about 20%. That leaves about 3/4 pound (340.2g) per person on average. I usually plan on 2 pounds (907.2g) per person so those who want leftovers (me!) can take some home (make sure you have plenty of aluminum foil or zipper bags on hand). I’ve been known to tell guests to bring Tupperware when they come. They love it!
If you need a lot of turkey and space permits, it is better to cook two small birds than one giant bird. They will cook faster and be more tender and juicy. Here’s why: The bigger the bird, the thicker the breasts and the longer it takes to cook the center of the breasts to the proper doneness. By the time they are done, thinner parts are overcooked, and the outer parts of the breasts are dry.
Cooking two smaller birds will actually take less time than one large bird and it will not take any longer time than one smaller bird if you get the cooker up to the proper temp.
What you need to know about turkeys before you go shopping
Today’s grocery store turkeys are the result of decades of selective breeding. The Broad Breasted White used by Butterball, Perdue, Smithfield, Jennie-O, and most other major brands has been bred smaller to fit modern family sizes, with larger breasts to satisfy the demand for white meat, with a metabolism that lets them grow to market size rapidly, and with all white feathers because dark feathers make black spots on the skin. They account for 99% of all turkeys on the market.
A bird labeled “Young Turkey” can be either sex or less than 8 months old. A “Fryer-Roaster Turkey” is an immature turkey younger than 12 weeks, of either sex.
Brine injection
Because most people don’t own a quality digital thermometer, and, as a result, they overcook their turkeys, most manufacturers inject a liquid brine, about 2% salt, into their turkeys. Salt is a great flavor amplifier if you don’t overdo it. The injection of a brine adds liquid helping to keep the meat moist. Remarkably, salt helps keep the moisture in. It seems the electrical charges in salt alter the structure of the proteins in the meat, a process called denaturing, and the denatured proteins become more hydrophilic, meaning they glom onto water and hold it tight. Finally, salt has antimicrobial properties.
Because processors are allowed to inject up to 8% of the weight of the bird, this also adds to their profit. Let’s do the math: If 8% of a 20-pound bird is injected brine, that’s 1.6 pounds. If the bird sells for $1.25 per pound on sale, that’s $2 for that salt water, even more when it is full price!
What the labels mean
Turkeys that say “basted,” “self-basted,” or “enhanced” have been injected with a salt solution and possibly flavor enhancers and tenderizers. “Kosher” birds have been salted on the outside and inside the cavity because it was thought in ancient times that this would draw out the “unclean” blood.
Now catch this: If a bird has had salt and water injected, the law still allows it to be labeled “natural” or “organic” because salt and water are natural ingredients! In fact, the word natural has no legal meaning and it is widely misused. Remember, this is a country where Congress once decided to classify pizza as a vegetable!
But salt is not evil. It is an “essential nutrient” which means it is necessary for good health and you must ingest it because your body doesn’t make it. Excessive salt consumption can be hazardous, but not moderate consumption.
So let’s do the math: An ounce of enhanced turkey (which has neither butter nor balls) contains about 65 mg sodium. So an 8-ounce (226.8g) portion of turkey, a pretty nice-sized serving, will contain 520 mg. If you are on a low-sodium diet, the Cleveland Clinic recommends you keep your daily intake down to 2,000 mg, so that a serving of turkey is only 1/4 of the recommended daily amount for someone whose doctor has told them to watch their salt intake. No sweat. For the rest of us? Chow down!
Avoiding salted birds
Nowadays finding a bird that has not been salted is almost a mission impossible. To get a bird that is not pumped, you need to special order it, go to a specialty store like Whole Foods, or buy it directly from a farmer. Some butchers develop relationships with local farmers and will take orders for fresh birds. Another good source is a Community Supported Agriculture (CSA) organization which you can find through LocalHarvest.org.
For more about salt and how important it is to your health, read my article on the Science of Salt.
Now a word about birds labeled “free range”. This is yet another case of industry bullying USDA into allowing a highly misleading term onto the label. The legal definition says “Producers must demonstrate to the Agency that the poultry has been allowed access to the outside” [italics are mine]. In practice, this means the producer can simply leave a door open to a small penned-in area. But the birds rarely go through the door into that scary sunny open area.
The term “pasture-raised” has no legal definition either. And most important, the word “natural” on a label has absolutely no legal meaning at all. Marketers can call anything they want natural without any legal repercussions: How about a chocolate-coated turkey beak? Actually, when I see the word “natural” I read “for suckers”. And don’t get me started on the word “organic”. I will be writing in detail about how this word has lost much of its value later. Suffice it to say, as with the word “natural” I see a marketing term with little quality or nutritional meaning other than “higher price”.
What about heritage breeds of turkey?
All turkeys are descendants of the wild turkey Meleagris gallopavo. As with other animals (hogs for instance) and vegetables (tomatoes for instance), farmers are rediscovering abandoned “heritage” breeds. Narragansett and Bourbon Red are two of several heritage turkeys that are making a comeback, but they are still hard to find. They are closer to wild turkeys, with smaller breasts, and darker and more flavorful meat that some people call gamey. Sometimes the meat is a bit tougher. Try one before you serve it to the gang on Turkey Day. They are also much more expensive. But beware. The term “heritage” is not government-regulated and there is nothing to stop unscrupulous merchants from labeling any old turkey as “heritage”.
Cooking techniques for heritage birds remain the same. I strongly recommend a dry brine, wet rub, and gravy. Since the breasts are smaller and darker, they will not take as long to cook, and breast meat and thigh meat will cook at much the same rate.
Fresh or frozen turkey?
“Fresh” poultry means, according to USDA, that the bird has not been taken below 26°F (-3.3°C) by the processor. At that point it is pretty hard (remember, the freezing temp of water is 32°F (0°C)), but not quite a bowling ball because of the proteins and other compounds in the liquids, not to mention the injected salt, preventing it from freezing completely. But ice crystals will still have formed. USDA inspectors allow up to 2°F (1.1°C) tolerance when testing birds in commerce, so a “fresh” turkey can be held as low as 24°F (-4.4°C).
Ice crystals are larger than water molecules, and they are sharp. When ice crystals form, the water expands and the sharp edges punch holes in muscle fibers, allowing precious moisture to escape. That’s the pink liquid in the bag. Called “purge”, it is mostly myoglobin, a protein-laden fluid that helps keep the meat moist. We won’t waste it. It will go in the gravy, but I would rather have it in the muscles where it belongs. To make matters worse, some grocers allow turkeys to thaw a bit so they feel fresh.
This phony “fresh” turkey business is bunk and USDA is allowing marketers to deceive the public.
What is a “fresh” turkey anyway?
Sometimes you can buy truly fresh turkeys with no ice crystals and no purge from a farmer or specialty butcher who has chilled them to between 32°F and 38°F (0 to 3.3°C). You may be able to find truly fresh turkeys raised on Amish-owned family farms. Amish farmers don’t use electricity so their birds aren’t processed on fast-moving disassembly lines and they aren’t up late surfing the net and doing things that get them overexcited. They’re plucked and cleaned by hand and are largely free of pinfeathers.
To get a truly fresh turkey, usually, you have to order it and the butcher or farmer will give you a pickup date. In Chicago, I occasionally drive to John’s Live Poultry and Egg Market where I can pick a live bird, and have it weighed, slaughtered, and dressed on the spot. I get to keep the head and feet too.
Drawbacks
The problem is that, when an animal dies, the muscles can’t get the blood-laden oxygen they expect so they get stiff. This rigor mortis usually sets in within an hour or so, and it doesn’t go away until about 12 hours later, so you don’t want to eat a freshly killed bird. Wait 24 hours.
But fresh meat doesn’t stay fresh forever. Buy a truly fresh turkey only if you are certain it has been killed within a week of the date you will consume it.
On the other hand, in an efficient slaughterhouse operation, turkeys are flash-frozen in extreme cold. This process forms smaller ice crystals and that helps prevent purge. I would rather have a bird that was flash-frozen right after slaughter than a so-called “fresh” bird that has been sitting around in the fridge for a couple of weeks.
Bottom line: Proper cooking is far more important than having a fresh bird.
Thawing turkey
To thaw a frozen turkey, place the bird, still in its plastic shipping bag, in a large roasting pan in the refrigerator. You need the pan because the bags always seem to leak. Allow 24 hours in the fridge for every 4 pounds. If you don’t want to do the math, just put it in the fridge 7 days before the day you will eat it. That’s a bit more time than needed, but hey, when you want to catch a train, you get to the station before the train does, right? Most turkey disasters I hear about are because the bird has not defrosted properly. There are faster ways to defrost a bird discussed in my article on thawing.
A day before cooking, strip off the plastic bag and remove the organs and neck from both the front and rear cavities. That’s the deep center and the last part to thaw, so removing them will help ensure that the interior is melted. Just leave the neck and giblets in the pan. We’ll use them later.
Cooking a frozen bird in an emergency
As much as it pains me to tell you, in an emergency, you can cook a frozen turkey. But expect the exterior to be overcooked by the time the center is cooked to a safe temp. So, make sure you have gravy.
Here are the rules for cooking a frozen bird: (1) You absolutely positively must use a meat thermometer for this maneuver; (2) you cannot stuff the bird; (3) you may have to cook for an hour before you can remove the giblet package and neck, but you really should get them out as quickly as possible, especially if they are in plastic, which can melt; (4) cook at a lower temperature, 250-275°F (121.1 to 135°C), to make sure the skin and exterior don’t dry out in the process; (5) cooking time will be 1.5 to 2.0 times as long.
Video: Don’t wash your turkey
Rinsing poultry in the sink cannot remove Salmonella and Campylobacter which are often embedded in the muscle. In fact, rinsing makes things worse by splattering contamination onto the sink and counters.
“There’s no reason, from a scientific point of view, to think you’re making it any safer, and in fact, you’re making it less safe,” said researcher Jennifer Quinlan in an interview on NPR. Quinlan is a food safety scientist at Drexel University in Philadelphia. In fact, Drexel has a public service program to educate the public complete with this animation:
“You should assume that if you have chicken, you have either Salmonella or Campylobacter bacteria on it, if not both,” said Quinlan. “If you wash it, you’re more likely to spray bacteria all over the kitchen and yourself.”
Salting, wet brining, dry brining, and injecting
If your bird has not been salted at the factory, you want to do it for this grilled turkey recipe or smoked turkey recipe. For years I advocated wet brining turkey, but I have changed my tune and I now prefer dry brining. Yes, I am a flip-flopper, so don’t vote for me if I run for President. Wet brining involves submerging the meat in a tub of salt water. I quit wet brining because it wastes a lot of herbs, spices, salt, and with some recipes, fruit juice. Salt gets in, but only a little salt. The rest are wasted because most of their molecules are too large to penetrate the skin or the meat which can’t absorb any more water anyway. They just settle on the surface.
If you want to flavor the surface, you can have more impact with a good rub. Wet brining means the bird must be kept chilled, occupying lots of fridge space or it must be kept in a cooler that must be checked regularly to make sure it is cold. Tests show that very little water from the brine enters the bird, at most 6%, and because it is not bound to the fibers, most of it drips out during cooking. Finally, the swim in the brine softens the skin and doesn’t help you get it dry and crispy so we do not recommend it for our grilled turkey recipe or smoked turkey recipe. Click here to read more about the science of wet brining.
Dry brining
Dry brining is a better way to get the benefits of salt without the fuss and waste. The night before preparing our grilled turkey recipe or smoked turkey recipe, just sprinkle the skin with salt, about 1/4 to 1/2 teaspoon of kosher salt per pound or less, but only if it has not been injected or koshered before you bought it. Moisture in the skin melts the salt and it travels into the meat. It will help season the meat, amplify flavor, and denature the proteins so they hold water better. This also helps the skin crisp during cooking because it breaks down the structure of the skin and dries it out. Don’t cover the bird with plastic wrap. We want the skin to dry out a bit. This will help you get skin as crisp as potato chips. Click here to learn more about dry brining.
Brine injecting
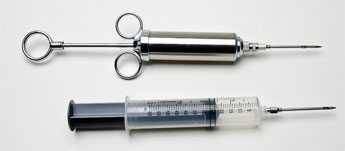
Another technique that works well is to inject a brine. Injecting is a sure fire way to get the salt down deep. By injecting, you don’t have to worry about oversalting, you can do it at the last minute, you have less waste, less cost, no huge containers are needed, no refrigeration space problems, and the biggest safety issue is making sure you don’t stab yourself. To inject, you need a special hypodermic for food. For more on the subject and for my poultry brine injection read my article on The Science of Injecting.
In recent years I have hit upon the perfect solution. Rather than diluting the meat with water by injecting with a brine, I dry brine and then inject it with oil. Read on:
Butterballing the meat
The deep-frying crowd likes to inject their meat with Cajun spices, but I’m not a fan. I think they are too strong and overpower the flavor of the turkey. My biggest concern with turkey is keeping the breasts moist, and that comes in two forms, water and fat. I manage the water issue with dry brining, and not overcooking. Because modern turkey breasts have so little fat, I sometimes like to add richness and more moisture by injecting oil. Butterball got its name by injecting butter into turkeys. Alas, they no longer live up to their name. Here’s how to butterball:
You can inject melted butter but as soon as it hits the cold meat it clumps and clogs the needle. So wait until the meat is warmer than the melting point of butter which is about 90°F and inject then, during the cook. And yes, you can do both dry brine and butterball. Injecting forces fat in, and it squeezes into the spaces between the muscle fibers, not into the fibers. Salt, however, gets into the fibers. I usually inject only the breasts because dark meat rarely needs it.
Because the meat is pretty full of natural water to begin with, remember meat is about 70% water, it will not absorb much butter because butter and water don’t mix. The exact amount of butter depends on the size of the bird. Melt one stick of butter (about 1/2 cup (118.3mL)). Inject about every 1/2 inch (1.3cm). Click here for more info on injecting. If there is any butter left, discard it. It has been contaminated, so do not put it back in the fridge.
How to make Granny’s gravy
I think I have made a strong case for a thin gravy that actually penetrates meat, but if you absolutely must make traditional thick gravy, here’s how:
1) Take about 4 tablespoons of the melted turkey fat and/or butter and put it in a saucepan over medium heat with 4 tablespoons of flour (the ratio is 1:1). Flour tastes better than cornstarch if you do this properly. Whisk the flour until the mixture is smooth, and keep whisking until it starts to turn pale amber, about 3 minutes. This is called a medium roux. The browning cooks the flour and kills the pasty flavor. You can make it richer by cooking it longer and letting it get darker, but don’t let it turn brown.
2) Slowly pour 1 cup [237 ml] of the smoked pan drippings into the roux, whisking it over medium heat as you pour, and keep whisking until it thickens and all lumps are gone.
3) Taste it before you add anything. You will probably want to add another cup of the thin gravy. You should not need to add salt and pepper. This should make the traditionalists very happy because this smoky, enriched stock will make a better gravy than any they ever had.
Water pans, drip pans, roasting pans
When setting up for 2-zone cooking, I normally recommend you put a water pan under the meat. It acts as a heat sink, absorbing energy and moderating fluctuations. A water pan also puts humidity in the atmosphere to reduce evaporative cooling and helps keep the meat moist. If you have a small grill, the water pan can actually sit between the flame and the meat, casting a heat shadow above it so the meat doesn’t overheat.
For this grilled turkey recipe or smoked turkey recipe, we replace the water in the pan with the fixins for our special gravy and it will collect dripping further enriching the gravy. This gravy/drip pan should have at least 3.5 quart (4L) capacity and must be large enough to fit under the entire bird. The best choices are stainless steel, ceramic, or CorningWare. Be forewarned, the pan it will get smoky and need serious scrubbing. Don’t use copper because it can react with the salts and acids in the gravy. I have used a disposable aluminum pan and noticed no off flavors, but I now have a stainless steel roasting pan that I use just for outdoor cooking because I got tired of sleeping on the couch.
You never want to put the bird in liquid on the bottom of a roasting pan. If you put it in liquid, you will boil the back and end up with soggy flavorless meat and inedible skin. If you put it in a dry pan, it will stick and the dripping oils will fry the back, usually overcooking it. So you’ll need a grate for holding the bird. You can use one from your grill, or even one from your indoor oven.
How to set it up
The tricky part is arranging everything when getting ready to prepare our grilled turkey recipe or smoked turkey recipe. Because there are so many different grill designs I can’t go through all the options, so grasp the science and adapt it to your own rig. The ideal setup is to place the bird on a rack 2 to 3″ (5 to 7.6cm) above the pan so heat and smoke can travel between them. If the bird is any lower, the mass of the cooler gravy, evaporation from its surface, and the sides of the pan will conspire to block heat, airflow, and smoke and you will end up with a pale, soggy, undercooked bottom.
The traditional turkey roasting configuration is a V-shaped rack that sits in a deep roasting pan with water in the pan to keep the drippings from burning. It is a recipe for skin as pale as a Seattle sunbather on the bottom and sides, and undercooked dark meat. I can see you nodding in recognition from here.
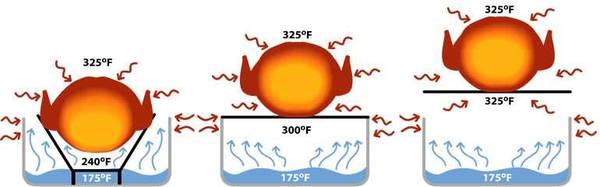
Prof. Greg Blonder, is a physicist, entrepreneur, former Chief Technical Advisor at the legendary Bell Labs, food lover, and the AmazingRibs.com science advisor and mythbuster. To assist in helping create our ideal grilled turkey recipe or smoked turkey recipe, he measured the temps at different levels above the liquid in a 3″ (7.6cm) tall pan of water.
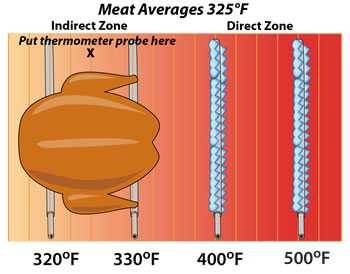
Temperature control
Even though the oven was 325°F (162.8°C), the liquid never reached boiling temp in the time it took to cook a turkey. That’s because air is a lousy conductor of heat. You can put your hand in a 325°F oven (162.8°C), but don’t put it in 325°F (162.8°C) oil. Because the evaporation of water from the surface cools the liquid in the same way sweat cools us on a hot day, the temp of the gravy may never get above 175°F (79.4°C).
As you can see from the illustration, if the bird is below the lip of the pan and about 2″ (5cm) above the gravy, the bottom of the bird is in 240°F (115.6°C) high humidity air, 85°F (47.3°C) cooler than the top of the bird which is chugging away nicely in dry heat. That’s why turkey backs are so often as flabby as an elephant’s.
Even if you place the bird on a grate on the lip of the pan, the bottom will still be much cooler than the top and will almost certainly be undercooked. He did experiments with a shallow pan and got similar results.
Tips for placing your bird
In order to heat the bottom of the bird properly when preparing our grilled turkey recipe or smoked turkey recipe, if you are using a 3″ (7.6cm) pan with liquid as I recommend, you need to get the meat 3″ (7.6cm) above the pan for the air temp to be 325°F (162.8°C) all around.
If you can’t get your bird above the pan, you should start it breastside down and turn it over after an hour. Another option is to just remove the drip pan about 20 minutes before the bird is finished and put its back above direct heat. Just be sure to watch it carefully so it doesn’t burn and check the temp in the breast before bringing it in.
How much smoke?
Nobody has ever ruined a turkey by under smoking it, but many birds and reputations have been ruined by too much smoke. Smoke is a seasoning like salt. It is part of the orchestra of flavors, not a drum solo. Show restraint. Experiment on a weeknight not on Thanksgiving. Suppress your testosterone. On a charcoal grill or smoker skip the wood altogether or use a single chunk or a handful of chips or pellets. Just a few ounces. On a gas or electric smoker, just a few ounces is all that’s needed. On a gas grill, because it has so much ventilation perhaps a cup.
Setting up your grill
A smoker is nice for this recipe, but the Ultimate Turkey can be done just as easily on a normal charcoal or gas grill. In fact, it can be done indoors without the smoke and still turn out a killer meal (more on that below). Long ago you should have done dry runs sans food with your grill so that by now you can hit two target temps: 325°F (162.8°C) and 225°F(107.2°C). Almost all my recipes call for one or the other and because only pellet grills have a thermostat control, you need to play the roll of thermostat. If you haven’t calibrated your system, click the link and practice long before you try to cook anything. For the internet’s best buying guide to grills and smokers, click here.
2-zone setup
When preparing our grilled turkey recipe or smoked turkey recipe outdoors, it is best to use a 2-zone setup. (Click that link to see exactly what I mean). And when you are on that page, click the links that show you how to set up a charcoal grill, gas grill, offset smoker, or bullet smoker. The grill has a hot side with direct heat underneath it, and a cooler side where the heat flows in from the hot side. We call them the direct zone and the indirect zone. You absolutely, positively do not want the bird sitting directly above the flame or coals unless you have always secretly wanted to run an avian crematorium. The meat and drip pan go in the indirect zone and roasts by convection airflow circulating all around the bird rather than by direct radiation from the flame. I do not recommend putting the meat and the drip pan in the center. It is too easy to burn the thighs and wings that way. Put the drip pan on the flame deflectors below the food grate. The bird roosts on the food grate above. See my article on the best setup for a charcoal grill.
Setup examples
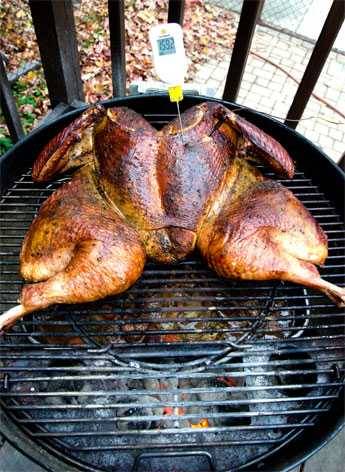
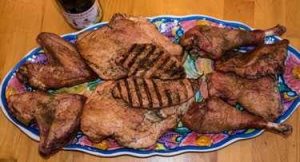
Here is a spatchcocked bird on a 30 year old Weber Kettle charcoal grill outfitted with a Smokenator, a device that holds the coals off to one side. Notice that the dark meat is closer to the coals since we want it cooked to a higher temp and the drip pan about 3″ (7.6°) below. Instant read digital thermometer is reading 159.2°F (70.7°C). That’s what I’m talkin’ ’bout! Click here to see this this charcoal grill setup up close and personal.
Above is a 15 year old Weber Genesis gas grill. I have removed the cooking grates. The bird sits on a wire rack above the drip pan filled with a flavorful gravy, and the drip pan sits right on the flame deflector bars. On the left is a disposable aluminum loaf pan with apple wood chips sitting on the hottest burner. I have covered the tips of the wings and drums with foil to keep them from burning. The foil is removed later and about 30 minutes before the bird is done, I removed the drip pan to firm up the back of the bird. Lately I’ve reversed the procedure and started cooking without the foil, and when the wings and drums get dark, then I cover them. Either method works. Click here to see this gas grill setup up close and personal.
Other options
If none of these works for you, try to raise the bird up by placing it on an oven rack sitting on top of several empty tall beer cans (don’t write to me if you don’t know how to empty them). If they are clean, they can sit right in the drip pan.
Beware! A disposable aluminum pan will not hold the rack and a bird without collapsing, so if you use a disposable pan, it must go under the grill grate and the bird must go on top of the grill grate. That, or you must rest a cooking grate on empty beer cans.
Regardless of your grill type, go easy on the wood. With charcoal, you will not need any, a small handful of chips or a single chunk at most. Too much smoke is ruinous. I know you want to put the pedal to the metal, but resist the temptation.
Setting up your smoker
The only thing you need to do differently than normal is get the drip pan under the meat. Just make sure the drip pan does not dry out. It evaporates rapidly. Check every 20 minutes or so. If you have two birds, try to offset them so one doesn’t drip on the other. And go easy on the wood! Just 4 to 8 ounces (113.4 to 226.8g) should be enough.
Smoker options
- Gas smoker setup. Put the turkey on a shelf high up in the cabinet and the gravy pan on the bottom shelf. You won’t need the built-in water pan. You’ll probably need to set the dial on high.
- Offset barrel smoker setup. Put the drip pan on the bottom of the cooking chamber under the cooking grate. See my article on the best setup for an offset smoker.
- Pellet smoker setup. Put the drip pan on top of the big deflector plate under the cooking grate and put the bird on the cooking grate. If you have a pellet smoker that generates its best smoke at about 200°F (93.3°C) or so, start there for about 30 minutes, and then crank it up to 325°F (162.8°C).
- Electric smoker setup. You probably can’t get up to 325°F (162.8°C) and it will be very humid in there. That’s good for juiciness and tenderness, but bad for the skin when smoking turkey. So take it up to about 145°F (62.8°C) internal temp, and then put it in a 400°F (204.4°C) oven to crisp the skin. You can also put it on a hot grill or under the broiler. Then ask for a charcoal, gas, or pellet smoker for your birthday. Better flavor too. Click the link to see why.
- Kamado or Egg setup. You do not want direct heat and only the oval shaped Primo can be set up in two zones, so you need to put in the deflector plate. The gravy pan can go on this plate.
- Smokey Mountain and other “bullet” smoker setup. If you are using a bullet-shaped water smoker like a Weber Smokey Mountain, try leaving the water pan dry and put the gravy in a pan on the bottom grate. That should do it. You can use the built-in water pan for the gravy if you wish. If the water pan is really dirty, line it with foil or put a pan inside it. You may have trouble hitting 325°F (162.8°C) this way, though. In order to get it up to 325°F (162.8°C), depending on the outside air temp, you’ll probably have to add more fully lit coals than normal and leave the vents open all the way. See my article on the best setup for a Weber Smokey Mountain.
Setting up your indoor oven
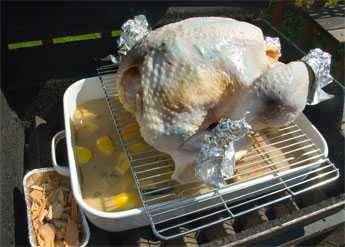
If you’re snowed in and can’t grill or smoke your turkey, you can make this recipe indoors very easily. You’ll just have to omit the wood. Don’t even think about using wood indoors. You’ll never get the smell out of the place and you’ll be sleeping on the couch for weeks. Here’s a picture by Matt Johnson showing his setup for cooking a turkey in the oven. Turkey on an upper rack, disposable drip pan with the gravy fixins sitting in a sheet pan to catch stray drips right below. You can also line the bottom shelf with foil if you don’t have a sheet pan big enough.

Breasts up during our grilled turkey recipe or smoked turkey recipe!
Some people like to cook breast side down because they think fat and juices will percolate down and keep the breast moist. Juices simply can’t travel very far through muscle fibers that confine them. Especially since the fibers in the breasts run horizontally, not top to bottom. And they are not straws. They are sealed on the ends. And the breast is not an empty jug waiting for juices to flow in. The breast meat is already saturated with fluid. When you sleep on your stomach, your breasts don’t swell do they? And if the juices could flow, pressure would push them up, away from the heat, like the liquid in a glass thermometer.
And where would these juices come from? Visualize an upside down turkey. The breast is maybe 3″ (7.6cm) thick at most. What is directly above it? The cavity! No juices there!
If you turn your bird upside down because you want fat to baste the breasts, alas, breasts have little fat. It’s in the skin, which would be below the breasts if the bird was upside down when smoking turkey, so melting fat would just drip out, not bathe the meat.
Finally, if you cook breast down when grilling or smoking a turkey, you smush the breasts and put marks on the skin, and if you put the bird in a roasting pan, the skin will probably not brown properly so we do not do it for our grilled turkey recipe or smoked turkey recipe.
Give your bird a lift
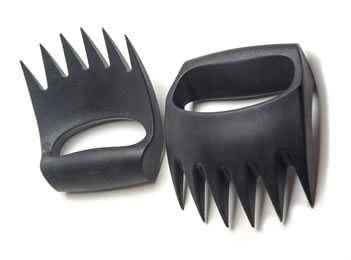
Once you are done smoking turkey, you’ll need something to lift the hot bird out of the cooker. You can buy specialized turkey lifters, but they are mono-taskers. I use my bear claws (shown here). They were designed for pulling pork, but they can do double duty as lifters and salad tossers. Click here for more info about these handy tools.
If you don’t want another gadget in the kitchen, you can lift a turkey with two wooden spoons. Just stick the handle of each into the front and rear cavity.
How To Carve A Chicken Or Turkey
Step one: Close your eyes and repeat after me “I am smarter than a dead bird”. Step two: Click here for step by step photos and a 1 minute video.
Cooking turkey breasts only
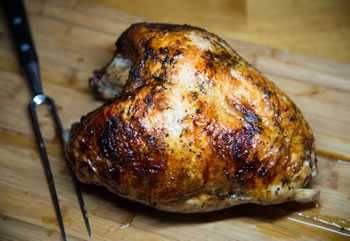
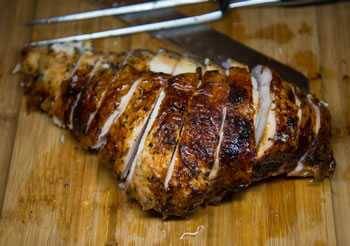
If you don’t want to do a whole bird for our grilled turkey recipe or smoked turkey recipe, smoking turkey breasts is a great alternative. They come in three forms, a double breast cut off the bird with bone in (above), a single boneless breast (below), or two breasts de-boned and rolled together and held tight with a mesh. The mesh is a pain to get off after you are done cooking. I much prefer the bone in breasts or boneless breasts when grilling or smoking a turkey. A 3 to 6 pound (1.4 to 2.7kg) whole double bone in breast will be done in about 2 hours at 325°F (162.8°C), and larger breasts will be done in about 3 hours. Boneless double breasts tied as roasts take about 3 hours. Single breast of 2 to 3 pounds (907.2g to 1.4kg) will take about an 1 to 1.5 hours.
For smoking turkey breasts, just follow the same basic concept as for the whole bird. Inject or dry brine, watch the temp like a hawk circling a flock of turkeys. You will need to add chicken stock to the gravy because there will be few drippings and no neck and skin to throw in there. Another option is to paint them with a Teriyaki or Yakitori sauce.
But if you’re going to the trouble of preparing our grilled turkey or smoked turkey recipe, why not cook the whole bird and savor the leftovers in sandwiches, salads, pot pies… ?
Making turketta
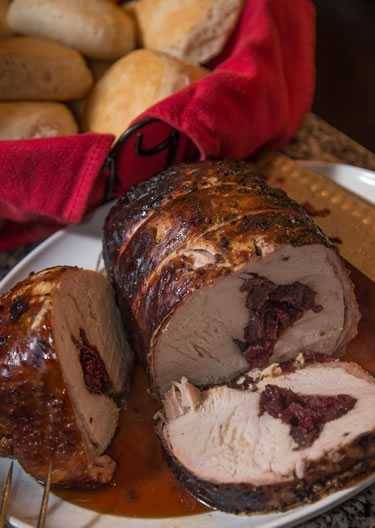
As an alternative to our traditional grilled turkey recipe or smoked turkey recipe, porchetta is a classic Italian recipe for stuffing a whole hog. Inspired, I’ve created something I called Turketta. I took a bone in breast, removed the skin, boned out the meat, placed them on the skin, piled on a stuffing of dried cranberries soaked in port wine, rolled it up and smoked it. Click here for the recipe with step by step pictures.
Smoked legs & wings
Smoked legs, which are technically drumstick and thigh together take 1.5 to 2 hours together or separately. Wings, 1 to 1.5 hours.
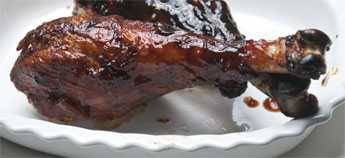
Disney Smoked Turkey Legs
Visit any of the Disney parks and you will see folks stumbling around delirious with huge smiles and monster turkey legs (actually they are drumsticks, since technically legs include the thigh). These pterodactyl-sized drums have spawned fan pages, scores of videos on YouTube, and rumors (no they are not emu legs). Smoking turkey legs has become so popular at Disney that they were featured on page one of the New York Times once. They are not hard to make at home once you crack the secret recipe, and we have it with a video.
Rotisserie cooking
Rotisseries are a good way to cook meat because the process of rotating it between hot and cool zones retains juices and ensures even cooking, but I don’t recommend them for turkey.
The problem is that you need to truss the bird up tight on a spit or else the wings and drums go flopping around and get burned. If you truss your bird for use when preparing a grilled turkey recipe or smoked turkey recipe, the skin beneath the wings, thighs, and drums never darkens and stays rubbery. And because the thigh is pressed tightly against the side, it takes too long to warm and cook through, so by the time it hits the ideal temp, about 170°F (76.7°C), the breast is overcooked. That’s why I recommend cooking turkey untrussed.
In addition, it is difficult to balance the bird on the spit. If it is imbalanced it puts serious strain on the motor. I’ve heard of them burning out. Replacement motors are usually north of $100. Some rotisseries come with counterweights that you put on the handle to balance the whole gizmo, like the weights you put on tires to balance them. That is a good thing.
Finally, the bird can rip loose of its moorings, and then you have torn breasts. I say fuggedaboudit.
Vertical roasters work
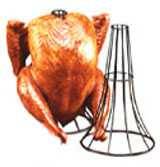
If you must serve a whole bird Norman Rockwell style, and if your cooker is tall enough, and most eggs, kamados, and ceramic grills are, try roasting the bird vertically.
The advantage of a vertical roaster is that you get much better airflow up into the cavity than when the bird is reclining and that means better smoke penetration from the inside as well as more even and faster cooking. The disadvantage is that you can’t easily put aromatics in the cavity which you can do when the bird is horizontal. Just make sure the tail sits about 3″ (7.6cm) above the drip pan for proper airflow.
The device you want is a wire armature that supports the bird like the Spanek Vertical Roaster (shown here).
Don’t put a beer can or a cannon up your bird’s butt
You absolutely do not want a beer can or Turkey Cannon or anything with solid sides. This is because the metal blocks airflow to the cavity and impedes heat and smoke when preparing our grilled turkey recipe or smoked turkey recipe. And no, the liquid in the can will not add moisture to the meat, especially where the can is in contact with meat because it will not boil. Click here to read the science explaining why beer can chicken and turkey are bad ideas.
Is pink meat safe?
When preparing our grilled turkey recipe or smoked turkey recipe, you might wonder if it is ok that some of the meat is pink. Yes, it can be, according to the US Department of Agriculture (USDA).
First of all, some turkey meat is naturally pink. According to the USDA, “The color of cooked meat and poultry is not always a sure sign of its degree of doneness. Only by using a food thermometer can one accurately determine that a meat has reached a safe temperature. Turkey, fresh pork, ground beef, or veal can remain pink even after cooking to temperatures of 160°F (71.1°C) and higher. The meat of smoked turkey is always pink.”
In addition, smoked meat turns pink due to a chemical reaction with the combustion gases and the smoke and the meat. For the Ultimate Turkey, we take the bird off at 160°F (71.1°C) and it will rise to 165°F (74°C) even if it is off the cooker.
Click here for more on what are ideal meat temps. Click here for more on meat science and the thermodynamics of cooking.
What about red or pink juices after preparing our grilled turkey or smoked turkey recipe?
Because of the speed with which commercial turkey farms grow their birds, it is not uncommon for there to be red or pink juices in the thigh joints even if the meat is properly cooked during our smoked turkey recipe. That’s because the joints bones have not had a chance to properly harden. If a little red makes you nervous, even if your thermometer is at 165°F (74°C), after carving, a minute or two in the microwave will take care of it. For a real eye-opener on why poultry is not done when the juices run clear, click here.
Taking your bird over the river and through the woods
If you are unsure about what temp your cooker will settle in at when preparing our grilled turkey recipe or smoked turkey recipe, and since variables like the ambient air temperature, sun, and wind can really muck things up, I recommend you put the bird on 30 to 60 minutes early. And when the probe says it is 160 to 165°F(71.1 to 74°C), put the bird into a faux Cambro to keep the bird warm until dinner time. A real Cambro is an insulated storage box popular with caterers. A faux cambro is simply a beer cooler.
The meat temp will rise about 5°F (2.8°C) at first, and an hour later the temp will have dropped only about 5 to 10°F (2.8 to 5.6°C)! Just don’t let it drop below 150° (65.6°C)F. If you have a good cooler, it should stay safe for up to 3 hours. This technique will soften the skin a bit, but that’s better than going cold turkey. So get that cooler cleaned up before you start cooking. Use bleach to clean it. Click here to read more about how to use a faux Cambro.
The faux cambro is especially handy if you need to take the bird over the river and through the woods.
Timing
I know you want to show off the fruits of your labor after preparing our grilled turkey recipe or smoked turkey recipe, but if dinner is more than 2 to 3 hours away, you need to cook the bird to 160°F (71.1°C), then chill the bird and re-heat it to 160°F (71.1°C) when you get there. This is called “serving leftovers for Thanksgiving dinner.” Now why would you do that? The meat will be dry and you’ll need a lot of my thin gravy to moisten it. I strongly recommend you serve freshly cooked meat or let somebody else cook the bird. If you have to cook the bird and travel more than 2 hours, then get there early and cook it on site. Cook it fast by spatchcocking it. Re-therming a cooked bird can take almost as much time as cooking it from scratch.
You will not enhance your rep with reheated dry meat.
What is the difference between white meat and dark meat?
As much as we are fascinated with breasts in this easily titillated society, I should set the record straight: Technically a turkey has one large breast divided by a breast bone. So as to not confuse, I shall be technically incorrect in this article and refer to each pectoral muscle as a separate breast.
Turkey breasts are called white meat because the muscles are paler than the meat of the legs and thighs. That’s because domesticated turkeys can’t fly, so their legs and thighs get more exercise than the breasts and wings. As a result, the muscles of the legs and thighs must be more efficient at using oxygen for continuous muscle contractions over an extended time. These “slow-twitch” muscles fire slowly and fatigue slowly, so they need more oxygen for fuel.
To supply this oxygen they have more myoglobin and fat in them. Myoglobin is a pink protein liquid that stores oxygen brought to it by the blood, and fat is a storehouse of fuel. The pink liquid in the plastic bag the bird comes in is myoglobin. Dark meat is pink when cooked medium rare just like pork, but for safety reasons we cook it well past pink until it turns gray.
Breast meat is made of “fast-twitch” pectoral muscles that are good at short bursts of rapid contraction, but they fatigue quickly. They don’t need much oxygen so they have much less of the pink myoglobin leaving the meat white when cooked.
Since domesticated birds such as the one likely used by you for our grilled turkey recipe or smoked turkey recipe, are largely confined and get little exercise, none of their muscles have nearly as much myoglobin for storing oxygen as red meat animals such as beef.
Wine for our grilled turkey or smoked turkey recipe: Match the sides, not the bird

Turkey, gravy, stuffing, sweet potatoes, cranberry sauce, pumpkin pie. No other meal has such a set menu. So what to serve?
When cooked properly, our grilled turkey recipe or smoked turkey recipe results in tasty and moist meat. When overcooked, as it often is, the dry meat is neutral and unexciting. So we moisten it with gravy and cranberry sauce and surround it with sweet dishes to enliven it.
If the task of selecting the beverage to accompany the annual eat-in has fallen to you, remember the sweetness of the sides, the fact that you are buying for everyone, not just yourself, and the fact that the average American does not like wine that is very dry.
What is needed is something quenching to wash down overcooked white meat, something with a hint of sweetness so it will not taste bitter beside the sweet side dishes, something tart enough to cut their sweetness, and something friendly that everybody will love.
Below are my recommendations for different types of wines to serve with our grilled turkey recipe or smoked turkey recipe. Ask your wine merchant for specific recommendations. They will rarely steer you wrong because they want you back.
And about the picture above, that is Yours Truly before I turned gray when I was the wine critic for the Washington Post pouring an 1806 Lafite, at the time the most expensive wine ever sold.
With a hint of sweetness
German Riesling Kabinett. German Riesling is light and fresh, and Kabinett is a grade of wine that is slightly sweet, but not too sweet. It can be floral and like a handful of fresh grapes.
Austrian Riesling, New York Riesling, and Washington State Riesling. Occasionally as good as the best German Rieslings, Austrian Rieslings are good values, and the best New Yorkers and Washingtonians, although not cheap, can be shockingly good.
Alsace Riesling. Similar to German Riesling, but often a bit more complex from aging in wood barrels.
Alsace Pinot Blanc. Refreshing, tart, complex, with just a hint of sweetness.
Alsace Pinot Gris and Oregon Pinot Gris. Light and tart. Steer away from California Pinot Gris. It is usually dull and boring.
French Rhone whites, American Viognier, American Rousanne, and American Marsanne. These are bigger wines, richer, complex, but rarely too sharp or harsh. Often reminiscent of tropical fruits.
Rosé and other pink wines. These wines are very refreshing and delightful. Alas, most are too sweet. But if you can find a good one that is off-dry, it will go well with your meal.
Drier wines
If your guests are into wine and prefers them bone dry, and if your meal is more savory than sweet:
Sauvignon Blanc and Semillon. I love these wines, especially Sauvignon Blanc from New Zealand and white wines from Bordeaux, but they are usually bone dry, and are not great matches to all the sweet stuff. If your meal is mostly savory, and your guests winos, go this route.
Pinot Noir and French Burgundy. The best of these are expensive, but they can be lighter than Cabernet and Merlot, and more tart, making them great foils for rich savory foods.
Click here for some websites that are good sources of specific wine recommendations.
Talking turkey trivia
A mature male is a tom, a female is a hen, an immature male is a jake, an immature female is a jenny. Some people believe hens are slightly more tender than toms, but because most turkeys are slaughtered when young, usually 4 to 5 months old, there is no noticeable difference according to taste tests by Cook’s Illustrated magazine.
Wild turkeys can fly short distances to escape hunters. They can run fast, too. Domestic turkeys are too heavy to fly.
The old saw that turkeys are so stupid that they will look up in a rainstorm and drown is a myth. They can, however, be drowned in gravy.
The flap of skin on top of the beak is a snood, the flap under the beak is the wattle.
The gizzard can contain stones to help the turkey with digestion.
Turkeys are native to North America. They were exported to Europe in the 16th century.
Stop blaming the tryptophan. The reason you fall asleep after dinner is not because of tryptophan in the turkey. Turkey doesn’t have much more of this essential amino acid than other meats. According to research, the ratio of tryptophan to food in turkey is about the same as in pork chop, chicken, salmon, beef, or lamb chops. You fall asleep because you are exhausted from cooking, cleaning, inlaws, chasing kids, stuffing your face, drinking, and watching the poor pitiful Lions.
Turkeys are nervous, but like being stroked and cuddled. Just like us.
Ben Franklin and the national bird. Was he serious about turkey?

It is often said that Benjamin Franklin (1706-1790) preferred the turkey to the eagle as our national bird, but it is not clear that he was serious. The notion comes from a letter he wrote to his daughter, Sarah Franklin Bache (1768-1807), on January 26, 1784, two years after the eagle was named the national bird. In the letter he is critical of the eagle’s habits and the artwork depicting it, perhaps mocking the fact that it took six years for Congress to chose a national bird.
His quote
It sounds to me as if Franklin, known for his wit, was exercising it well:
“For my own part I wish the Bald Eagle had not been chosen the Representative of our Country. He is a Bird of bad moral character. He does not get his Living honestly. You may have seen him perch’d on some dead Tree near the River, where, too lazy to fish for himself, he watches the Labour of the Fishing Hawk; and when that diligent Bird has at length taken a Fish, and is bearing it to his Nest for the Support of his Mate and young Ones, the Bald Eagle pursues him and takes it from him.
“With all this Injustice, he is never in good Case but like those among Men who live by Sharping & Robbing he is generally poor and often very lousy. Besides he is a rank Coward…
“I am, on this account, not displeas’d that the Figure is not known as a Bald Eagle, but looks more like a Turky. For in truth, the Turky is in comparison a much more respectable Bird, and withal a true original Native of America… He is besides, though a little vain & silly, a Bird of Courage, and would not hesitate to attack a Grenadier of the British Guards who should presume to invade his Farm Yard with a red Coat on.”
If you must fry it
Frying a turkey is fast, captures a lot of moisture in the meat, and produces really crisp skin. It is also a great way to burn down your house or put you in the hospital. I don’t think fried turkey is as tasty as our grilled turkey recipe or smoked turkey recipe, so I don’t recommend it and I will not share a recipe for it, but as a safety precaution for those of you who insist on taking the risk, above is a photo from the nice folks at ThermoWorks showing the proper way to do it.
- Notice the bird suspends in the oil on a rope so it can be gently lowered and raised. The worst thing you can do is drop a cold bird into hot oil rapidly. It practically explodes the oil out of the pot and onto the flames.
- Notice that there is no lid so steam will not build up under the cover.
- Notice the foil protecting the gas tube.
- Notice the asphalt floor.
- Notice the Two-Channel Thermocouple Thermometer with Alarm with two 5-inch Penetration Probes (103-160), one in the bird, and one clipped to the side to measure the oil temp.
- Here is a video and a song on the subject:
Why Thanksgiving is special and I’m fighting the War on Thanksgiving

Finally, there’s my rant, reprinted from the Chicago Tribune: Fight Back Against The War On Thanksgiving.
Leftovers and that valuable carcass
Do not discard the carcass after preparing our grilled turkey recipe or smoked turkey recipe. There is plenty of meat left and plenty of flavor inside those bones. Put it in the fridge. Don’t leave it sitting at room temp for more than 30 minutes.
Steps
1) After the guests leave, wash your hands well, and pull all the remaining meat off the carcass. Set it aside for smoked turkey supper salad, smoked turkey pot pies, turkey sandwiches, turkey fajitas, turkey salad, turkey soup, or pulled turkey. The meat freezes well if wrapped tightly in plastic wrap or a zipper bag.
2) Take the stripped carcass and break it into chunks. Put it into a deep pot, cover with water, and toss in 2 chopped carrots, 2 chopped onions (skins and all), a few celery leaves, a bay leaf, and some herbs. Add any leftover gravy from when you cooked the bird.
3) Bring to a gentle simmer over medium heat. Do not boil yet. Simmer just below the boiling point for at least 2 to 6 hours. Turn off the heat, skim the scum, remove the big chunks, set them aside, and strain. Taste it, but resist the temptation to add salt. You can always add it later, but you can’t take it out. Thin it if you wish or cook it down to make it more concentrated. I like to concentrate it and freeze it in ice cube trays. Then I drop the cubes into a zipper bag and label it with the date. Then pick the boiled meat off the carcass and add it to the other leftover meat.
4) The next time you are making rice, risotto, couscous, paella, or soup, use the frozen cubes for a wonderful flavor. Pour some in an ovenproof bowl, add some caramelized onions, float a toasted crouton on it, put some muenster cheese on top, stick it under the broiler, and you’ve got a killer French onion soup.
Related
- Freezing And Reheating Leftovers
- Turkey Gumbo
- Smoked Turkey Pot Pies
- Smoked Turkey Leftover Supper Salad
- Bobby Flay’s Turkey Cuban
- Turkey Fajitas With Creamy Avocado Sauce

The Ultimate Smoked Or Grilled Turkey Recipe
Rate this RecipeMakes
1 roast turkey with gravyIngredients
Method
- Approach One: Norman Rockwell BirdCooking a whole bird is the tradition, but it produces the least moist and least tasty bird of the three methods. If you must do it, do not stuff the bird or put anything in the cavity. When you stuff the bird it takes far longer for the heat to travel to the center of the stuffing and in the process the exterior gets way too hot and the meat gets overcooked. By leaving the cavity empty the heat and smoke flavors can enter the cavity, cooking the bird much faster and more evenly without overcooking. Treat the crowd to "muffings" by cooking the stuffing in muffin pans and serve everyone an individual muffin shaped stuffing serving, crunchy all over. Onions and oranges in the cavity do very little to enhance flavor and they just block airflow. To bring flavor to the cavity, sprinkle the meat with spices and herbs. More on this below.
- If you cook the bird the traditional way, whole, like the Normal Rockwell bird, do not truss or tie the bird. Let the entire surface brown, even the armpits and crotch, because nobody wants to eat rubbery skin. This will help the thighs and drumsticks cook faster because they need to be cooked to a higher temp than the breasts.
- Approach Two: Cut The Bird Into PartsStrongly consider cutting the bird into parts. You will be able to get it browned on all sides (brown is beautiful, brown is the flavorful Maillard reaction). When you cook a whole Norman Rockwell bird, the cavity never browns. When you cut it into parts it cooks faster so there is less moisture loss and it is more even temperature throughout, and you can remove each part at optimum temp (breasts 160°F (71.1°C), thighs and drums 170°F (76.7°C)). Here's a video.
- Video: Cooking the Ultimate Turkey on a GrillThe video describes the technique of using the Slow 'N' Sear to to cook a turkey on a Weber grill.
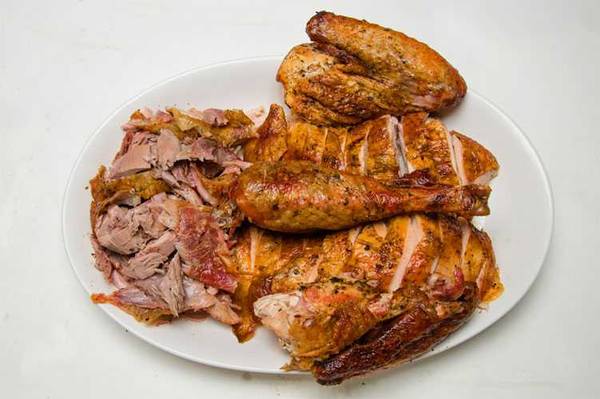
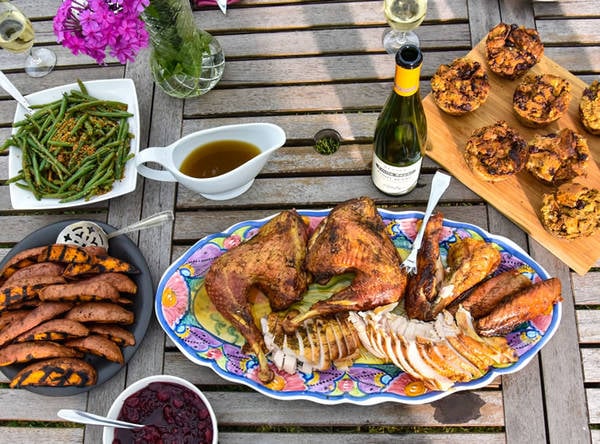
- If you are using a grill in a 2-zone setup, you can start it in the indirect zone with some smoke, and then, when the meat hits about 150°F (65.6°C), flip it skin side down on the hot side to make it ultra crispy. In fact, this method is ideal for a grill, so if you don't have a smoker, give it serious consideration. You also get a whole carcass to add to the gravy, and that's more flavor.The only drawback is that a cut-up bird needs more cooking surface than a whole bird, and you don't have the drama of presenting a whole bird.In the picture of a lightly smoked bird above you can see on the left the wings, boneless breasts with the tenders removed and grilled separately, drums, and boneless thighs. Done this way it is easy to get really moist meat with each piece removed at optimum temp, and sliced across the grain.
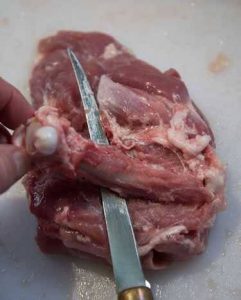
- The approach is pretty much the same as carving a cooked turkey. Remove the wings. Cut the tips off the wings and throw them in the gravy. Cut off the thighs at the ball joint where they meet the body. Bend each drum and thigh away from each other so it is easy to find the knee joint and cut them apart. Now remove the breasts by running your knife along the sides of the breast bone and follow the bones with your knife along the rib cage until you have two big boneless breasts just like you would do carving a cooked bird. Underneath each breast you will find a muscle that is loosely attached called the tender. Remove it because there's a good chance it will fall off during the cook. I'll tell you a secret. I usually toss these in the fridge and grill them the next day. They're perfect for sandwiches. But first you want to remove the tough tendon in there as shown in the picture below.
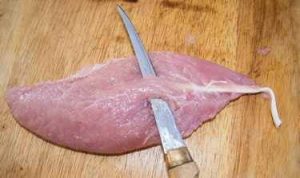
- Then comes the only tricky part, removing the thigh bone. This makes it really easy to slice when cooked. With a sharp tipped knife, slice along both sides of the bone. Then slip the knife under the bone and scrape it along the bone until it comes out (below).
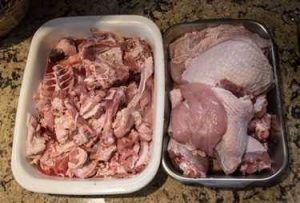
- Bust up the carcass and throw it all in the gravy/drip pan (click here for more on how to make the gravy). A 16 pound (7.3kg) bird will yield about 10 pounds (4.5kg) of meat (including the wing and drumstick bones). Dump any juices from the bag into the gravy too.
- Preheat the grill in a 2-zone setup and shoot for about 325°F (162.8°C) in the indirect zone or get your smoker settled in at that temp. Put a grate above the gravy pan. Start the thighs and breasts first on the indirect side. After 15 to 20 minutes, add the drums and wings. Watch their temps individually with an instant read thermometer. Remove the breasts and the thick part of the wings at 160°F (71.1°C) and the dark meat at 170°F (76.7°C). When the meat hits about 150°F (65.6°C), if the skins aren't crisp, move the meat over to the direct side. If you want, you can even go crazy and paint on a sauce or a glaze. Everything will be tender, juicy, and finished in about 1.5 to 2 hours because parts cook more quickly than a whole bird.
- Approach Three: Spatchcock The TurkeyStrongly consider butterflying (a.k.a. spatchcocking) the bird. I know this is radical and might give Aunt Matilda conniptions, but it guarantees a moister bird, more delicious brown surfaces, and cooks much faster (that's why it is moister). And it looks cool. Check out the video.
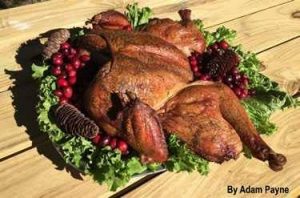
- Video: The Ultimate Turkey on the GrillYes, I know it is not Norman Rockwell turkey, but there are some significant advantages to butterflying it (also called spatchcocking). Click here to see pictures of a bird being spatchcocked with step by step instructions.
- By removing the spine and flattening the bird you can brown both sides. Brown is beautiful. It has more flavor than pale meat. It is a well-known process called the Maillard reaction. The cavity of a Norman Rockwell bird remains pale and unappetizing.It allows you to season both sides evenly.It cooks faster at the same temperature. Faster cooking means less moisture loss and when it comes to turkey breasts, moisture is critical. On a day when the air temp was 65°F (18.3°C) I have cooked a spatchcocked 18 pounder (8.2kg) in less than 90 minutes on a Weber Kettle at about 325°F (162.8°C). Your cooking time will depend a lot on the outdoor air temp, the thickness of the breasts, and the unique characteristics of your grill or smoker. Click here for estimated cooking timesBecause heat enters the meat from two sides the top side doesn't dry out as much.When breasts are done, thighs are too. This can be tricky on Norman Rockwell birds because you usually want the breasts about 10°F (5.6°C) lower temp than the thighs, and since the thighs are thinner, this happens naturally when the bird is butterflied.The meat is not tall and it fits better on a grill with a low lid. It is perfect for Weber Kettles.Carving is a lot easier. The thighs come off with one easy cut. No fumbling around looking for the joint. The breasts are easier to remove too.The back can go in the gravy making it tastier.It looks pretty cool!
- Approach Four: Sous-Vide-QueThe ultimate solution to dry breasts is cooking turkey sous vide, and then finishing it on the grill. I discuss this marvelous method, the recipe, and there's even video on this page. If you are unfamiliar with sous-vide-que cooking visit my page about sous vide cooking and the grill.
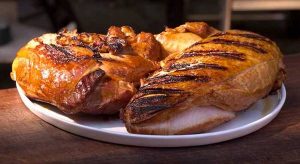
- The Meathead MethodHere is a summary of some tricks you should employ.If your turkey is not labeled "basted", "self-basted", "enhanced", or "kosher", help the proteins hold onto liquid with a dry brine. We will not waste money making a wet brine loaded with apple juice, sugar, and spices that can't penetrate muscle. But the proper amount of salt is a game changer. More on this below.Even if it has been injected with a saline solution at the factory, and chances are that it has, you can still amp up boring birds by injecting them with butter or oil. We will not go crazy and inject all manner of spices and other flavors that will only mask the flavor of the meat. All we want to do with the injection is keep the meat moist. More on this below.Because herbs and spices cannot penetrate skin or meat, we will use a rub of aromatic herbs both on top of and under the skin to add more flavor to the skin and the surface of the meat. More on this below.Add oil and herbs to the outside of the skin to help make it crispy and boost flavor. More on this below.Do not place the bird inside a roasting pan. Instead place it above a roasting pan so air can flow all around it, cooking and browning it properly on the underside. On a grill or smoker, putting the pan under the grate is perfect. More on this below.Roast the bird as close to 325°F (162.8°C) as your grill/pit/smoker/oven will let you. It will cook in a humid, aromatic, smoky atmosphere to hold in moisture and add flavor. It will be done faster than you think. More on this below.Prevent the wing and drumstick ends from burning by covering them with foil for part of the time. More on this below.Do not cook breast side down as has become popular. It just doesn't help, and in fact it harms. More on this below.Do not baste during cooking. Tests prove that it does not make the meat juicier. But it can slow cooking by cooling the meat and it can make the skin soft. You will still get a beautiful crisp brown skin without basting. More on this below.Use a digital thermometer to monitor the bird's temperature to make sure it is not overcooked, and not the plastic popup that is inaccurate an often set 20°F (11.1°C) too high, guaranteeing breast meat drier than week-old stuffing. More on this below.Remove the turkey from the heat when all parts are a minimum of 160°F instead of 170°F to 180°F (76.7 to 82.2°C) as most recipes recommend, and it still will be safe. Juicier too. The USDA revised its guidelines in 2006 so most cookbooks are out of date. More on this below. And yes, you can poke it many times and it will not dry out. It is 70% water, so a 20 pounder (9.1kg) is 14 pounds (6.4kg) of water. A few drops will not make your bird dry. Temp is far more important.
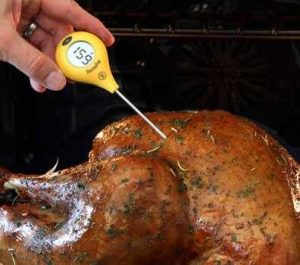
- Do not tent it with foil when it is finished cooking because the steam trapped under the foil softens the skin. Resting does not redistribute juices and any that spill will not be wasted. See all that steam? It is moisture that you want in the meat! Serve it hot and moist. Don't let it sit around cooling and drying out. More on this below.Do not slice the breasts while they are still on the bird. That is cutting with the grain and makes the meat stringy when you chew. Instead, remove each breast lobe and slice it across the grain, making it more tender and making sure each slice has a strip of skin on it. More on this below.Instead of a gloppy starchy sauce, make a succulent thin gravy the way you would make a soup stock, with giblets and trimmings from the bird, onions, carrots, celery, and more. We will put them in a pan under the bird to catch its sexy smoky drippings. Let the gravy remain thin and potent so it can infiltrate between the muscle fibers rather than sit on top like a lump. Hot thin gravy will also warm the meat if it has cooled off too much. You will make enough gravy so we can still use it to make that thick flour-based goo if the traditionalists insist, and it will be better than ever because the base is so much tastier than just plain drippings. And there will still be enough gravy for leftovers and the mashed potatoes. More on this below.
- Preparing The Wet Rub For TurkeyA dry rub is a mix of spices and herbs rubbed into meat, but for turkey, we're going to use a wet rub, a mix of herbs, spices, with oil or water. Turkey and herbs get along like peanut butter and jelly. Click here to read my article about Herbs and Spices.The wet rub goes under the skin so the herbs and spices can be in intimate contact with the muscle tissue. Then we'll put some rub on top of the skin to flavor everybody's favorite part and because oil helps crisp the skin. If you don't want to fuss with under the skin, you won't lose much if it all goes on top of the skin.I recommend you use my Simon & Garfunkel poultry rub blend. It's a mix of parsley, sage, rosemary, and thyme (sing it), with oregano, basil, bay leaf, black pepper, and sugar.If you want to use your own favorite rub, use something without salt if the bird has been salted at the factory or you have salted it with a dry brine or injection. My Simon & Garfunkel rub has no salt. Remember, you can always add salt, but you can't take it away. Click here for more about the science of rubs.Sometimes, if the sage in my garden hasn't frozen by Thanksgiving, I'll put olive oil or butter and several whole fresh sage leaves under the skin instead of a wet rub and use the wet rub on the outside of the skin only. You can see the sage leaves under the skin in the picture below. They taste great and look kewl. People will ask about the secret ingredient.

- Mix the herb blend with the oil.
- Take off your Superbowl ring, and gently push the rub under the skin covering the breasts. Spread it out and work it as far down to the thighs and legs as possible. Try to avoid leaving behind large clumps. In 2014 I got the Tweet below from Max Unger, All-Pro center and then a member of the world champion Seattle Seahawks, asking me about the instructions here.
- Spread the remaining rub on top of the skin. If you run out, rub the exterior with olive oil or vegetable oil and sprinkle it gently with a little black pepper, sage, and thyme. Then sprinkle salt on the skin to help it crisp.
- Do not tie the legs together. Most turkeys come with an armature holding the tops of the drums together. And most cookbooks tell you to tie them up if they didn't come that way. This just doesn't make sense. Here's why.Dark meat is best at about 170 to 175°F (76.7 to 79.4°C), but if you tie the drums together you pin the thighs tight against the body of the bird and they'll take longer to cook. So if you remove the bird when the breasts are 160°F (71.1°C), the thighs will also be about 160°F (71.1°C). But if you let their freak flag fly, heat will infiltrate them from all sides and, because they are thinner than the breasts, they will be at 170°F (76.7°C) when the breasts hit 160°F (71.1°C).Some chefs tell you to put a Wagnerian breast plate made of foil on the white meat in order to reflect heat so the thighs can get ahead of them. Now that is really goofy. A thin layer of foil is not going to reflect much heat nor is it going to be much of an insulator. All that will do is retard the browning and crisping of the skin.Some other chefs tell you to put ice bags on the breasts before cooking in order to chill them so that the thighs will have a head start. One New York Times expert whom I normally worship even use Ace bandages to hold the icebags in place so the poor turkey looks like was up all night drinking Wild Turkey. Just letting the thighs free so hot air can surround them will do the job just fine, thank you. And doing so has the added bonus of letting the crotch area brown.If there is any rub left, toss it in the gravy.
- Preparing The Turkey GravyWhatever you do, don't skip the gravy. I know this whole approach may sound a little goofy, but trust me: This nectar is a show stopper. First time out of the gate, follow my recipe closely until you get the concept. If you wish, you can do this a day in advance.This gravy is not the thick and pasty stuff made with flour that sits on top of the meat and forms pudding skin. This gravy is a jus, thin, flavorful broth that penetrates the meat, making it incredibly moist and tasty. And if Granny insists on the thick glop, or if you need traditional gravy for the mashed potatoes, there is more than enough of my gravy to mix with flour. I'll show you how further down the page.There is almost always leftover gravy that you can freeze. It makes a killer soup base or stock for cooking rice, risotto, couscous, or whenever a recipe calls for stock. I use it to make the gravy for turkey pot pies with the leftovers.
- After the bird has thawed, open the bag it came in and pour the juices into the pan in which it was sitting. Even if the bird was salted, save those the juices for the gravy. They will not be too salty.
- If there is a plastic pop-up thermometer, remove it and discard it. If you rely on it you will be eating balsa wood. If there is a gizmo holding the tops of the drumsticks together, remove it. By holding the thighs and drums tight to the body, it prevents them from cooking properly and keeps the skin in the bird's crotch from darkening and crisping. Yes, I know the books tell you to truss the drumsticks. They're wrong. I'll explain below.
- Pull the stuff out the cavities. Check both front and rear openings. Typically you'll find the neck and a bag of "giblets" in there. Put the neck in the pan. The bag usually contains the heart (looks like a heart), the gizzard (two marbles connected in the middle), and the liver (it is the floppy, shiny thing). Put everything except the liver in the gravy pan. The liver will not be used for the gravy. Freeze it in a zipper bag and save it along with other chicken and duck livers until you have enough to make a nice pate, or toss it in a pan with some oil, cook it, and feed it to the dog.
- Remove "the part that goes over the fence last", and trim excess skin and fat from around both cavities, front and rear, and put them in the pan along with the neck and the juices. Then whack off the wing tips at the first joint and toss them in the pool. There's a lot of flavor in them. Don't worry about the fat, you can skim it later. If you are spatchcocking, rinse the brown organ meat off the backbone and discard it (it is not tasty). Throw the backbone in the bath.
- Leave the skin on the onions, lop off the ends and cut the onion into quarters. Peel the carrots and cut them into 2 inch (5cm) lengths. Use the entire rib of celery, leaves and all, and cut it into 2 inch (5cm) lengths. Add these to the pan along with the rest of the gravy ingredients. Refrigerate the whole thing. We will use it when we cook the bird. Here's the pan before cooking.

- I discuss how to finish the gravy by placing it under the bird and straining it down below in the section on cooking the bird.
- Finally! Let's Cook That Bird!All the pregame activities are over. It's time to get down to business. You want to begin by preheating the oven about 5 hours before your guests are ready to sit down. Yes, your grill or smoker is really an oven. Get over it.
- Crank your oven/grill/pit up to 325°F (162.8°C) or as close as possible as measured at the level of the cooking grate by a digital thermometer. Do not measure the temp using the cheap thermometer in the lid unless you plan to eat the lid. There can be a great difference between the grate temp and the lid temp.
- When it is hot, clean the grate you will cook the bird on before you put the drip pan in. Week-old grease and gunk the cooking grates will not add the kind of complexity you want in your gravy. Now put the drip pan and all the gravy fixins onto the cooker at least 2 to 3" (5 to 7.6cm) below the bird if possible.
- If you have a leave-in digital thermometer with a probe on a wire, insert the probe into the breast so the tip is in the center of the thickest part of the breast, being careful not to touch the ribs. Digital thermometers have small sensors and they are very close to the tip, so they are by far the best. The sensitive areas of a dial thermometer are too big to be accurate.
- Now add your smoke wood. Turkey loves smoke, but too much can ruin it in a hurry, and there is is a fine line. The first time you try this recipe I beg you to go easy on the smoke wood. Overdo it and the bird will taste like an ashtray.I've had good luck with apple, alder, peach, cherry, and oak. Avoid mesquite, and hickory. They'll work, but I think they're a bit too strong for delicate lean meats like turkey.On a charcoal grill or smoker, you may not need to add wood at all. The charcoal will probably give you all the smoke flavor you need. If you do add wood, you can toss it right on the coals. 2 to 4 ounces (56.7 to 113.4g) by weight should be enough. Smoke adheres to wet surfaces, so add the wood at the start of the cook.On a gas grill you'll need 4 to 8 ounces (113.4 to 226.8g) of wood. You may decide after tasting it that you want more on your next cook, but don't ruin the first one with too much smoke.On my gas grill I usually place one golf-ball sized chunk of wood right on a burner in the flame. Chunks smolder slowly, but if you do not have chunks, you can use chips or pellets.To use chips or pellets, toss them in a disposable aluminum pan and put it as close to the flame as possible. Click here for more on The Science of Wood. There is no need to soak the wood. Wood does not absorb much water. That's why they make boats out of it. Let the wood catch on fire. Burning wood makes better tasting smoke than smoldering wood.
- Place the bird on the cooking rack, breast side up, close the lid and don't open it for an hour. That means no basting. Not if you want crispy skin. Remember, basting just makes the skin wet and soft.
- Check the progress and when the wing tips and drumstick tips look nice and brown, after 30 to 60 minutes, grab 4 pieces of aluminum foil, each about 8" (20.3cm) square, and coat one side with vegetable oil so it won't stick. Cover the tops of the wings and drumsticks with the foil. You did lop off the wing tips and toss them in the gravy, didn't you? The foil will keep these skinny parts from burning.If you don't have a thermometer on a wire already in the breast, spot check the temperature with a good digital instant read thermometer by inserting the probe into the deepest part of the breast. Push the tip past the center and pull it out slowly. The lowest temp is the one to watch for. You can do this occasionally as needed. You won't harm anything by peeking.If necessary, add a quart of boiling water to the gravy pan. Don't add cold water or you can cool off the cooking chamber. Make sure there are at least 2 inches (5cm) of liquid in the pan at all times. Do not let the onions and other solids in the pan burn! Let them get dark, but not black. While you're under the hood, if you are using charcoal add another 15 to 20 chunks every hour. Resist the temptation to reach for the wood chips.If you fear that the bird is progressing too slowly and you are having trouble keeping the temp up to 325°F (162.8°C), preheat your indoor oven to 325°F (162.8°C) and move the bird and the gravy inside. Finishing it this way is fine. You will not lose your pitmaster card. The smoke flavor is already in the bird so now your focus must be on making sure it is not overcooked.
- As the meat temp approaches 160°F (71.1°C), tilt the bird and drain the cavity into the gravy. Now check temps all over, especially the back which can be a bit soggy or even undercooked if it is very close to the water. If the back isn't 160°F (71.1°C), remove the gravy pan and put the bird over direct heat to firm it up. This should take no more than 20 minutes or so, but watch things, because without that buffer of water, you can burn the back in a hurry.Now it is time to move the bird to the cutting board or a platter. Pick a platter with a lip that contain the copious juices. A lot of books say you should put a foil tent on the bird and rest it. Don't do it. This just makes the skin soggy. It does nothing to improve juiciness. Serve your meat hot and crispy. It will get more than enough resting as you move it from the cooker and while you carve.If you are going over the river and through the woods with your bird, or if your bird finishes early, read about how to keep it hot with a faux Cambro.
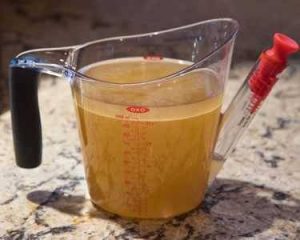
- Carefully remove the gravy pan from the cooker. Pour it through a strainer into a large pot or saucepan. I use the OXO Fat Separator shown here. On the fat separator, when you remove the red plug, clear stock rises up the spout and when you pour, the fat gets left behind. If you don't have a fat separator, use a large spoon or basting bulb to remove most of the fat. You'll never get it all, so don't obsess. Discard the solids. They have given you their all. Let it sit for about 10 minutes. Now taste the juice under the fat. It should be rich and flavorful. If you find it too weak bring it to a boil and cook it down a bit. Taste again and add salt only at the last minute. If you add salt and then reduce it, it will be too salty.
- I pour the gravy into a coffee carafe to keep it warm especially when I have to go to someone else's house for dinner. The fat rises in the thermos, so I can just pour some off before serving, or shake it up to mix it in. When you are ready to serve the bird, you can transfer some of the gravy to a gravy boat or serving bowl if you don't like the looks of the carafe. I usually splash some on the carved meat just before I put the platter on the table.As proof of its goodness, when you chill the leftovers it will solidify into a jelly. That's what happens to melted collagens, they turn to gelatin, and collagens bring flavor and texture to the table. See my article on meat science for more on the subject.Try to resist the temptation to thicken this gravy with flour or cornstarch. If the idea is to moisten meat, starchy sauces just don't get the job done. Starches are large molecules and they can't penetrate the tiny openings in the meat. The gravy just floats on top like a life preserver after the ship has gone down. My thin gravy will soak into the meat and add much more flavor. After you taste my gravy, you won't do the thick high school cafeteria stuff again. But if there are hardened traditionalists in the house, I have included instructions on how to satisfy them above.
Video
Notes
Timeline for a 6 p.m. dinner
| WHAT TO DO | WHEN TO DO IT |
|---|---|
| Get all the shopping done except salad, begin thawing regardless of size | Friday morning |
| Unpack bird, check thaw | Wednesday morning |
| Prep gravy, make the wet rub | Wednesday |
| Inject (optional), apply salt, buy salad fixins | Wednesday |
| Preheat cooker and gravy, apply rub | 1 p.m. Thursday |
| Put the bird on and add wood | 2 p.m. Thursday |
| Add water to gravy pan, add foil to drum and wing tips if needed | 3 p.m. Thursday |
| Add water to gravy pan if necessary | 4 p.m. Thursday |
| Remove gravy, strain, skim fat, taste | 4:30 p.m. Thursday |
| Remove bird, heat gravy, carve | 5 p.m. Thursday |
| Splash with gravy, serve | 5:30 p.m. Thursday |
| Take a bow | 6:00 p.m. Thursday |
Cooking time
A clock cannot tell you when food is cooked. Only a digital thermometer can do this. Click here for our Platinum Medals for thermometers. Turkeys are notoriously unpredictable in the wild and only slightly less so in the oven. The two most important factors in determining cooking time are the cooking temp and the thickness of the thickest piece of meat, the breast. But actual cooking time will vary depending on how well it is defrosted, whether or not you brined or injected, what temp your fridge is, if it sat at room temp for a while, how close your bird is to the gravy pan, how well your cooker holds steady the quality of your thermometers, airflow within the cooker, humidity in the cooker, and the breast size of your bird. That’s a lot of variables! Now if you are an experienced low and slow cook, you know that low temps keep protein loose and that holds in moisture. But we are cooking at 325°F (162.8°C), not the normal 225°F (107.2°C) (the slightly higher temp is needed to crisp the skin), so it will cook much faster than you think. Given all those disclaimers, the table here is a rough guide for how long it will take to get the temp to 160°F (71.1°C) minimum in all parts of the bird. Do not bet on it. Bet on a good thermometer. If you don’t have one, don’t blame me if your guests get tummy aches (or worse), if you keep your guests waiting, or if you serve shoe leather. And please don’t ask me how long a stuffed bird will take. Stuffed birds are a safety risk as I discuss below, and as I also explain below, stuffing the bird guarantees overcooked breasts. I don’t test recipes with stuffed birds, so I have no idea how long they take.| Unstuffed Pounds |
ESTIMATED TIME Whole Bird At 325°F (162.8°C) |
ESTIMATED TIME Spatchcocked Or Pieces |
|---|---|---|
| 12 to 14 (5.4 to 6.4kg) | 2 to 2.5 hours | 1.5 to 2 |
| 14 to 18 (6.4 to 8.2kg) | 2.5 to 3 | 1.5 to 2 |
| 18 to 20 (8.2 to 9.1kg) | 3 to 3.5 | 2 to 2.5 |
| 20 to 24 (9.1 to 10.9kg) | 3.5 to 4 | 2.5 to 3 |
| 24 to 30 (10.9 to 13.6kg) | 4 to 5 | 3 to 4 |
Why We Require You To Sign In Before You Can Post Comments
Before you can post a comment or question you must sign into our commenting partner, Disqus. This is helps make sure everyone hanging around the grill is civil. We do not tolerate nastiness, racism, porn, inappropriate language, or attacks on others. All comments are the property of AmazingRibs.com and we reserve the right to quote them, edit them, delete them, and block people from making future comments.
Please leave comments and questions on the page devoted to the same subject so others can see them and our answers when they are reading about that subject. You must enable JavaScript to use the comments section, and you must accept cookies to post comments. Note that the software that runs Disqus is different from the Pitmaster Club so members need to sign into that separately.
Moderators