


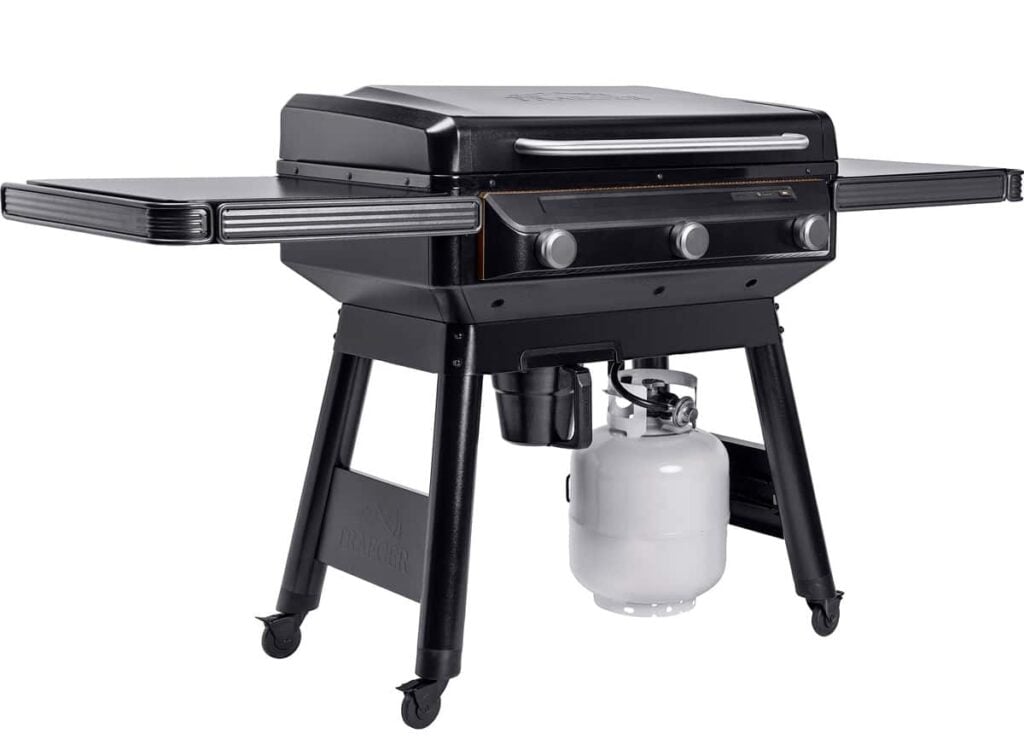
The 3-burner Traeger Flatrock Flat Top Grill‘s innovative features and heavy-duty construction sets it apart from other griddles.
Few cooking devices are as hot at the time of this writing as flat tops, a.k.a. standalone griddles. Griddles have the same type of cook surface used by your favorite diner. They’re essentially one huge rectangular skillet surface. Backyard cooks are discovering that outdoor, residential griddles are versatile and great for anything from eggs and pancakes to burgers and steaks, and so much more. They make frying, steaming, sautéing, and searing large amounts of food simple and fun, all while keeping the fumes outside instead of in your kitchen. While a couple of brands have dominated the market for years, more and more established smoker and grill manufacturers are coming out with their own flat tops, most recently the Traeger Flatrock Griddle.
Top-down
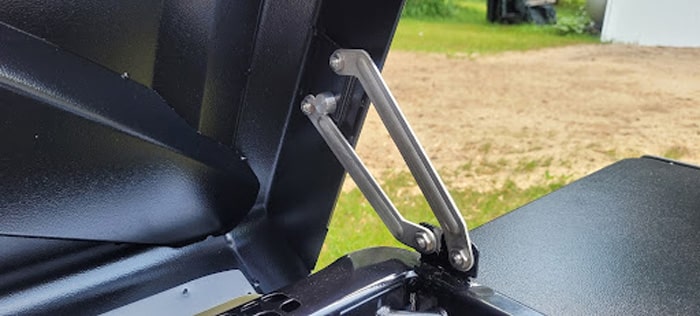
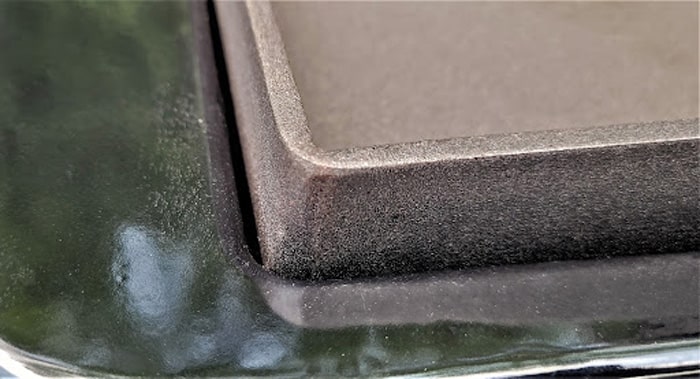
The Flatrock is 74″ wide x 27″ deep x 42″ high, made predominantly of porcelain-coated steel, and weighs 189 pounds. It has a conveniently attached, hinged, lid which is meant to protect the cooking surface when not in use. Always leave the lid up whenever the burners are on to prevent warping. The dual hinges are strong enough to hold the lid up even in windy conditions, yet it is easy enough to lift and lower with minimal effort. The lid does a great job at protecting the cooktop from rain if, say it is left uncovered and a storm rolls in overnight (don’t ask me how I know that)!
Opening the lid requires at least an 8.5-inch space from the back of the unit to a wall or deck rail for clearance, but Traeger recommends a minimum of 18 inches from the Flatrock to any combustibles, house siding, deck rails, furniture, etc.

Like what you’re reading? Click here to get Smoke Signals, our free monthly email that tells you about new articles, recipes, product reviews, science, myth-busting, and more. Be Amazing!
The Cooktop
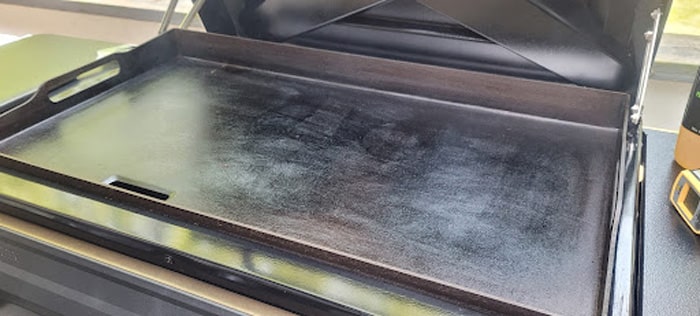
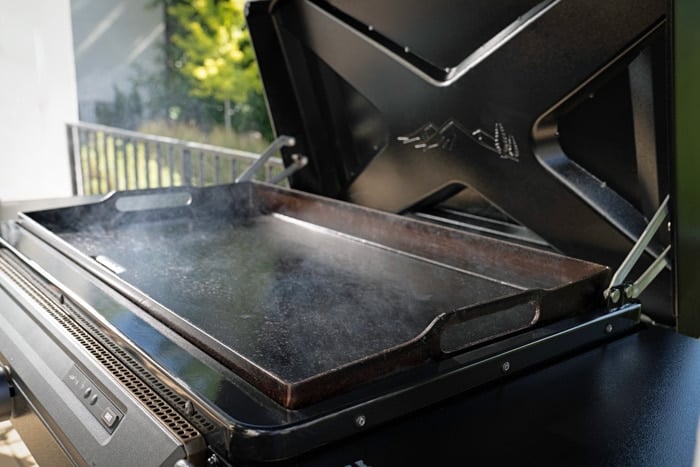
The 33″ x 18″ (594 sq. inch) removable, carbon steel griddle top has handle holes on the sides to allow for easy removal, and these are necessary due to the cooktop’s unique recessed design, but more on that later. While the holes do interrupt having the full side edges to scoop food against, and initially some goodies did fall outside these handle holes even while being careful during testing, it’s easy enough to adjust your spatula-scoopin’ habits and learn this cooktop without much fuss.
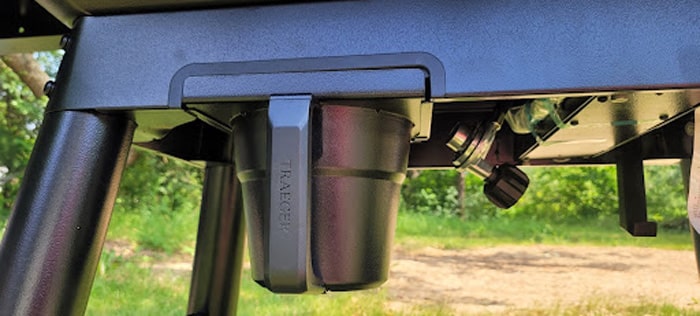
The grease drain is a rectangular hole that sits on the front side, just left of center, and is connected to the “EZ Clean Grease Keg” (shown in this photo) via an enclosed chute to keep things clean and safe. The heavy-duty, slide-out grease keg is easily accessed from the front and keeps the grease and food bits out of reach of your pet’s tongue. Traeger conveniently makes disposable custom-fit foil liners to keep cleanup easy. Some griddlers complain that front grease drains make it easy to splash grease on yourself during clean-up. I didn’t find this to be a problem though. As with many things, eye protection, paying careful attention to what you’re doing, and not being over-zealous when working with hot grease will save your bacon (metaphorically speaking, unless, of course, you are actually griddling bacon!).
Ignition and U-shaped Burners
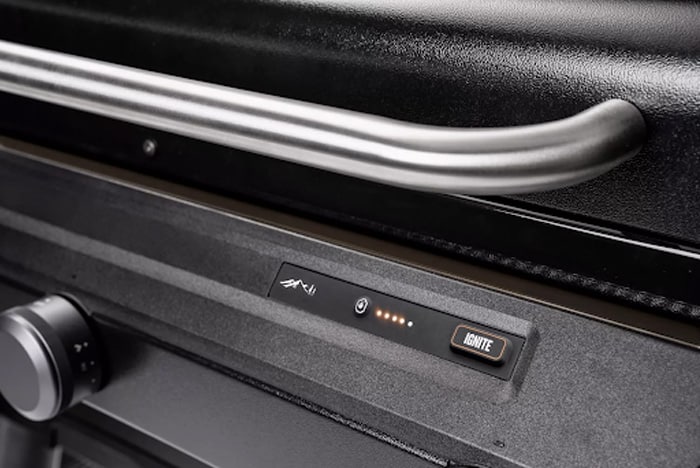
Similar to a gas grill, an electric ignition system lights each burner independently, making for the convenient startup of single or multiple burners using the same button. Each of the three burner control knobs has an LED light above it indicating when that respective burner is lit and when it goes out. This is a great, and safe, touch since you cannot see the burners due to the recessed cooktop.
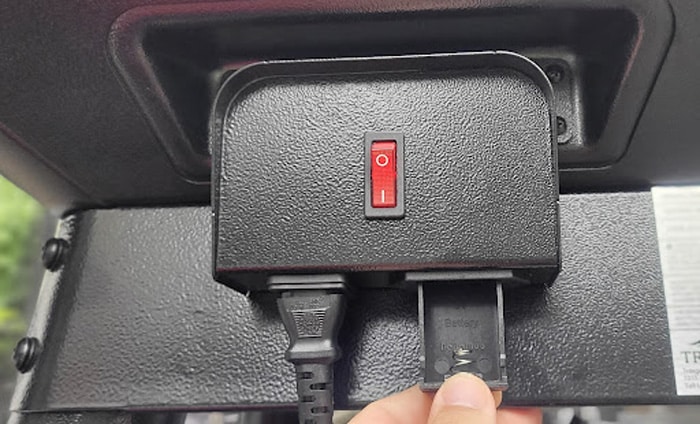
The ignition is powered by connecting the included detachable 5.5-ft power cord to a standard 3-prong outlet, but Traeger wisely includes a 9-volt battery compartment on the back power module as well, for those times when you set up out of cord’s reach or your power is out. The battery will power only the ignitors, not the burner indicator lights or fuel sensor lights. There is also a lighted on/off switch here, and the cord can wrap around the module when not in use.
Up your game: Join our Pitmaster Club. Try it out for free for 30 days. No credit card is needed. No spam. Join now and Be Amazing!
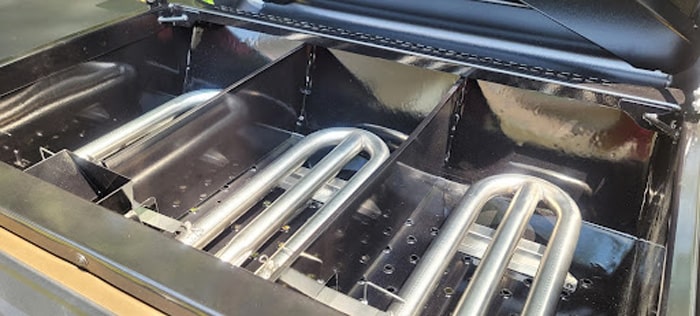
The 3 stainless steel burners are U-shaped, effectively giving double the burner-to-surface heat of standard straight burners common in most griddles. I view it as 6 burners connected in pairs. This helps prevent hot and cold spots on the cooktop by spreading out the flames more. There are two metal walls or “heat shields” separating the burners from each other to aid in creating separate cook ‘zones’ on the cooktop above. This separation is helpful when cooking two foods that need moderately different heat levels. More on the effectiveness of this later. At 15,666 BTUs each (47,000 BTUs total), there’s no shortage of power here.
Manual Lighting
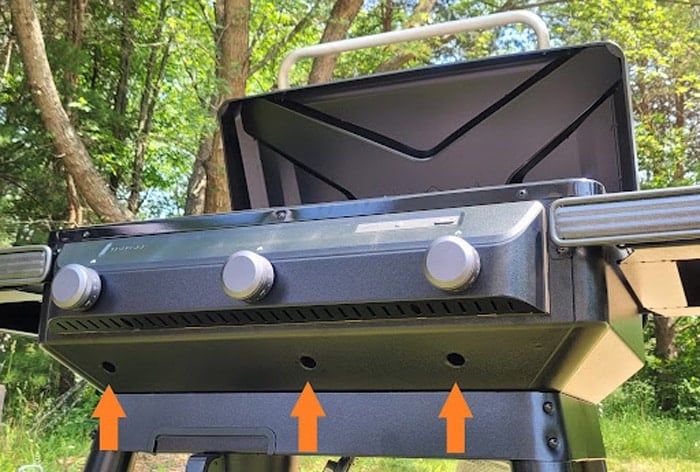
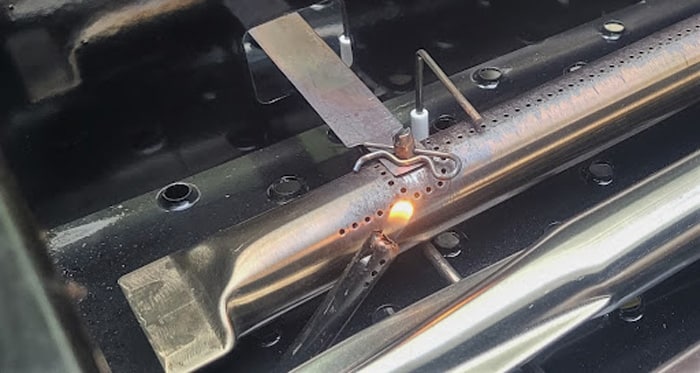
Traeger includes a wire “matchstick holder” on a chain underneath tucked up near the propane hose. This is to hold a match to light the burners in the event of a no-electric ignition, such as power failure and a dead or missing 9-volt battery. Light a match, place it into the end of the holder, and insert your new homemade sparkler into one of the burner access holes, located on the front panel underneath the knobs, indicated by the orange arrows in the photo. Match holders for manual lighting are standard on all gas grills so I knew what it was but the owner’s manual fails to mention what it is and how to use it.
I discovered that a standard click flame stick lighter (the kind with a 5-inch or longer barrel that are available everywhere) works much easier and is the perfect length to safely reach the burner, as shown in the photo. Note: use caution when lighting manually, and only turn the burner on after the lighter (or match) is in place and you’re sure it is lit.
As mentioned earlier, the cooktop is recessed down into the chassis, instead of sitting high on top of it as with most other griddles. This is to shield the burners from the negative effects of wind. Traeger calls this their “FlameLock” construction. They claim it reduces propane use by 28% since you won’t have to crank the burners up on windy days. Smart move!
Want a new set of tools? Check out Meathead’s new book, The Meathead Method. It’s a toolbox that will elevate all your cooking. Alton Brown calls it “The only book on outdoor cookery you’ll ever need.”
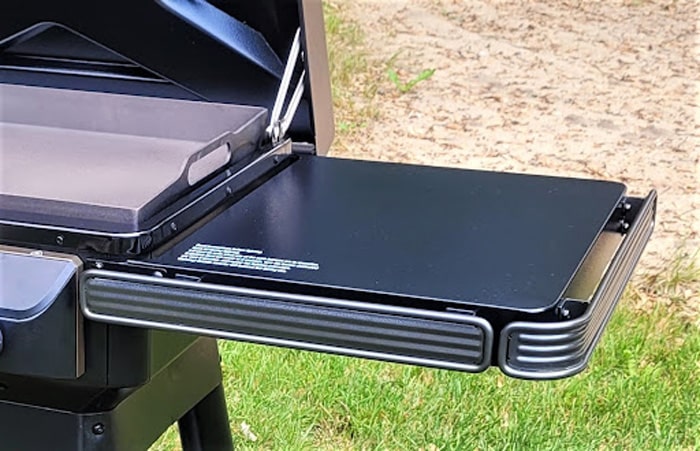
Side Shelves and Traeger’s “Pop-and-Lock” Rails
Large 22.5” x 17.5” work shelves on either side support a whopping 50 pounds each, and they easily fold down for a skinnier storage footprint, reducing Flatrock’s overall length from 71 inches to about 42 inches. Around the front and side of both shelves are Traeger’s unique P.A.L. (“Pop-and-Lock”) rails, which allow you to attach any of several optional accessories, such as tool hooks, paper towel rack, cup holder, or a bin for sauce, oil, and water squirt bottles. Put ‘em wherever you want. The customization these allow is a great touch.
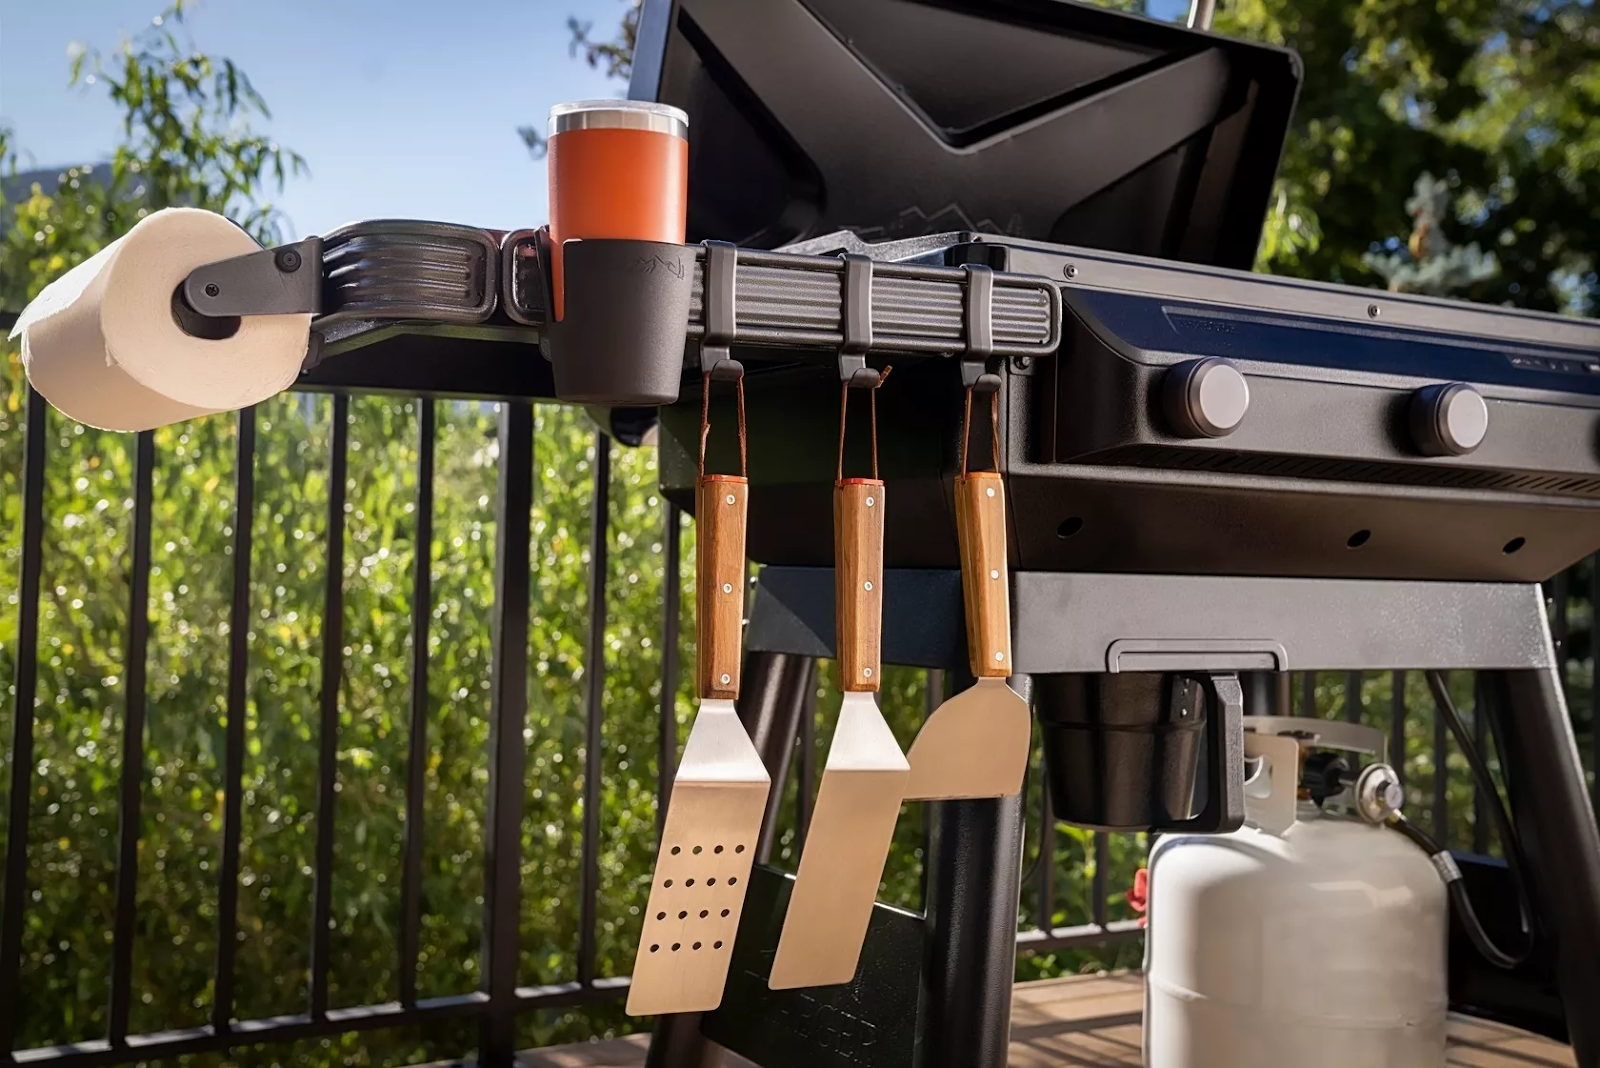
The Flatrock does not come with any of these P.A.L. accessories, nor does it come with the griddle cover or cooking tools, but they are all available for purchase and are very high quality. Even if you leave the accessories off, the rails still add a nice cosmetic touch and help make the Flatrock one nice-looking cooker!
Legwork
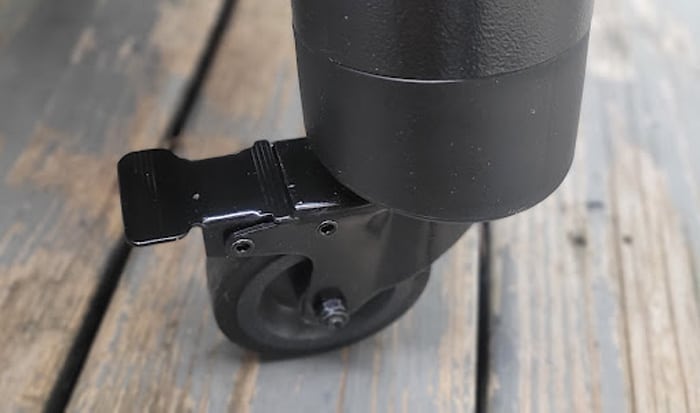
You’ll notice the Flatrock has no bottom shelf. While at first I thought I’d miss it, I really didn’t. And Traeger’s build quality doesn’t necessitate a shelf to tie all 4 legs together for stability like some other freestanding grills might. The legs are braced in pairs and are very sturdy as is. And with the generous side shelves up top, you’re not hurting for shelf space for the average cook.
Another nice touch is that all 4 legs have swiveling, locking casters, so if you need to move the Flatrock around easily, or don’t want it to move around at all, you are covered. I find that the casters work well enough to hobble over the gaps in my deck boards just fine, however, they’re not large wheels, so it’s a struggle to move over grass as you might expect. Thankfully, with the ability to easily remove the heavy cooktop and the propane tank, you can lighten the Flatrock up considerably if you need to move it out to the backyard or up the stairs of your back deck.
Tank storage and “Fuel Sensor”
Underneath, on the right side is a convenient hook to hang a standard 20-pound propane tank. But it’s not just a tank hook, it’s connected to Traeger’s “Fuel Sensor” scale. The scale weighs your full tank when you install it, and attempts to show your current remaining fuel as the tank gets lighter from use. It does this via a series of 5 small lights on the front control panel next to the ignition button.
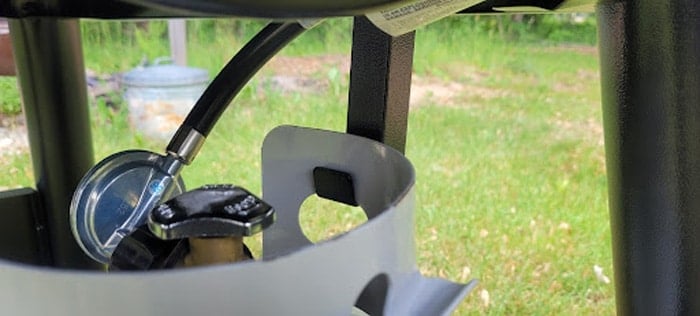
The manual includes simple instructions on how to calibrate this Fuel Sensor when you install your full tank. Try as I may, I could not get the calibration to take. To me, this isn’t a big deal, as I also use an inexpensive inline tank gauge like this one. Commenters online have mentioned having this issue as well, so it’s not unique to my experience. Traeger also touts prompt, daily customer service, and some commenters have confirmed this as well, so I gave it a shot myself.
Traeger’s customer service
My experience with their customer service regarding the fuel sensor not calibrating, as mentioned above, was wonderful. After roughly a 10-minute wait time (it was dinner time, after all), the “service professional” I spoke with, Kristin, was very helpful. She seemed to truly enjoy her job, she had a ‘smile’ in her voice. After sharing some pictures I’d already taken of the parts up underneath, and a brief video chat via my phone so she could see the pieces herself, she promptly arranged to have 2 replacement parts sent out. I honestly can’t remember a more pleasant customer service experience, and that’s the full truth. My call was about 20 minutes long, but she was a real joy to speak to and she addressed my needs fully. I give Traeger’s Customer Service an A+. Once the parts arrive and I’m able to test them out, we will update this review.
Seasoning your Steel Cooktop
The seasoning procedure is mandatory on steel cooktops before cooking. Some come pre-seasoned, but the Flatrock does not. Don’t skip or skimp on this, do it right and you will be glad you did. Seasoning serves two functions; it creates a non-stick surface for easy cooking, and it creates a barrier that prevents rust from forming. You do the same with cast iron pans. For seasoning and especially for cooking we highly recommend the use of an infrared thermometer to target specific temp ranges. I use this one from ThermoWorks.
Seasoning Technique
To season your cooktop, slowly heat it to about 450°F. With the Flatrock, I got there by setting the knobs at medium for about 10 to 12 minutes on a warm 80°F day in the shade. Make sure you have a high smoke point oil such as avocado, grapeseed, sunflower, or peanut oil; even regular ol’ canola, vegetable oil, or Crisco shortening will work too, albeit they are more of a medium smoke point, so lower your seasoning temp to about 350-400°F. Traeger and other brands also sell tubes of seasoning conditioner, which is often a mix of sunflower oil and beeswax. Avoid animal fats like bacon for the initial seasoning, and avoid low smoke point oils like flaxseed and some olive oils.
Add a very small amount of oil to various places over the hot cooktop and promptly spread the oil out evenly in thin coats with a wadded-up paper towel and long tongs, as if you’re gently ‘wetting’ the entire surface, and allow it to smoke off. After roughly 5 minutes, or when the smoke dies down, repeat this procedure at least 3 times. I did it 5 times. Be sure to get the edges as well, even the outside edges. All exposed parts of the cooktop should be seasoned. You’ll get little bits of paper towel crumbs coming off from the rough surface, this is okay, you can scrape them away later. The seasoning process will discolor your cooktop, this is normal. As you continue to use it and maintain the seasoning it will develop more of a patina.
WiFi
This griddle is not WiFi-capable like Traeger’s WiFire wireless controller. The Traeger app does have several guided griddle recipes so you may want to download it to explore, but you can’t monitor temps and fuel level from the app on Flatrock.
Temperature Control
We recommend preheating your griddle on low or medium to avoid potential warping of the cooktop which can result from sudden high heat. So, in following my own advice I set all burners on low from a cold start on an 80°F gorgeous summer day. The Flatrock hit an average of 325°F in about 12 minutes, and after 30 minutes the average was about 380°F across the surface. There will always be variances across a solid cooktop surface with multiple burners beneath, especially early on during the preheat. Flatrock’s variances seemed to stabilize after 25 minutes. Initially, the cooktop got hotter at the front edge than the rest in the first 10 to 20 minutes, especially on the front-right side, but it began to level off afterward.
Next, it was time to blast! Going against my own advice (for science!) from a cold start on an 80°F day I set all 3 burners on high. The Flatrock had no trouble getting to cooking temps fast! It took less than 5 minutes to get to an average of 325°F, and no more than 8 minutes to get to 425°F. Most griddle cooking will be done in this range of 325 to 425°F. Traeger states the Flatrock will reach a scorching 600°F, but after 25 minutes with all burners on high, my thermometer read 560°F average across the surface, that was enough for my tests, for my propane budget, and for my arm!
Zones
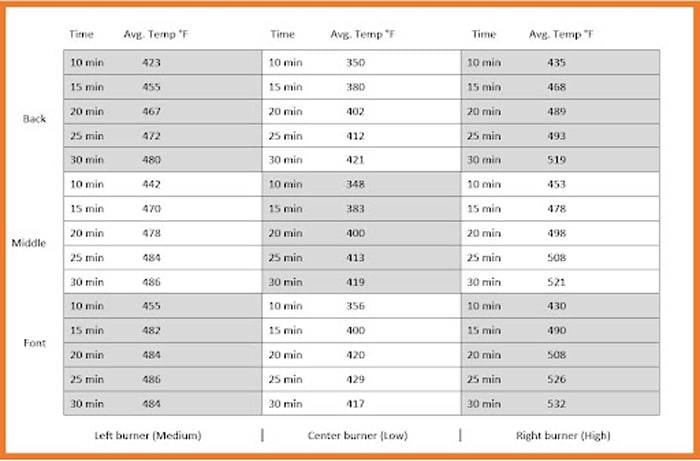
As mentioned above, Flatrock’s 3 U-shaped burners are separated by “heat shields”, essentially creating isolated compartments for each burner. Traeger calls this “TrueZone total temperature control”. This aids in creating more distinct temperature zones above each burner. This can never be a perfect system, with the physics of heat and metal being what they are, but heat shields greatly enhance zone separation on gas grills. Let’s test it.
With an infrared thermometer, timer, and notebook in hand, I set the left burner on medium, the center burner on low, and the right burner on high. After 30 minutes the neighboring high and low burners maintained about a 100°F separation, with the high burner center zone at 521°F and the low burner center zone at 419°F. The neighboring low and medium burners had nearly a 70°F difference in the center zone, with the low burner at 419°F and the medium burner next door at 486°F. A solid hunk of metal simply cannot have any on/off spots for heat, so some bleedover is expected. These clear differences in next-door temperatures, however, show that the Flatrock does a great job at creating different cooking zones.
Cooking Tests
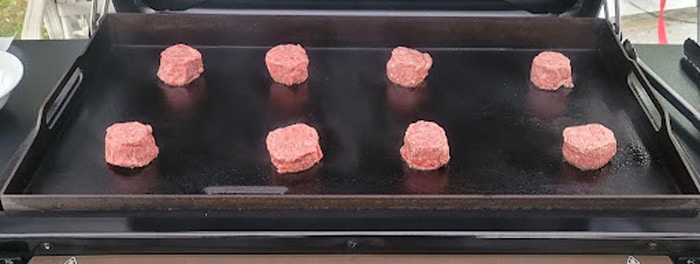
Enough geeky stuff; let’s get to cookin’! First up was likely the most common griddle meal aside from breakfast; smash burgers.
Smash Burger Test
Following The Flat Top King’s “How To Make The Perfect Smash Burgers” recipe, I got to work. I preheated the Flatrock aiming for 425°F by setting all burners around medium. In less than 10 minutes I was up to temp. To get started, I placed eight 1/4-pound pre-formed 81/19 meat-to-fat burger pucks on the cooktop. I spread these out so as to not crowd the meat.
Traeger states that Flatrock has a 24-burger capacity, which is optimistic but plausible if they were all touching. That is a lot of frying beef and doesn’t give you much room to flip them! I found 12 quarter-pound patties to be plenty on the cooktop while allowing room to flip. They cook fast enough that you can cook them in shifts if you’re feeding a crowd. Do not place the meat on the griddle until it’s up to your desired cook temp, because you want a very quick cook.
Smash Burger Techniques
Smash the burger balls down thin using a burger press or a small cast iron pan, anything that you can easily flatten the patties with, making sure all edges of the patty are in contact with the griddle surface and are equal thinness. A piece of parchment paper on top of each patty helps them to not stick to your press while smashing. Next it’s time to add a dash of salt and any other seasonings you want. The patties will cook in about 1-2 minutes on that first side, so you have to act fast when cooking several! Eye protection should be worn to protect from splattering grease, and heat-resistant gloves with forearm protection aren’t a bad idea either. This gets hot!
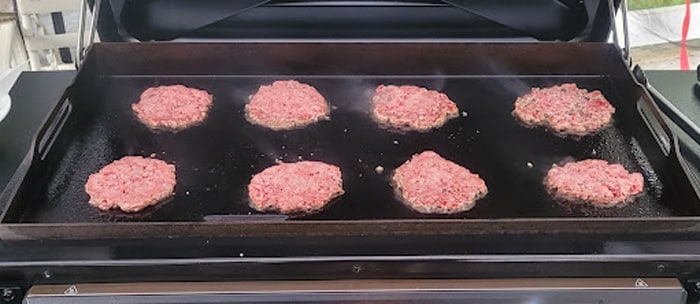
Unlike flipping a burger on a grill grate, with smash burgers you need to work your spatula from the side of the patty in a quick sawing motion to ‘slice’ it from its grip on the cooktop surface until it’s separated, then carefully flip it. Two spatulas are helpful to aid in flipping without extra grease splashing. Once you flip you can then add another light shake of your seasoning and your cheese, since it will melt in the minute or two that it takes the other side to cook. Remove once the cheese is fully melted and place on a toasted bun.
The thin patty, quick, hot cook, and full contact of the meat to the griddle surface give smash burgers their characteristic crispy edges while maintaining an irresistibly juicy inside.

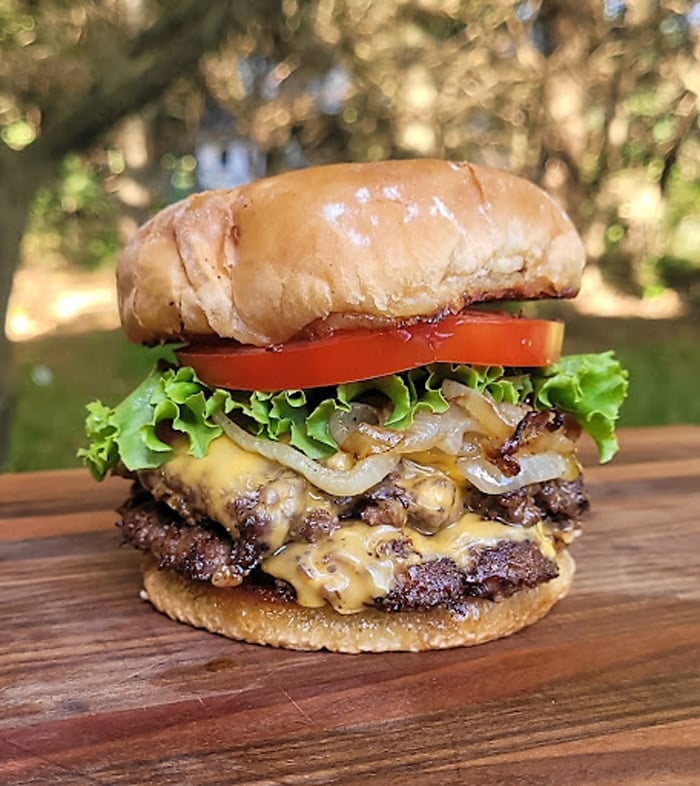
We all know grilled burgers are wonderful, but if you’ve never had a proper smash burger cooked on a flat top griddle, you are missing out. Make it a priority!
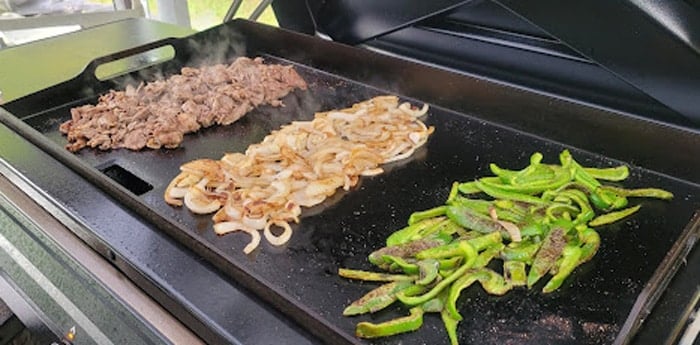
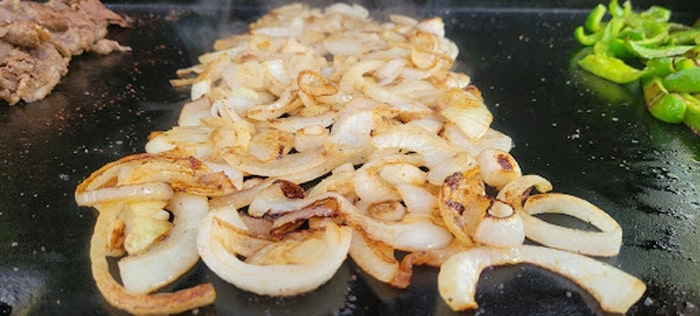
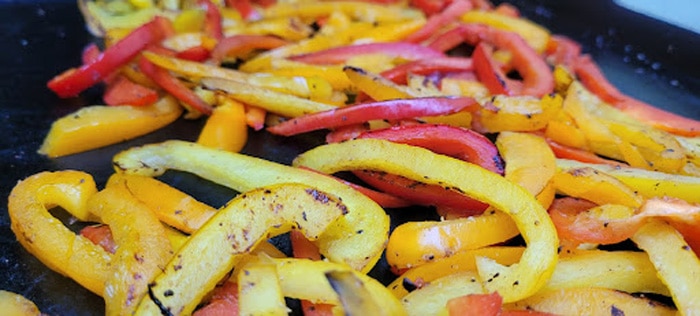
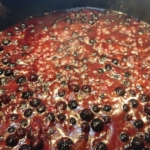
Cheesesteak Test
Next up was cheesesteaks. A recipe like cheesesteaks is fun because you can utilize the different temperature zones since lightly sautéing veggies takes a lower heat than browning meat and toasting bread. For the cook below, I set the left burner on medium-high and the center and right burners on low. The Flatrock shined, as expected. Yes, there are peppers, and no, I didn’t call it a Philly!
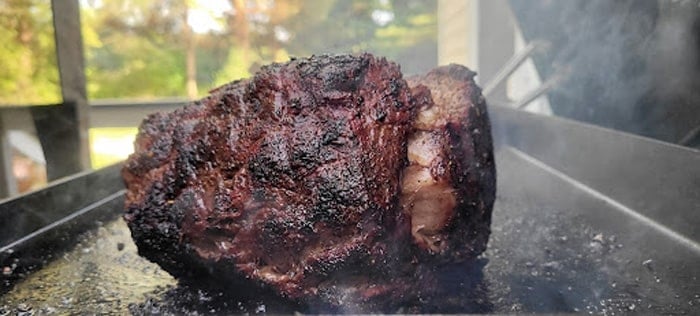
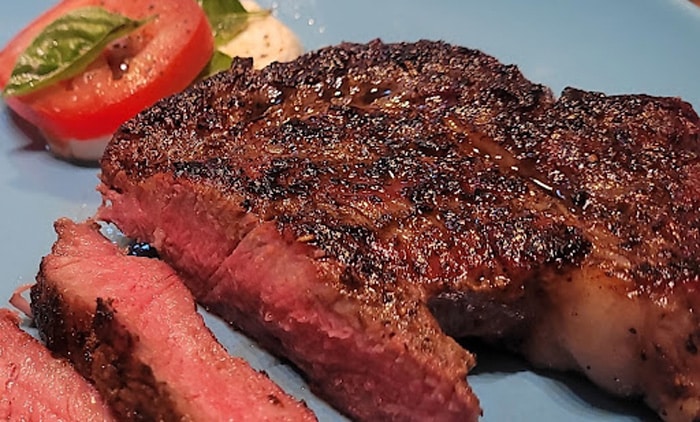
Most people don’t think about doing large hunks of meat like roasts on a griddle for good reason; griddles don’t smoke or roast. But they sure lay down a magnificent sear if you use them along with a gas grill or smoker. Cook your steaks, roasts, and other thicker cuts on your smoker with wood or charcoal (after all, we are first and foremost a BBQ website!), then sear them on your griddle. Notice how sexy this prime rib reverse sear turned out…
…and this steak.
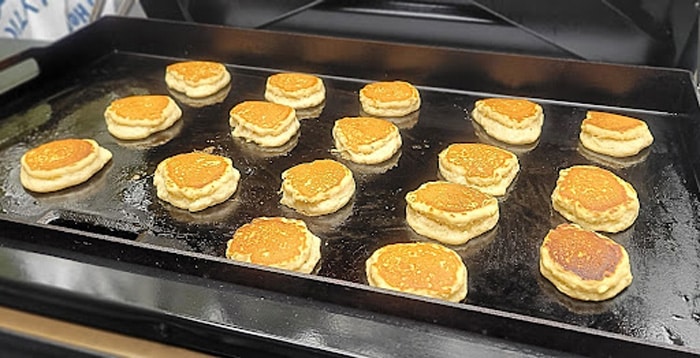
Pancake Test
Speaking to the steadiness of temperature across the surface of all 3 burners, let’s try pancakes. I aimed for a cook temp of 375°F, according to the recommendation of The Flat Top King’s “Best Pancakes On The Griddle” recipe. My mini pancakes agreed with my infrared gun data noted above. Temps were slightly hotter early on in the front-right side as you can see from the slightly darker pancake. Elsewhere, as steady as a [Flat]rock!
Assembly
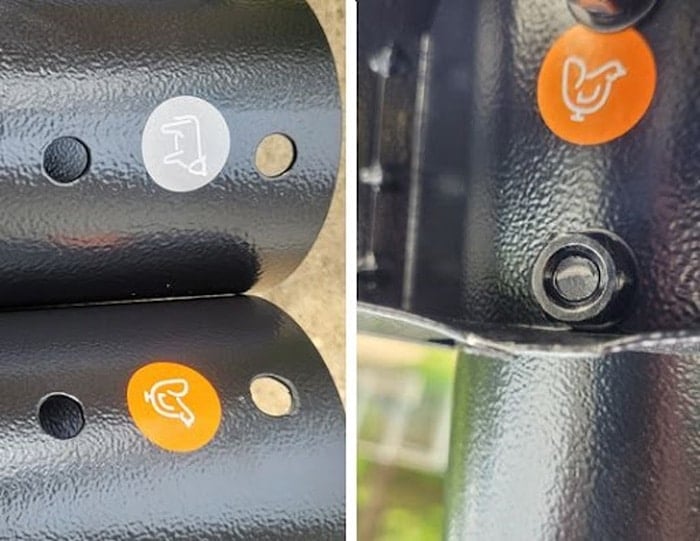
Assembly was fairly straightforward. All the parts were there, including the needed wrench, screwdriver, and Allen wrench; although you might favor using your own tools instead. The Assembly Guide contained no words, only pictures, throughout the step-by-step direction but it wasn’t too much of a struggle. Traeger adds some humorous bits for you along the way to make assembly a little more fun. The 4 legs are either ‘chicken’ or ‘cow’ so that they match up with their respective angled sockets.
A QR Code is available in the front of the Assembly Guide to scan with your smartphone which will assist you with animated steps. Convenient!
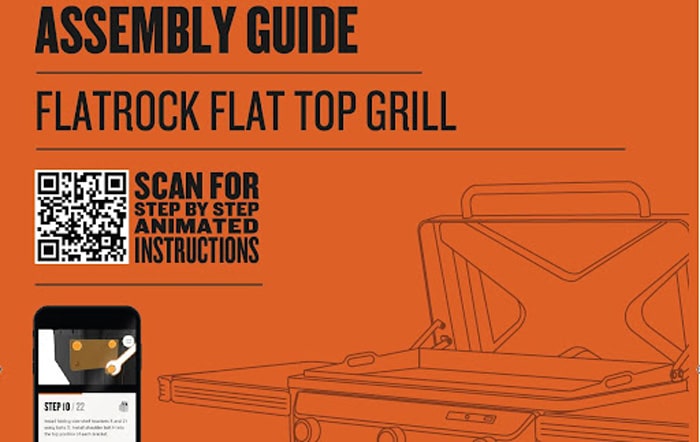
Traeger also suggests you have a buddy and a six-pack available during assembly, and the Assembly Guide includes a progress meter of sorts in the upper-right of each page showing how empty your six-pack should be as you go along. I think I was a step or two ahead of them if I’m being honest.
Editor’s note – Huskee assembled Flatrock all by himself! Prost!
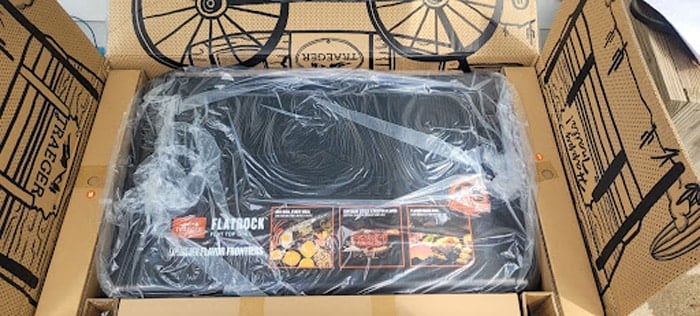
Unpacking the Traeger Flatrock
Traeger packed everything very neatly and securely. The box even turns into a fun project for the kids, making an ‘old west’ themed cardboard stagecoach and play center, complete with instructions on how to set it up. A great touch for the little ones!
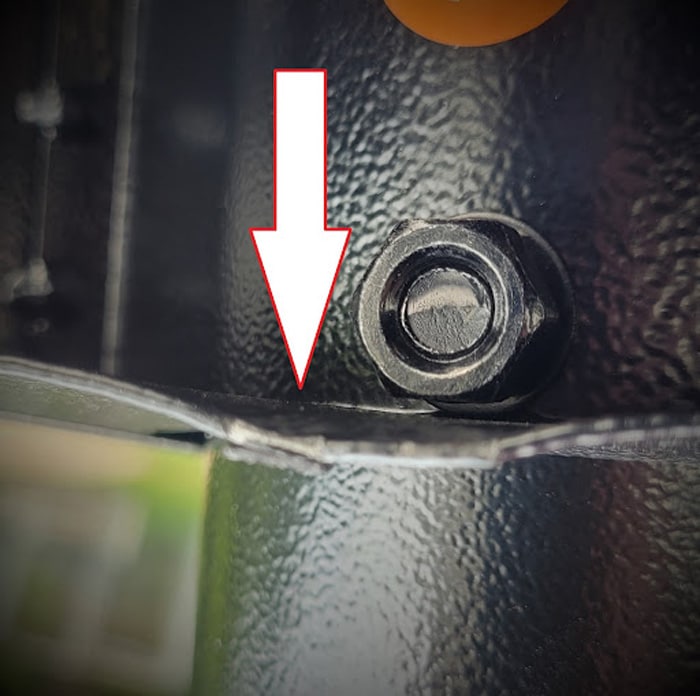
There’s only one spot where I had minor difficulty with assembly; two of the leg sockets didn’t have enough room for the bolts securing the legs to go in due to their close proximity to a flange on the leg socket. I had to use the jaws of my wrench to bend the flange on the leg socket down to make room for the bolt, as shown by the arrow below. I can see where this could stump someone less handy.
All together, assembly took about 2.5 hours by myself, but I wasn’t rushing. I was taking my time, on a hot day, to make sure I didn’t miss anything and to try to enjoy the process. It’s always fun to see your project take shape, and I 100% agree with Traeger in that cold beverages help.
Final Thoughts
It’s been a pleasure working with the Flatrock for over a month of testing. So far it’s seen thunderstorms, wind, and hot sunshine, and it’s weathered these conditions like a champ. Temp control is quick and very easy with its three powerful burners, uniform heat across the cooking surface, and the ability to better attain separate temperature zones when needed. The Flatrock is more expensive than most residential griddles, but unique features and hefty build quality set it a few paces ahead of many competitors’ models available at the time of this writing.
Is the Flatrock worth its equally hefty price point? As with anything, value is a personal decision based on several factors, but if treated right and maintained properly I expect the Flatrock will most likely outlast many of its lower-priced competitors. Plus it includes perks and features that added to the performance and enjoyment of use. So for all of this, I will say “yes, Flatrock justifies its price tag.” We award the Traeger Flatrock Flat Top Grill our Platinum Medal.
Warranty
Traeger offers a 5-year warranty on the body and legs rusting through and a 1-year warranty against other material and manufacturing defects.
We thank Traeger for providing a Flatrock for our tests.


 Sign up for a free trial of the AmazingRibs.com Pitmaster Club and experience everything that the world's largest membership-based BBQ and grilling community has to offer!
Before you can post a comment or question you must sign into our commenting partner, Disqus. This helps make sure everyone hanging around the grill is civil. We do not tolerate nastiness, racism, porn, inappropriate language, or attacks on others. All comments are the property of AmazingRibs.com and we reserve the right to quote them, edit them, delete them, and block people from making future comments.
Please leave comments and questions on the same page that is devoted to that subject so others can see questions and our answers when they are reading about the subject. You must enable JavaScript to use the comments section, and you must accept cookies to post comments. Note: the software that runs Disqus is different from the Pitmaster Club, so members need to sign into the Pitmaster Club separately.