


Achieve cooking perfection on charcoal and gas grills with the 2 zone grilling setup.
The most essential concepts an outdoor cook needs to understand are the importance of temperature control, the differences between direct heat and indirect heat, and how to use a 2 zone grilling setup.
Whether you are cooking on an El Cheapo Charcoal Grill from Wally World, a Super Stratoliner Stainless Steel Gas Grill from Williams of Napa, or a Texas Tinkermann Iron Tube Competitor mounted on a trailer, most outdoor cooking goes best if you use a 2-zone setup. Even if you are only cooking hot dogs.

To cook delicious food, you need to control your cooking temperature because the compounds in foods react differently to different levels of heat. For example, meats are composed of protein, water, fat, collagen, and some sugars, and each component changes drastically at different temperatures. Fats render at one temp, water evaporates at another, collagens melt at another, sugar caramelizes at another, the Maillard reaction (a.k.a. browning) occurs at another, and carbonization (a.k.a. charring or burning) occurs at yet another temp.
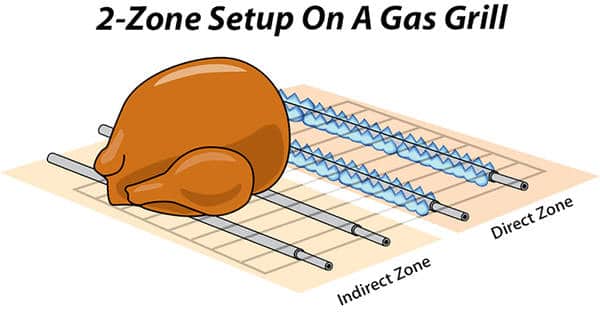
On a grill, a 2 zone grilling setup is ideal because it gives you much better control over temperature. In a 2-zone setup, you have one side of the grill that is hot and producing direct radiant heat, and the other side is producing no heat and food on that side cooks by indirect convection heat. We’ll call one the direct zone and the other the indirect zone. When you shop for a grill, you must get one that allows you to configure it in 2 zones.
2 zone grilling setup, a technique for temperature control
The most common mistake we make is using too much direct heat. That’s how we make hockey pucks. If meat is exposed to very high heat for too long the proteins get their undies in a bunch and shrink, squeezing out the liquids, and the result is tough dry meat.
Using a 2 zone grilling setup allows us to control the temp applied to the food. We can gently heat a turkey in the indirect zone, get it cooked to juicy, tender, smoky perfection, and be the heroes of Thanksgiving. Using a 2-zone setup we can slowly gently bring a big prime rib to bumper to bumper medium rare with no gray meat, and a perfect crunchy crust, and be the heroes of New Year’s Eve.
We can start chickens over the indirect zone at a low temp and cook them until they are almost done. Then move them over the direct zone to crisp the skin and finish cooking. We can cook the most tender ribs with a special secret sweet dry rub and never burn a grain of sugar, and then move it over the direct zone to sizzle on the sauce and caramelize it to finger licking sticky goodness. We can even make fluffy baked potatoes with crackling skin completely free of burn marks. Here you can see the cooks at the Weber Grill restaurant in Chicago using a large charcoal grill in 2 zones.
2 zone grilling setup, a technique for different foods
A 2 zone grilling setup is especially handy if you have more than one food cooking at once where the thickness and water content of the two is significantly different so they will cook at different rates. For example, you might put lobster in the indirect zone to roast gently for about 20 minutes, and then put asparagus on the direct zone to sear quickly.
An indirect zone is particularly helpful for preventing food from burning if it is very sweet or if there is sugar in the rub or sauce. Slices of pineapple are great on the grill, but can burn quickly if put over direct heat. Start them in the indirect zone, then move them to the high heat to brown.
2 zone grilling setup, a technique for slow roasting
Roasts, like pork loin or beef roasts, or even whole chickens will burn badly before they are cooked through if put over direct heat. They need to go in the indirect zone.
2 zone grilling setup, a technique for holding
Even if your steaks are all cut to the same thickness, somehow one of them just wants to get outta there and cooks faster. With 2 zones you can move it from the direct zone to the indirect zone to hold without overcooking. This is especially useful when you have six steaks and on guest wants it rare, another well done, and the others in between. You can slide them to the safe zone at the appropriate time.
Think of your grill as an oven
I know you don’t think of your grill this way, but if it has a lid, it really is an oven. Since temperature control is critical to all cooking, the major differences between your outdoor and indoor ovens are crucial:
(1) The heat source in your indoor oven is probably under a metal plate so the food is not directly over the heat source. It is indirect.
(2) Controlling the temperature is not as easy outdoors as it is in your kitchen because your indoor oven has a thermostat that regulates the oven heat. The thermostat is often off (often by as much as 25°F), but at least it holds the temperature constant. Outdoors, at the moment, only pellet smokers have thermostats, and there is a battle with sun, wind, and rain, hopefully absent in your kitchen.
(3) Temperature control is especially hard outdoors because the thermometer on your grill is probably worthless, regardless of the price you paid for your fancy stainless steel grill. Most grills have cheap bi-metal thermometers and they can be off by as much as 50°F, especially because the probe is often nowhere near the meat.
How to control temperature on your grill
Every grill is different, but when using a 2 zone grilling setup try to get your indirect zone down into the 225°F range. That’s a magic number at which a lot of foods cook best. On a charcoal grill you push the coals to one side of the charcoal grate. On a gas grill you turn off all the burners except one or two. You will need to fiddle with your system. You may find that you can hit the 225°F mark with a three burner gas grill by turning one burner on medium and the other two off. Or maybe it needs to be on low. But then you have no hot zone. No problem.
When it is time to move the the food to the hot zone, you can put it on a platter and then crank the hot side. When it maxes, put the food back on. You need to get to know your instrument and master the concept.
A good way to do this is do some dry runs with a good thermometer and without food. You cannot trust your grills thermometer. You absolutely must get a good digital thermometer for your grill. Please read my buyer’s guide to thermometers. You should also read my articles on the thermodynamics of cooking and meat science.
Sometimes you will want to add a water pan or two, especially if you are smoking

If you add a water pan under the meat while using a 2 zone grilling setup, you are adding moisture to the atmosphere. And if the water pan is above the heat source you are further protecting the meat from direct heat — the water absorbs heat helping to keep the temperature down. Smoking, which is usually done at low temperatures for a long time can dry out the meat, so putting humidity into the atmosphere can help keep the meat moist. In addition, moisture mixes with the combustion gases, even on a gas grill, and creates desirable flavors. Some smokers, like the Weber Smokey Mountain, come with a water pan. That’s it in the picture below on the right just beneath the ham and above the charcoal.
Just one thing: The pan can emit a little steam, but don’t let it boil. Don’t worry, it won’t boil if the air in the cooker is 225°F even though that is higher than the boiling point. Evaporation takes energy away from the water and that cools it too quickly so it can take many hours to hit 212°F if ever. Use a digital thermometer to make sure the air temp is at or near 225°F.
All you need in the water pan is water. Don’t waste money on wine, juices, beer, whatever. They will not flavor your food. Click here for more on the subject of what to put in the water pan. Here are some ways to set up for indirect cooking with a water pan.

On a charcoal grill, fill up a chimney, wait til the coals are white, dump the coals all on one side of the bottom rack, and put a water pan on the other.
Put the top rack on, put the meat on the top rack above the water pan, and another water pan on the top rack above the coals.
Here’s another article on how to set up a charcoal grill for moist smoke roasting. Follow the same concept on other charcoal grills.

The metal insert on the right side of this Weber Kettle grill is called a Smokenator and it keeps the coals off to one side so, as in the photo, you can put your food on other side for low and slow indirect smoke roasting, and you can put more meat below on the bottom rack, or, as in this photo, a pan of beans under the ribs to catch the drippings. If you have a Weber Kettle, you need one of these handy attachments. Click the link above for more about setting up a Smokenator.

The very popular and inexpensive Weber Smokey Mountain (WSM) and other “bullet” shaped smokers have a water pan between the coals and the food. Leave it in and you are cooking indirect. Take it out and you are cooking direct.
The water pan helps stabilize and lower oven temp and adds humidity to the oven. It can also catch drips for sauce. Here’s an article on how to set up a WSM for moist smoke roasting.

The gas grill above is set up with a water pan under the meat for indirect cooking and to collect drippings. The pan is filled with wine, fruit, herbs, onions, and more goodies to make a flavorful stock for gravy (they do not flavor the food above in any way).
To the left is a small pan with wood chips for smoke. It is resting on a hot burner so the chips will smolder. Click here for more on how to make the ultimate smoked turkey, even on a gas grill. Here’s an article on how to set up a gas grill for moist smoke roasting.
For some foods you do not want a water pan. If you are cooking something that finishes quickly, like steaks or chicken parts, the pan has little or no impact, so you can skip it.
Seasoning and calibrating your grill or smoker with dry runs
The first thing to do after you assemble your new grill or smoker is to season it and calibrate it by doing a few dry runs without food. This will burn off any manufacturer’s grease, and give you a sense for how to set it up to hit the two important target temps that almost all my recipes use: 225°F and 325°F.
