


Hold your hand up if you love fried chicken, French fries, onion rings, calamari, zucchini, and all things fried.
Just as I thought, that’s everybody. Hold your hand up if you make them at home? Just as I thought, not many hands in the air.
Why? Because it’s a pain in the schmaltz. It spatters all over the stove, it smells, all that vaporized grease lands on the cabinets and counters, and oil gets on the burner and smokes and sets off the smoke alarm. And if the breading is nice and crunchy but the interior is still not done, then what?

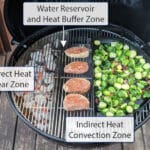
Here’s a breakthrough that doesn’t require buying a bulky standalone deep fryer, a monotasker that wastes a lot of oil and counter-space: Your gas grill is perfect for frying. Feel free to slap your forehead. That’s right: your average backyard gasser does the job admirably. You don’t need a side burner because you can right on the grill grates. It solves all the problems of frying. Who cares if it spatters or smells? You’re outside. And if you use a 2-zone setup, you can fry on the hot side of the grill then drain and drip-dry the cooked foods on the indirect side plus keep them warm over there! And, if the breading is perfectly browned and crisp but the chicken is still a bit undercooked inside, keeping it on the indirect side will finish the cooking without burning the breading. This method is even better than frying inside.
How the process works
Technically, frying is convection cooking. No, convection cooking doesn’t only take place in a convection oven. Convection takes place whenever a food is surrounded by a flowing substance, and that includes oil, water, and air. The hot oil transfers energy to the cold food, which warms it, and as the food absorbs energy from the oil, the oil then temporarily cools. Because the oil is flowing, the cooled oil sinks to the bottom of the pot, where it warms up again and then rises, and the cycle continues, keeping the meat constantly warm. If there is enough hot oil, and not too much cold food (which would slow down the cycle), the continuous flow of energy from the oil to the food cooks the food. As the food heats, moisture escapes from the food in the form of steam, making lots of bubbles in the oil and dehydrating the food a bit. On breaded and fried foods, that dehydration is exactly what you want to create a crisp crust. If the oil is hot enough, the escaping steam will help prevent some of the oil from penetrating the breading. If the oil isn’t hot enough (or cools too quickly from an overload of cold food), the breading can become greasy. If the oil is too hot, it will cook the outside too quickly and not enough energy will transfer down to the center of the food. This can be a health risk if you are cooking chicken, so try to maintain a consistently even frying temperature. The food’s thickness is another crucial factor determining how quickly it will cook.
Chicken and French fries are best started at about 375°F, while fish and donuts start best at about 350°F. I have found 375°F is a good all-purpose starting point for most fried foods. When the cold food hits the hot oil, the oil temp will drop rapidly and a lot. And you must use a thermometer to accurately measure the oil temp. Bimetal dial thermometers are too imprecise, plus they attach to the side of the pot, placing them next to hot metal, which skews the reading. I use a Thermapen or a ThermoPop (shown below). Both are fast, and I can insert them into the center of the pot and into the meat to check its progress. Just be sure to wear a glove to protect your hand from oil spatters.

Which oil is best? For most frying, a neutral flavored oil is the go-to, but in Spain and Italy, chefs make olive oil and fried seafood sing in harmony. For most foods, go for an oil with a high smoke point such as soybean oil, peanut oil, or canola oil. Many restaurants use soy bean oil. The idea is to let the natural taste of the food shine through.
If you fry a lot, it’s important to replace the oil often. The oil’s chemistry changes as it is repeatedly heated and cooled, and the oil picks up flavors and flotsam from the materials being fried. Ever fry a batch of fish and then a batch of donuts? The donuts will taste fishy. Your eyes and nose are the best way to tell when it is time to change the oil. If the oil looks dark brown, starts to smoke, starts to smell like the food, or smells a little off and reminiscent of crayons (a sign of rancidity), it’s time to change the oil.
Four types of frying
In general there are four types of frying, and they depend on the amount of oil used.
Stir frying is usually done in a wok or frying pan with a very small quantity of oil, measured in teaspoons, over very high heat. I’ll be sharing some fun ways to stir fry outdoors with you soon.
Sautéing is usually down in a sauté pan or frying pan with a bit more oil, measured in tablespoons, over medium to medium-high heat.
Shallow frying is when the pan has 1/4″ to 3/4″ of oil, barely enough to go halfway up the food. Shallow frying allows some of the steam to come off the top of the food where it is less likely to knock off the coating. For stir-frying, sautéing and shallow frying, the hot pan is in direct contact with the food and conduction from the metal is the primary heat source, while convection from the oil is the secondary heat source. Shallow frying is the method I use most often for fried chicken.
Deep frying is when the food is completely submerged in oil and convection flow of the oil is the primary heat source. This is the best way to make French fries and breaded veggies.
Basic equipment
While you can fry in electric aluminum pots, stainless steel pans, copper pans, and other vessels, I prefer cast iron for shallow and deep frying because it holds and conducts large quantities of energy. Many chefs swear by cast iron frying pans, but I prefer to use a large cast iron Dutch oven. It can store more energy, and it contains some of the inevitable spattering. Never fill a frying pot above half way because cold food could make it overflow as it bubbles up. And don’t forget that digital thermometer because temp control is important.
So here’s the grill-frying technique
You need a gas grill with at least two burners. You can do this on a charcoal grill or campfire, but it is important to be able to quickly control the oil temp, and gas grills have fingertip control. If you’re looking for a new gasser, check out our database of gas grills that our experts have tested, rated and reviewed.
You need a pot with high sides to contain spatters and retain heat. I strongly recommend a cast iron Dutch oven. Here is the Lodge 12″ 8 quart. It has two features that make it a multitasker. It has legs which make it handy for cooking directly over embers and coals in campfires, fireplaces, and on charcoal grills. And it has a flat lid with a lip so you can pile hot coals on top. This lid feature turns it a real oven for baking things like peach crumble or biscuits or Killer Skillet Cornbread Recipe or Texas Style Chili Con Carne Recipe. Lodge isn’t the only brand in town: Camp Chef also makes some nice ones, too.

Put the frying pot over one burner on your grill and turn it on high. Pour the oil into the pot. For shallow frying chicken, I pour in the oil to a depth of about 3/4″. Keep in mind that the oil level will rise as it is displaced by the food. Heat it to 375°F in the center. Add the food, and make sure that the displaced oil rises enough to cover more than half of the food. It should reach about three-fourths of the way up the food. Work in batches to leave some space between each piece of food. If you crowd the pot, the oil temp will drop too far and the breading may get greasy. I remove the food when it is GBD (Golden Brown & Delicious) to light brown. If the meat is below a safe internal temp, I just put the meat on the indirect side of the grill, close the lid, and in a few minutes, while it is drip drying, it finishes cooking through.
It is helpful to have a spider strainer. This is a wire scoop used frequently in Chinese cooking. It gently lifts fried foods and makes it a breeze to remove small pieces from the oil. gently. A slotted metal spoon is not quite as good, but it works. In a pinch, tongs will do the job too, but often they tear the breading and skin off chicken.

Some tips
Dry breadings. If the food sits around the coating gets soggy. If that happens, give it a fresh coating.
Keep it chill. Cold foods fry better.
Watch the oil temp. If you are frying in batches, let the oil come back up to temp before putting cold food in the oil.
Keep it clean. Skim off bits and chunks that come off the food. When the oil gets cloudy, time to change.
Dredging and battering
There are two ways to make the breading: Dredging or battering. Both use flour as a base.

Dredging has many variations. The simplest, and often best, is just rolling the food in flour. You can use a bowl, but I like to toss some flour in a plastic bag, drop in the food, and shake. Remember Shake ‘n Bake? It’s a quick and efficient way to dredge food in flour. Dredging is often the precursor to a triple dip: first in flour, then in egg, and then a final dip in flour or breadcrumbs (or panko, corn flakes, corn meal, crushed pretzels, potato chips, crushed corn chips, and various other combinations). Many frying experts mix corn starch with the flour. The ratios vary from 1:1 to 2 parts flour to 1 part corn starch. You can go straight from the dredge to the oil or let it sit a while to hydrate the starch. I have found no difference. For a full recipe, click here to see my fried chicken recipe cooked with a flour dredge. If you like it spicy, click here to see my Nashville Hot Chicken recipe.
Battering means dunking the food in thick, wet goop. Batters tend to coat the food more evenly, leaving a thicker, smoother, lighter finish. Onion rings and fish are often battered, and Japanese tempura is always battered. To make a light and crunchy textured batter, you want carbon dioxide bubbles in the mix, either from beer, baking powder, baking soda, or all three. Because batters are wet, it takes longer for the oil to drive off all the moisture. But the steam bubbling up in the batter makes the cooked batter lighter and crunchier. Click here to see my beer/tempura batter recipe for vegetables and seafood.
Here’s a tip: Most recipes tell you to mix the flour or batter with pepper, herbs, and spices, but that’s a waste because you never use all the flour. A better idea: put salt, herbs and spices right on the food before you dredge it in flour. That way, you will taste more of the seasonings.
Safety
Frying on a grill is no more risky than frying on a stovetop indoors. In fact, it may be safer because a fire indoors can take out your house. Frying on a grill is a lot safer than deep frying turkey. Use a tall sided Dutch oven to minimize spattering and prevent spills. Leave a lot of space between the top of the oil and the top of the pot so it cannot overflow and so if you jostle the pot it cannot spill. Handle hot oil with respect, as even a small spatter on your skin can be painful. Let the pot cool before moving it. Keep children and pets away. Don’t let handles stick out. Wear an apron or clothes you don’t mind getting a little grease on. Keep a fire extinguisher with a class B rating on hand
After cooking
After frying put the food on a wire cooling rack over a sheet pan or, if you don’t have a rack, you can put a few sections of newspaper in a sheet pan and then a few sections of paper towel on top of the newspaper like this:

After you are done, if the oil was barely used, smell it. If it does not have a strong smell, you can reuse it, even if it has changed color a bit.
Let it cool down and then filter it. Start by scooping out the large bits with a slotted spoon or a small strainer. Get a bottle large enough to hold all the oil and put a large funnel in it. I use tinted wine bottles so light won’t further degrade the quality. Line the funnel with cheese cloth. A coffee filter will clog too easily. Some paper towels or other clean cloths will work. Then pit a fine mesh strainer over the filter. A tea strainer is perfect. Pour the oil through. Store it in a cool spot for a while, no more than a month. Over time, oxygen combines with the oil and spoils it, but this method works fine if you plan to fry again soon.
Oil that has been used for frying fish usually gets fish oil in it and you do not want onion rings that taste like fish. Spent oil or oil that is cloudy or funky smelling should not be used for cooking. It contains harmful compounds.
When the oil is spent, don’t pour it down the drain. It can coagulate there, mix with hair and other waste, and clog your pipes or even the city sewage system (these clogs are called fatbergs – Google it). Some towns have an oil recycling drop-off, but not many. I dispose of some spent oil by drizzling it on newspaper that I then use to start my charcoal chimney. Spent oil can also help start a fire in a log-burning smoker in campfires, and in fireplaces by splashing it on the logs. You can pour it into an unbreakable container like a plastic milk bottle and throw it in the trash. Many restaurants go through a lot of oil, and they have a recycling receptacle out back. Recyclers pick it up for powering cars or they refine it for other uses. Some recyclers even pay the restaurant. I know someone who deep-fries a lot of turkeys and he slips into the alleys after restaurants have closed and adds his oil to their receptacle. How nice of him to improve their bottom line!
 Sign up for a free trial of the AmazingRibs.com Pitmaster Club and experience everything that the world's largest membership-based BBQ and grilling community has to offer!
Before you can post a comment or question you must sign into our commenting partner, Disqus. This helps make sure everyone hanging around the grill is civil. We do not tolerate nastiness, racism, porn, inappropriate language, or attacks on others. All comments are the property of AmazingRibs.com and we reserve the right to quote them, edit them, delete them, and block people from making future comments.
Please leave comments and questions on the same page that is devoted to that subject so others can see questions and our answers when they are reading about the subject. You must enable JavaScript to use the comments section, and you must accept cookies to post comments. Note: the software that runs Disqus is different from the Pitmaster Club, so members need to sign into the Pitmaster Club separately.