AmazingRibs.com is supported by our Pitmaster Club. Also, when you buy with links on our site we may earn a finder’s fee.
Click to see how we test and review products.
Sous-Vide-Que Marrying The Grill, Smoker, And Sous Vide (13 Recipes, 3 Articles)

Published On: 5/9/2019 Last Modified: 6/16/2025
This is really cool stuff. A marriage that will last. By marriage of water and fire, sous vide with the grill and smoker, we can achieve extraordinary results, in some cases, better than with either cooking method on its own. You can get incredibly tender, juicy, safe, and flavorful foods.
We have a lot of free info on the concept on this website, but for a comprehensive deep dive into the subject, consider purchasing our eBook “Sous Vide Que Made Easy: How To Deliciously Marry Sous Vide with The Grill And Smoker“. It is only $3.99 0n Amazon in Kindle format. To enjoy the book, you will need the Kindle app which runs on iOS, MacOS, Android, PC, and Kindle.
Here’s how it works
In case sous vide (pronounced soo veed) is new to you, here’s a primer: The technique is an extension of a concept that barbecue fans know well: Low and slow cooking. You will be hearing a lot more about it in the next few years, and many of you will find a sous vide device among your holiday gifts. Sous vide is a hot trend in cooking.
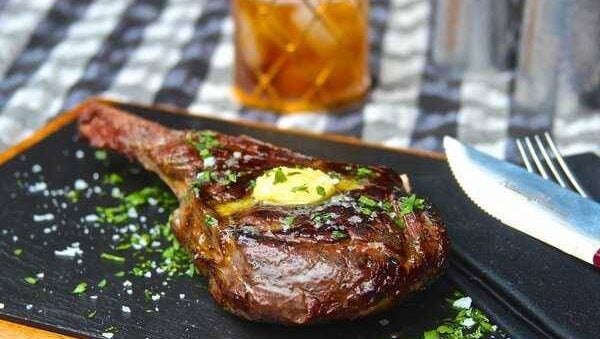
The genius of it is that the food can never get hotter than your sous vide temperature. Take a steak, for example. If you grill a steak, your grill is typically in the 400°F or more range and the meat is right over intense infrared radiant heat. Getting it cooked properly is like catching a bus that won’t stop. You’ve got to jump on as it goes by, and you have a very short window of time before the bus passes you and the meat is overcooked. If you jump too soon, the meat is undercooked.

When cooking sous vide, you slip the food into a vacuum bag or you can put it in a plastic zipper bag and slide the bag into a pot of water so that the water pressure pushes the air out of the bag, then zip it up.
Then you put a special heater called an immersion circulator in the pot of water, where it warms and circulates it. This device heats the water precisely to a temp you choose, say 131°F for perfect medium rare steak. The food in the bag heats to that temp and it can never get any hotter. It can never get to 132°F or more, so the meat can never be overcooked. You get predictable results with precision temp control.
Contrast that with conventional cooking. Let’s take a tough cut of meat like flank steak. From the belly area of the steer, it is a hardworking muscle loaded with connective tissue. It is also a thin tapering muscle, usually 1/2″ think on one end and 1″ thick on the other. If you sear it over high heat the energy moves inward and by the time you have developed a flavorful brown crust, the heat overcooks a layer beneath the surface so this cut is often half overcooked.
But in a sous vide bath for 8 hours at 131°F, it can become as tender as a ribeye. Cooking sous vide heats the meat to a uniform temp from bumper to bumper so nothing is overcooked. You can leave the food in the bath for hours, even days. We know that low and slow tenderizes and moisturizes meats by melting connective tissue that surrounds muscle fibers and bundles and rendering fat (see my article on meat science). The result is very tender juicy food, even if you start with a tough cut. Sous vide low and slow even tenderizes woody vegetables by softening tough structural components.

The secret to tenderness is that breaking down connective tissue isn’t just a matter of temperature. It is a matter of time AND temp. At these temps enzymes kick in and have plenty of time to do their magic. That is why low and slow barbecue works. So even though you might be cooking at 131°F, the longer cook times at temps enzymes love helps tenderize and the lower cook temps prevent things from getting tough.
This is really cool stuff. A marriage that will last. By marriage of water and fire, sous vide with the grill and smoker, we can achieve extraordinary results, in some cases, better than with either cooking method on its own. You can get incredibly tender, juicy, safe, and flavorful foods.
Time and temp
The trick to sous vide success is dialing in your preferred temperatures and times. The problem is, there is no one single combo. And there are so many contradictory charts and recipes out there. As an example, here are some recommendations for pork ribs from top experts:
- Jason Logsdon, sous vide pioneer and author, says 140°F for 1 or 2 days for “chop-like” ribs and 156°F for 18 to 36 hours for more fall apart ribs.
- Philip Preston, sous vide pioneer from PolyScience, a producer of circulators and other sous vide tools, says 145°F for 24 hours.
- J. Kenji López-Alt tested pork ribs for SeriousEats.com. He recommended two versions, 145°F for 36 hours for ribs that are “extra meaty, like a pork chop” or 165°F for 12 hours for ribs that are more “traditional barbecue style”.
- Chef Andrew Zimmern says 152°F for 18 hours.
- Grant Crilly of ChefSteps, makers of Joule, says 162°F for 4.5 hours.
- Doug Baldwin, scientist, book author, and another pioneer, does his at 175°F for 8 to 12 hours.
Many circulators come with an app with recommended time and temp settings. Keep in mind, these are not dictum from high above. They are chosen by trial and error by the chefs who made the app. And taste is a matter of taste. There is no one perfect setting for everyone. If your machine is app-less or it isn’t detailed enough for you, SousVide Dash is an iOS app that is well respected. In addition there are several good books and websites that we recommend in the section titled “For More Info” below.
But you need a starting place. In selecting a temperature, remember you have a lot of leeway. To simplify things for you, we put foods in two basic groups, Tender Cuts and Tough Cuts. Start there. And remember, you can always pull the bag out of the bath while it is cooking and squeeze the meat to feel how tender it is.
The thing to remember is that the texture of the food changes with the temperature and time in the pouch. And variables such as how much connective tissue and marbling can significantly impact the results. So one combination of time and temp might work great for USDA Choice grass finished Hereford sirloin, and another will be better for USDA Prime grain finished Black Angus ribeye.
Below are our recommended temperatures and times as starting points that will produce meats that we are confident will please you. We have simplified things a lot. As you practice you will learn which time and temperature combos work for your tastes, just like you learned which cut of steak you like best and what temperature you prefer. Experiment! Keep a notebook!
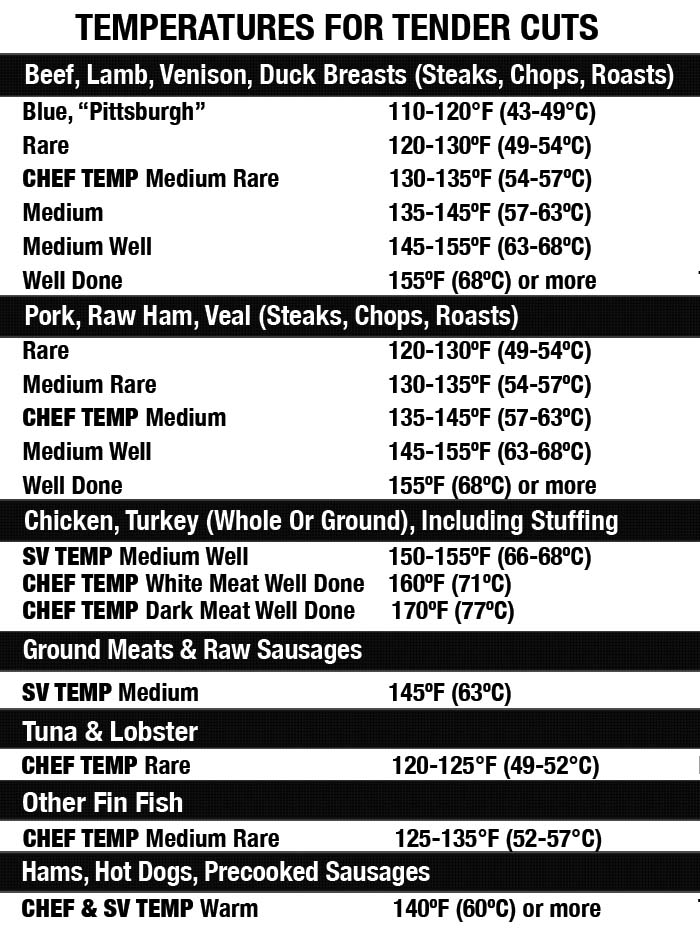
Tender Cuts
“Tender Cuts” includes foods that are relatively tender and are usually cooked to less than 160°F when not cooked sous vide. Pick the doneness temperature you like for any food in the Tender Cuts group on the chart and the cooking time depends mostly on thickness. Yes, fat content, connective tissues, and water content are factors, but let’s not complicate things by throwing those variables into the works.
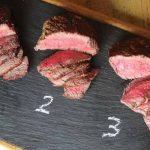
So, how do you like your steak? Medium rare, medium, medium-well, or well-done? And pork chops? Welllll, if you’ve never tasted a pink pork chop cooked to 135°F to 145°F (medium) you have never tasted pork. Even though it is pink, it is perfectly safe. Chicken? You have been forced to destroy it all your life because the contamination rate is so high (90% of all chicken has pathogenic bacteria according to Consumer Reports). That’s why you must cook it way past well-done to 160°F. Just lowering it a notch to 155°F, or heaven forbid, 150°F, where there is still some pink to the flesh, and you are in for an all new experience.
How long to cook foods in the Tender Cuts group? Here’s a rule of thumb: Use the chart here to pick the same temperature you like when cooking conventionally and cook sous vide at about 5°F less for about 90 minutes per 1” thick, then sear or smoke. Taste it and make adjustments on the next cook.
1 – Cook. Salt, then sous vide for 2-4 hours at the temp at left.
2 – Optional. Chill thoroughly in the bag.
3 – Rub. Remove from bag, pat dry, sprinkle generously with salt-free rub or lightly with salted rub.
4 – Finish. Sear in a hot pan, griddle, or on a grill until you like it, or smoke at 225°F (107°C) and then sear. Bring to the temp at left. Glaze or sauce if you wish.
Tough Cuts
These are the big tough barbecue cuts like pork ribs, pork shoulders, beef briskets, and beef ribs. These are hardworking muscles and notoriously tough cuts that pitmasters typically smoke roast between 225 and 275°F for a long time until they hit an internal temperature of 190 to 205°F. Fortunately, sous vide is incredibly good at breaking down these tough muscles and making them tender. Hard core pitmasters are amazed at the texture of barbecue cuts cooked sous vide. Unfortunately, although the flavor profile can be excellent, nobody will mistake sous vide que pork or beef for real smoke roasted barbecue. So you need to make a decision: Smoke flavor or tenderness.
You don’t have to cook the brisket or pork butt whole! And you shouldn’t. Brisket point, the muscle on top, is a lot fattier and absolutely should be cooked separately. Its composition is a lot different than the flat, which is lean and much tougher. If you separate the two muscles, you’ll find the point is ready much sooner than the flat.
The reason we smoke huge cuts low and slow for eight hours or more is because it takes a long time to melt connective tissues, render fat, and tenderize. Cut them into smaller chunks, and they tend to dry out because of the increased surface area for evaporation. With sous vide, not a problem! Low and slow is the rule of the day and a brisket flat cut into six chunks will still be as tender and juicy as a whole smoked packer’s cut brisket.
Sous vide times and temperatures for these meats can really vary depending on how much connective tissue, fat content, thickness, and most of all, your preferences.
How long to cook Tough Cuts? Here’s a rule of thumb:
Sous vide at 145°F to 150°F for 24 hours.
Taste and make adjustments on the next cook.
1 – Cook. Salt, then sous vide at 145°F (63°C) for about 24 hours.
2 – Optional. Chill thoroughly in the bag.
3 – Rub. Remove from bag, leave wet, sprinkle generously with salt-free rub or lightly with salted rub.
4 – Roast or smoke. Roast or smoke at 225°F (107°C) until 145-155°F (63-68°C).
5 – Optional. Thoroughly dry the surface. Sear in a hot pan, griddle or on a grill. Glaze or sauce if you wish.
Tips
- Use fresh quality ingredients. Sous vide tends to amplify defects, so if your pork has been in the freezer too long and the fat is getting rancid, it will get worse in the bag.
- For food safety, you should not cook at temperatures lower than 131°F. After that, pick the temperature and time from the guide that will deliver the texture you like best
- The thicker the food, the tougher the cut, the longer it takes to cook.
- Don’t start timing until the water is up to temperature.
- You can sous vide frozen food direct from the freezer. Add an hour or two.
- Poultry skins tend to saturate with liquid and may get too soft to crisp during searing. Try removing them before sous vide and sear or fry them into crunchy flavorful cracklins, crumble them, and sprinkle on the cooked meat.
Problems with sous vide
Sous vide is not perfect.
- Cook at too low a temp, below 131°F, and you have a wonderful environment for bacterial growth.
- A lot of liquid comes out of meat and into the bag, depending on the cooking temp.
- You can put butter and herbs in the bag, but the flavors cannot penetrate most meats, and with all the water in the bag, the flavor is diluted so it barely impacts the surface.
- You can leave it in the bag too long and that will dry it out. You can cook at too high a temp and that will dry it out. Yes, food floating in liquid can get dry because when proteins shrink, they squeeze out moisture.
- When meat comes out of the bag, it is butt ugly and it lacks the rich flavors that are created when you sear and brown foods, the flavors created by the Maillard reaction. Many people throw the meat in a hot pan or onto the grill to sear it. This is a great technique and you end up with super tender meat, but less flavor than if it was cooked on the grill from start to finish.
Explore the world of Sous Vide Que, the ultimate marriage of water and smoke, by clicking here to download our ebook “Sous Vide Que Made Easy” for $3.99 on Amazon (free Kindle app runs on all computers). Or get the book and others FREE as a member of the AmazingRibs.com Pitmaster Club. Click here to join.
Grilling
I love what the grill does with sous vide, especially a charcoal grill. I take it out of the bag and let it cool a bit, and then toss it on a hot grill. Sear the meat on a scorching hot grill, lid up so that the energy is concentrated on only one side at a time and so that when you flip, it allows the energy to bleed off into the air rather than push down into the meat overcooking it. In a few minutes, you have an extraordinarily tender steak, with a nice crisp complex sear, and a little smoky flavor. This is the similar to the reverse sear BBQ technique. But the crust does not have as much flavor as it would have had if the meat had been cooked entirely on the grill, especially if you used a flavorful rub and reverse seared. So you have a tradeoff: Tenderness or flavor. For a tough cut like flank steak, sous-vide-que is a great choice. For a tender cut like filet mignon or a thick ribeye, reverse sear.
Smoking
It gets better. When the meat comes out of the bag, it can go into a smoker. All it takes is 30 minutes in smoky air and you will taste it. And the internal temp of the meat barely rises. Another trick is to chill the food when it comes out of the water bath and smoke or sear it a day or three later. This process even seems to improve the flavor!
Close Proximity Smoking
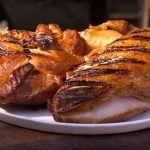
Check out how we cooked this turkey breast by sous viding it at 131°F for 12 hours, and then searing it on a special cooking surface called GrillGrates with wood pellets just a fraction of an inch below the meat to add smoke flavor in a hurry. My friend Greg Rempe calls my little innovation CPS, Close Proximity Smoking.
A little history
Sous vide is not really new. Chris Young of ChefSteps, the people who make Joule, says “It began in the late 1960s and early 1970s with important work being done independently by the American Ambrose T. McGuckian, the French chef George Pralus, and the French food scientist Bruno Goussault. The first sous vide meal was almost certainly served at the Holiday Inn in Greensboro, SC in 1970 by McGuckian who had been an employee of Grace Cryovac and had been involved with a program to improve hospital food in Sweden in the late 1960s. This program utilized vacuum packaging of food that Graze Cryovac had originally developed in conjunction with NASA and the space program.”
But the equipment was originally bulky and expensive. It caught on with restaurants, especially those who served large parties, because they could toss 300 bagged sirloins in the warm water, and when it was time to serve, pull them out and toss them on a scorching hot griddle. Nice way to serve perfectly cooked tender meals in a hurry! Fortunately, in the past few years, the devices have become suitable for home use and prices have come down.
Tools
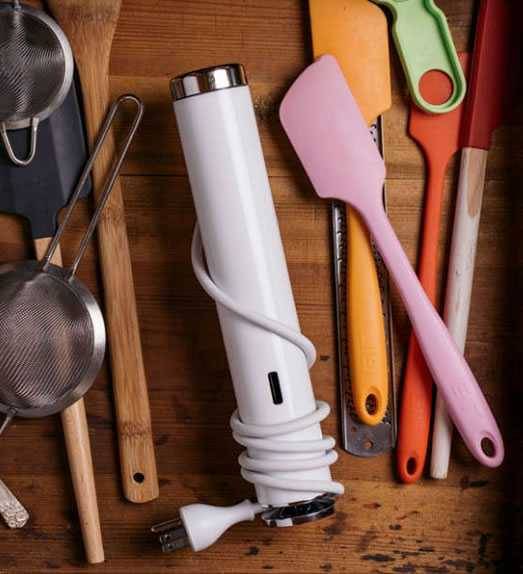
There are many options. Sous Vide Supreme and a few others make a breadbox size tub that has a built in heater, but no circulator. I much prefer the stick types like Anova and Joule, both of which are now under $200. Both have models that can use either bluetooth or wifi.
My favorite is Joule (pronounced jool, it is a scientific term for a tiny measurement of energy, and a pun on jewel). It was introduced in fall of 2016 by the really smart science oriented chefs at ChefSteps who helped create the landmark 6 volume set of cookbooks, Modernist Cuisine. Joule is the best of the many I have tested. It is narrower than a stick blender, about the size of an old-fashioned flashlight. It has a strong magnet in the bottom that holds it upright in a steel or enamel pan (some stainless steel is not magnetic). It also has a well designed clip that can hold it onto a pot.
Unlike the competition, it is water resistant, meaning it can be splashed but not submerged. It also heats the water faster than others. The app that controls it is where it really shines. It has excellent tutorials, videos, and recipes, and it is frequently updated. You no longer need reference tables to select cooking times and temps. The app asks you what kind of meat you’re cooking, if it’s frozen, how thick it is, and what level of doneness you want, and in case you aren’t sure, you can click on a picture. It also talks to both Bluetooth and wifi. The app is backed by a website from the manufacturers, ChefSteps.com, and is loaded with technique, thoroughly tested recipes, and beautiful videos. Here’s a snapshot of the app. And yes, you can use sous vide to make medium rare burgers safe.
It has one drawback: There is no display on the device to tell you the water temp or to control the temp. It all must be done via smartphone or tablet. This is no problem as long as you and Joule have a connection.
If your machine doesn’t come with an app or the app isn’t techie enough for you, SousVide Dash is an iOS app that is well respected. Prof. Blonder says “dreadful interface, but all the bells and whistles you might ever want. And then some. You can adjust basic information like heat transfer coefficients between the bath, the plastic bag, and the meat.
I checked a few predictions with actual measurements and with a bit of tweaking, it was quite close. Note there is always some uncertainty due to current patterns in the bath. Their model assumes water at the same temp flows equally on all sides of the sous vide bag, which is often not true, especially if you overload the bath. Also, the kill predictions for listeria and salmonella are only a guide, as it depends on heating rate, pH, exact species, etc. But, you’d have trouble improving on this calculator for accuracy.”

What about the bags? Sous vide means “under vacuum” because the food was originally packed in special thick plastic bags with a vacuum machine like a FoodSaver that sucked out all the air and heat sealed it. But you don’t need a vacuum sealer. Any old food grade freezer safe zipper bag will do. You can push the air out by gently slipping the bag under water and zipping it closed as the water approaches the top. Archimedes’ principle of displacement ensures most of the air is out. In simple language, It states that the weight of the meat displaces water and that the water will rise because of the meat. In this case, the rising water pushes the air out of the bag.
Contrary to popular opinion, we don’t need the air out for safety; we want it out so the meat is in contact with the bag and the bag in contact with the heat source, the water. An air bubble acts like an insulator. Here’s how to seal meat in a plain old zipper bag for sous vide cooking:
Sauces
Depending on cooking time and temp, there can be still significant water loss in the bag. Those juices could be the basis for a sauce, but most pro chefs don’t bother. Chef Jensen Lorenzen of The Larder Meat Co. in San Luis Obisp, CA is a sous vide expert. He has experimented with the juices in the bag after cooking. He says, “It typically has a great deal of myoglobin in it, which coagulates when you try to reduce it. If you have any fat in the bag that can break your sauce.
I’ve also found that the flavor combo from herbs, salt, and myoglobin, intensified by cooking in a bag, makes for a strange mix of flavors. You just don’t get the evaporative benefits of traditional cooking methods. You can strain it out and add wine, stock, etc., but by that point you might as well be using demi-glace or stock.” Remember, when you normally make a pan sauce, there are brown bits from the searing in the pan, and they are loaded with concentrated flavors from the evaporation, maillard reaction and caramelization.
Safety
What about microbes? With sous vide, food is often cooked at temps below USDA recommendations. While USDA temps are simplified for easy consumer guidance, what they don’t tell you is that you can get safe food, pasteurized, at temps below the recommended USDA guidelines. How? By cooking it longer. As I explain in my article on meat temperatures, pasteurization of meat is not just a matter of temperature. It is a measure of temperature, time, how much contamination there is (load), and the desired kill rate, all taken together.
That article explains in detail the science behind the concept based on extensive research by USDA, FDA, and many other scientists. In short: According to USDA, you can pasteurize turkey instantly when the internal temp hits 165°F, but it takes 27 seconds at 160°F, 5 minutes at 150°F, and 82 minutes at 136°F. So cooking below USDA recommended temps can be safe, as long as you cook for a longer time and don’t set the temp too low.
Many websites recommend sous vide in the 120 to 130°F range and many people believe that over 120°F bacteria can’t grow. Not so, says ML Tortorello, PhD, Chief of the Food Technology branch in the Division of Food Processing Science & Technology at FDA, Editor of Food Microbiology, a peer reviewed journal, and co-editor of the Encyclopedia of Food Microbiology 2nd Edition. “It is true that most foodborne pathogens such as Salmonella, Listeria, and pathogenic strains of E. coli, cannot grow at 120°F, but that is an easy temp for thermophilic bacteria [bacteria that like warm temps]. Some examples of foodborne pathogens that can grow at higher temps are Clostridium perfringens and Bacillus cereus which has a maximum growth temp of 131°F.”
So, to be safe we recommend you cook red meat, pork, and poultry at 131°F and above. Besides, 131°F is medium rare, the temp at which most beef steaks reach optimum tenderness and juiciness, and it’s below the optimum temps for pork, chicken, and turkey. Even after the final sear step, the internal temps usually remain under 135°F, still medium-rare, very tender, and juicy. So 131°F is the minimum temp I shoot for. For specific temps, check our growing section of recipes.
Safety tip: Raw garlic, onion, and herbs can harbor bacterial spores that may not be killed even at 131F so it is a good idea not to use them in a sous vide bag. Botulism spores are especially hard to kill at typical sous vide temps. Besides, flavor molecules from herbs and spices are too large to penetrate much beyond the surface. It is far more effective to season food after it comes out of the bag.
Safety tip: Never needle tenderize with a jaccard tenderizer. These tiny blades can push surface contamination deep into the meat where it is cooler and pathogens can grow. And for similar reasons, it is best not to cook ground meats sous vide.
Safety tip: Heat the water to the desired temp before putting the meat in.
Does sous vide have legs?
Sous vide is more than a splash in the pot followed by a flash in the grill. Without a doubt it will be used extensively by restaurateurs and caterers. Will it be a hit at home? Is this the next fondue pot? The cool wedding gift you use for a year and then it goes into the attic?
At the current price point, under $200, I suspect tens of thousands will be sold in the coming years. But because the food must be submerged 4 to 40 hours in advance, many of us just won’t plan far enough in advance. And because it has greater impact on some foods more than others we won’t use it for everything. But I think we will figure out what dishes we like it best for and we’ll probably use it much more often than a fondue pot. I think it will become a regular tool in many homes.
What will we use it for? Really tough cuts that will benefit from a sear on the grill like beef flank steak, beef short ribs, corned beef and pastrami, poultry breasts such as duck and goose, and lean pork loin chops. Check out this video of how we used sous vide to make a small cut of beef brisket far better than it is possible in a smoker, and how we made a chuck steak sing. As we continue to experiment this list will grow. And if you want to dig deeper into this cooking method, check out our ebook Deep Dive Guide, Sous Vide Que Made Easy: How to Deliciously Marry the Grill and Smoker with Sous Vide.

this item is for members only
Sous Vide And BBQ Join Forces To Create The Best Turkey Ever
This sous-vide-que turkey recipe results in superbly tender and and juicy meat from the low and slow sous vide method.this item is for members only
The Big Chill: A Trick For Making The Perfect Sous-Vide-Que Steak
By starting steak in a temperature controlled sous vide water bath, it's rendered perfectly cooked every time.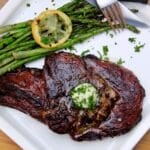
The Secret To This Amazing Grilled Ribeye Is Sous Vide
Grilled ribeye steaks are always a crowd favorite but it is easy to overcook this pricey beef cut. Here is the secret to getting it right.this item is for members only

Rich Butter Poached Bison Ribeye Recipe, The Sous-Vide-Que Method
Grilled bison steaks have never tasted better thanks to the sous-vide-que cooking method. It's sheer steak bliss.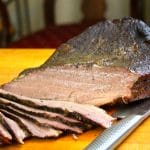
Sous Vide And Smoke Ensure Texas Beef Brisket Nirvana
Create mouthwateringly tender Texas-style BBQ beef brisket every time with this recipe for sous vide and smoked brisket.this item is for members only
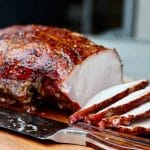
The Best Beef Prime Rib And How To Cook It Sous Vide Que
Beef prime rib is a popular holiday roast. Here's how to prep a whole beef prime rib from the butcher so it cooks properly.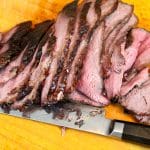
Mouthwateringly Tender Bottom Round Roast, Sous Vide And Smoked
Sous-vide-que bottom round roast makes an inexpensive and lean cut of beef tender by combining the sous vide method with the grill.this item is for members only
Beef Ribs with Rosemary And Wine Sauce, Sous Vide And Smoked
Smoked barbecue beef ribs are taken to a new level of deliciousness in this recipe for sous-vide-que beef ribs with rosemary wine sauce.this item is for members only
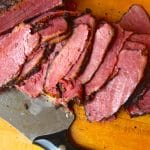
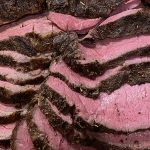
Pure Pastrami Perfection, The Sous-Vide-Que Method
Pastrami is the ultimate expression of beef brisket, and it is at its best if you start with sous vide. Read on for our recipe.this item is for members only
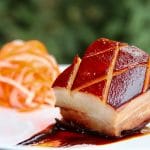
Melt-In-Your-Mouth Sous Vide And Smoked Pork Belly Recipe
Fall apart tender and full of smoky goodness, this recipe for sous-vide-que pork belly is sure to be a crowd favorite.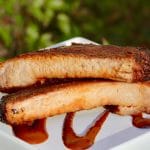
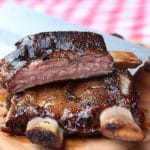
Perfect Smoked Ribs Every Time With Sous-Vide-Que
Create succulent ribs on the smoker or grill by marrying water and fire in this recipe for sous-vide-que St. Louis spare ribs.this item is for members only
Slice Into Juicy And Tender Pork Loin, Sous-Vide-Que Style
Create perfect pork loins every time with this recipe for sous vide and smoked (sous-vide-que) pork loin. You'll never look at pork the same.this item is for members only
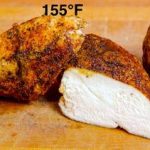
Perfect Grilled Chicken Breasts, The Sous-Vide-Que Method
Ensure moist and tender boneless chicken breasts on the grill every time with this ultimate guide to the sous-vide-que cooking method.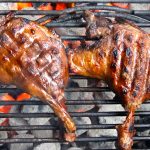
Melt In Your Mouth Duck Confit, The Sous-Vide-Que Method
This recipe takes duck confit to new heights by using the sous vide method for moistness and tenderness along with the grill for smokiness.this item is for members only
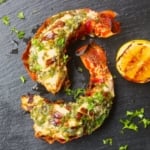
Tender Sous Vide And Grilled Lobster Tail With Chimichurri Butter
Cooked to perfection with sous vide then lightly charred on the grill, this sous-vide-que lobster tail recipe is the best you'll ever taste.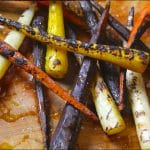
Crunchy And Lightly Charred Carrots, Sous-Vide-Que Style
Grilling carrots can be a challenge but the addition of sous vide ensures that they are cooked to perfection before being grilled.Related articles
- Food Safety From The Store To The Table In The Age Of COVID-19
- Award Winning Food Temperature Guide And What You Need To Know About Food Safety
- Basic Meat Science For Cooks
- Cooking Hot And Fast, Low And Slow, And The Reverse Sear Method
- The Big Chill: A Trick For Making The Perfect Sous-Vide-Que Steak
- Mouthwateringly Tender Bottom Round Roast, Sous Vide And Smoked
- Sous Vide And Smoke Ensure Texas Beef Brisket Nirvana
- Sous Vide And BBQ Join Forces To Create The Best Turkey Ever
- The Secret To This Amazing Grilled Ribeye Is Sous Vide
- The Best Beef Prime Rib And How To Cook It Sous Vide Que
- Perfect Smoked Ribs Every Time With Sous-Vide-Que
- Pure Pastrami Perfection, The Sous-Vide-Que Method
- Melt In Your Mouth Duck Confit, The Sous-Vide-Que Method
- Slice Into Juicy And Tender Pork Loin, Sous-Vide-Que Style
- Crunchy And Lightly Charred Carrots, Sous-Vide-Que Style
- Rich Butter Poached Bison Ribeye Recipe, The Sous-Vide-Que Method
- Beef Ribs with Rosemary And Wine Sauce, Sous Vide And Smoked
- Tender Sous Vide And Grilled Lobster Tail With Chimichurri Butter
- Melt-In-Your-Mouth Sous Vide And Smoked Pork Belly Recipe
- Perfect Grilled Chicken Breasts, The Sous-Vide-Que Method
- Pozole Rojo Done Sous Vide Que
Up Your BBQ IQ By Joining The Pitmaster Club

Sign up for a free trial of the AmazingRibs.com Pitmaster Club and experience everything that the world’s largest membership-based BBQ and grilling community has to offer!
High quality websites are expensive to run. If you help us, we’ll pay you back bigtime with an ad-free experience and a lot of freebies!
Millions come to AmazingRibs.com every month for high quality tested recipes, tips on technique, science, mythbusting, product reviews, and inspiration. But it is expensive to run a website with more than 2,000 pages and we don’t have a big corporate partner to subsidize us.
Our most important source of sustenance is people who join our Pitmaster Club. But please don’t think of it as a donation. Members get MANY great benefits. We block all third-party ads, we give members free ebooks, magazines, interviews, webinars, more recipes, a monthly sweepstakes with prizes worth up to $2,000, discounts on products, and best of all a community of like-minded cooks free of flame wars. Click below to see all the benefits, take a free 30 day trial, and help keep this site alive.
Post comments and questions below
1) Please try the search box at the top of every page before you ask for help.
2) Try to post your question to the appropriate page.
3) Tell us everything we need to know to help such as the type of cooker and thermometer. Dial thermometers are often off by as much as 50°F so if you are not using a good digital thermometer we probably can’t help you with time and temp questions. Please read this article about thermometers.
4) If you are a member of the Pitmaster Club, your comments login is probably different.
5) Posts with links in them may not appear immediately.
Moderators